\contentspageHow to make a game like Pong with Felgo - Paddles
Tutorial Chapters
-
Overview
-
Creation of a Felgo game
-
GameWindow, Scenes and Physical Worlds
-
The Level and the Ball
-
Level Boundaries
- Paddles
-
HUD
-
Menus
-
AI
-
Special Effects
-
Music and Sound
-
Further Perspectives
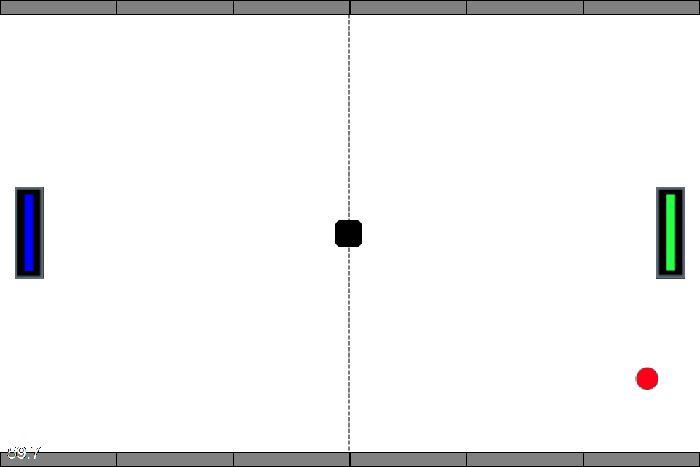
Paddles
You can prepare two paddle images with the size of 20px*60px placed in your img folder.


Afterwards you create a Paddle.qml in the entities directory which includes a new EntityBase loading the paddle image comparable to the Ball.qml. Furthermore the Paddle can be used as
player instance which means you have to add some player specific logic, such as: a playerID to identify the player or a MultiTouchArea which influences the entity using the users touch input.
import QtQuick 2.0
import Felgo 4.0
EntityBase {
id: entity
entityType: "paddle"
property int playerID : 0
property int score: 0
BoxCollider {
id: boxCollider
width: sprite.width
height: sprite.height
bodyType: Body.Static
anchors.centerIn: parent
fixture.friction: 0
fixture.restitution: 1.0
}
Image {
id: sprite
source: playerID === 1 ? "../../assets/img/paddle_green.png" : "../../assets/img/paddle_blue.png"
anchors.centerIn: boxCollider
}
MultiTouchArea {
width: sprite.width*4
height: sprite.height
anchors.centerIn: sprite
enabled: true
multiTouch.target: parent
multiTouch.dragAxis: MultiTouch.YAxis
multiTouch.minimumY: level.y+level.blockHeight+sprite.height/2
multiTouch.maximumY: level.height-sprite.height/2-level.blockHeight
}
}
Two new player instances can be placed in the level now. Don't forget to create a player alias for each player instance you create in the level file. You may not want to place the paddles directly to the left and right wall,
but you can add some deadzone. To get the right visibility you should insert the paddles in Level.qml after the background and before the ball instance.
...
property alias player1: player1
property alias player2: player2
property alias ball: ball
property int blockWidth: gameWindowAnchorItem.width/6
property int blockHeight: 10
property int deadZone: blockWidth/2+10
...
Paddle {
id: player1
playerID: 1
x: level.width-deadZone
y: level.height/2
}
Paddle {
id: player2
playerID: 2
x: deadZone
y: level.height/2
}
You should also add the player alias to the FelgoScene.qml so the players can be accessed from everywhere in the scene.
 ...
   width: 480
   height: 320

   property alias level: level
   property alias entityContainer: level
   property alias ball: level.ball
   property alias player1: level.player1
   property alias player2: level.player2

 ...
At the end it looks like a real game, and you already can play it with a friend, you just have to count the points on your own.
Counting on your own is exhausting and your opponent could betray you, so the next step is to add some game logic. One approach is to create a goal element which increases the player score and resets the ball. The Goal.qml
in the entities directory is similar to the Wall.qml but with less Rectangles, because it isn't visible at all. It uses an additional property target which stores the target of the player who wins on collision.
import QtQuick 2.0
import Felgo 4.0
EntityBase {
id: entity
entityType: "goal"
property variant target
BoxCollider {
id: boxCollider
bodyType: Body.Static
fixture.onBeginContact: {
target.score++
level.reStart()
}
}
}
The new goal instance should be placed in your level between the ball and the first wall.
...
Ball {
id: ball
x: gameWindowAnchorItem.width/2
y: parent.height/2
}
Goal {
target: player1
height: parent.height
width: deadZone
anchors.left: parent.right
anchors.bottom: parent.bottom
}
Goal {
target: player2
height: parent.height
width: deadZone
anchors.right: parent.left
anchors.bottom: parent.bottom
}
Wall {
...
The goals are placed outside the visible Scene to get a nicer visual effect of the ball hitting the edge.

You should also add a reset and end function to the end of the Level.qml which is used by the goal to reset the ball after hitting the edge. It uses a timer to provide some more preparation time before the ball gets
respawned again.
...
Timer {
id: startTimer
interval: 1000;
onTriggered: {
ball.reStart(gameWindowAnchorItem.width/2, parent.height/2)
}
}
function reStart() {
ball.reset(gameWindowAnchorItem.width/2, parent.height/2)
startTimer.start()
}
function end() {
player2.y = level.height/2
player1.y = level.height/2
ball.reset(gameWindowAnchorItem.width/2, parent.height/2)
}
...
Great! The ball gets respawned after a point, but there is no display of the scores. A Heads Up Display - HUD would be the perfect thing for this task.


