What's a Match-3 Game?
Before we start with the tutorial on how to create a match-3 game with Felgo, we should focus on the basic idea behind such games. I think most of you already know games like Candy Crush Saga or even got invited to play such games. The main concept is simple:
- The game consists of a grid with multiple elements in different shapes or colors (these elements are also called blocks in this tutorial).
- Whenever a group of at least three elements of the same type is connected, they can be removed from the grid. That's why these games are also called match-3 games.
- After a group is removed, the existing blocks in the grid fall down and fill the empty spots.
- Empty spots at the top of the grid are then filled with new, randomly created blocks.
- The user can now go on with removing groups of matching elements.
The game continues like that until a certain criteria is reached, for example:
- A certain score is achieved.
- No more groups can be removed.
- Some special elements have been removed.
- And so on ... you get the idea!
We will stop our game when there are no groups left to remove. When this happens, we show the player score and provide a button to start a new game. The player can remove a group by clicking it and gets points based on the
number of elements in the group.
When you create the game with this tutorial you will learn how to:
- Create random objects and place them within a grid layout.
- Find groups of elements of the same type within the grid.
- Remove objects from the grid.
- Move objects down to fill empty spots.
- Communicate events using signals.
- Load and use custom fonts.
If you are not yet familiar with the basic setup of projects, QML or how to create your own entities, please consider taking a look at the following tutorial to help you get started:
Now we are ready to go! But first things first, we still need to set the theme for our match-3 game: In the game Juicy Squash we want to mix the most delicious smoothie in the world! So let's fill the blender in our kitchen
with all kinds of fruits and squash them to reach the perfect juicy score! ;-)
We also provide the full source code of Juicy Squash made with Felgo in the Felgo SDK. See here where to find the demo in your SDK directory.
You can find two game versions there:
Resources
All the resources of the game should be placed within the assets directory of the project. You can download them here.
Setting Up the Project
Let us start with creating a new empty project in QtCreator. We will use the portrait mode as interface orientation. After you finish the project setup, please add the downloaded resources to the assets folder of your
project. They should appear in the Other files\assets directory of the project tree. Please take care not to add an additional subdirectory that might be created when you unpack the resources archive.
That's all the setup we need, let's start to implement the game!
Basic Game Layout
The first thing we want to accomplish is to create the fruits and place them within a grid. But before we add any new entities and complex calculations, you should replace your Main.qml with the following
implementation.
qml/Main.qml:
import Felgo 4.0
import QtQuick 2.0
GameWindow {
id: gameWindow
activeScene: scene
screenWidth: 640
screenHeight: 960
FontLoader {
id: gameFont
source: "../assets/fonts/akaDylan Plain.ttf"
}
Scene {
id: scene
width: 320
height: 480
property int score
MultiResolutionImage {
source: "../assets/JuicyBackground.png"
anchors.centerIn: scene.gameWindowAnchorItem
}
Text {
font.family: gameFont.name
font.pixelSize: 12
color: "red"
text: scene.score
anchors.horizontalCenter: parent.horizontalCenter
y: 446
}
}
}
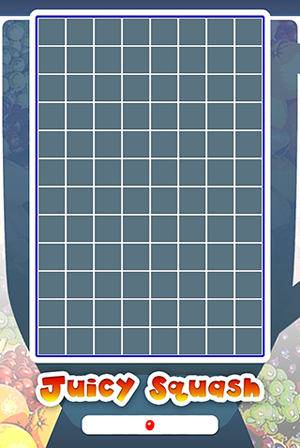
These few lines will provide a basic design for our game. We define a MultiResolutionImage that already shows the game layout. This image is bigger than the actual scene size we
defined. On different devices with other screen ratios more of the background image will show in order to avoid dark borders. Please check out the tutorial on scaling modes and
support of multiple screen sizes if you are interested in this topic.
We also display the player score in our own custom font. This is achieved by adding the FontLoader component and setting the source to our font in the
assets directory.
Let's hit play and see if everything works fine up to this point! Your screen should look like that:
Show Me Some Fruits!
Now let's move on to the fruits we want to add. We have many different kinds of fruits in the game, but beneath the different appearance they share the same game logic. We can treat them as a single game entity with
different visual representations. Just create a new file Block.qml within your qml folder and add the following lines of code.
qml/Block.qml:
import Felgo 4.0
import QtQuick 2.0
EntityBase {
id: block
entityType: "block"
property int type
property int row
property int column
signal clicked(int row, int column, int type)
Image {
anchors.fill: parent
source: {
if (type == 0)
return "../assets/Apple.png"
else if(type == 1)
return "../assets/Banana.png"
else if (type == 2)
return "../assets/Orange.png"
else if (type == 3)
return "../assets/Pear.png"
else
return "../assets/BlueBerry.png"
}
}
MouseArea {
anchors.fill: parent
onClicked: parent.clicked(row, column, type)
}
}
The main idea is to set up each block as an independent entity that knows its position on the grid and its type. Based on the value of the type property we simply show a different fruit image. In order to listen
to clicks on a fruit by the player, we added a MouseArea that covers the whole item. Whenever a block is clicked, it emits a signal that holds all the relevant
information. This way we can conveniently use a single function to handle the clicked signals from all the blocks in the game. And furthermore, we directly know at which grid position the click occurred and what type of fruit
is at that position.
The fruits are now ready to be created and added to the game, but we will need a lot of game logic and calculations for the grid. We do not want to directly place all of that within our game scene. To achieve a better
separation of code and clear responsibilities of components we will create an additional item GameArea.qml to hold the grid of fruits and all the necessary calculations.
qml/GameArea.qml:
import Felgo 4.0
import QtQuick 2.0
Item {
id: gameArea
width: blockSize * 8
height: blockSize * 12
property double blockSize
property int rows: Math.floor(height / blockSize)
property int columns: Math.floor(width / blockSize)
property var field: []
signal gameOver()
function index(row, column) {
return row * columns + column
}
function initializeField() {
clearField()
for(var i = 0; i < rows; i++) {
for(var j = 0; j < columns; j++) {
gameArea.field[index(i, j)] = createBlock(i, j)
}
}
}
function clearField() {
for(var i = 0; i < gameArea.field.length; i++) {
var block = gameArea.field[i]
if(block !== null) {
entityManager.removeEntityById(block.entityId)
}
}
gameArea.field = []
}
function createBlock(row, column) {
var entityProperties = {
width: blockSize,
height: blockSize,
x: column * blockSize,
y: row * blockSize,
type: Math.floor(Math.random() * 5),
row: row,
column: column
}
var id = entityManager.createEntityFromUrlWithProperties(
Qt.resolvedUrl("Block.qml"), entityProperties)
var entity = entityManager.getEntityById(id)
entity.clicked.connect(handleClick)
return entity
}
function handleClick(row, column, type) {
}
}
At the top of the file we define the size of the game area and some additional properties for the block size (size of fruits) and the total number of rows and columns of the grid. We also already prepare a signal we will use
later to relay the message that the game is over. The most important part of the object is the field property. It represents the game field (grid) as an array of block-entities. We then have a few functions that
help us to fill our game field with fruits:
index(row, column)
Returns the array index for a specific grid position. We can use this function to conveniently access a block in the field array for a given grid position (row and column).initializeField()
Empties the grid and fills it with new blocks.clearField()
Correctly removes all block-entities from the game area and clears the field array.createBlock(row, column)
Adds a new, random block to the game at a certain grid position.handleClick(row, column, type)
Will handle all the clicked-signals from the blocks we create. The parameters tell us the position and the type of the block that has been clicked. We connect the signal of our dynamically created blocks with
this function through the entity.clicked.connect(handleClick) command.
Let's add the game area to our scene and trigger the initialization of the game field.
qml/Main.qml:
GameWindow {
id: gameWindow
onSplashScreenFinished: scene.startGame()
EntityManager {
id: entityManager
entityContainer: gameArea
}
FontLoader {
id: gameFont
source: "../assets/fonts/akaDylan Plain.ttf"
}
Scene {
id: scene
GameArea {
id: gameArea
anchors.horizontalCenter: scene.horizontalCenter
blockSize: 30
y: 20
}
function startGame() {
gameArea.initializeField()
scene.score = 0
}
}
}
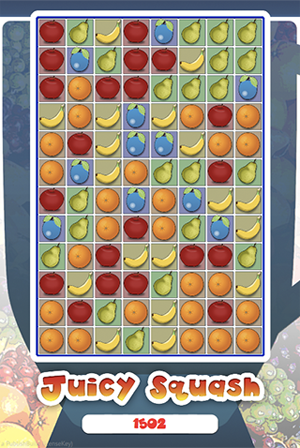
We also add the EntityManager component we are using in the createBlock-function and specify the game area as the entityContainer for all the blocks. The
startGame-function resets the points and the game field. It will be called each time a new game has to be started. The line onSplashScreenFinished: scene.startGame() will trigger the very first
initialization after the Felgo splash screen is gone. When you start the game at this point you should already see the grid filled with fruits! Looks delicious!
How to Match-3
This tutorial is a guide on how to create a match-3 game, so we want to find out when three or more fruits are together. When creating the fruits, we already connect their clicked signal to our handler function
by stating entity.clicked.connect(handleClick). We are then going to check all the blocks that are neighbors to the one we clicked. If more than three blocks of the same type are connected, they will be
removed.
qml/GameArea.qml:
Item {
id: gameArea
function handleClick(row, column, type) {
var fieldCopy = field.slice()
var blockCount = getNumberOfConnectedBlocks(fieldCopy, row, column, type)
if(blockCount >= 3) {
removeConnectedBlocks(fieldCopy)
}
}
function getNumberOfConnectedBlocks(fieldCopy, row, column, type) {
if(row >= rows || column >= columns || row < 0 || column < 0)
return 0
var block = fieldCopy[index(row, column)]
if(block === null)
return 0
if(block.type !== type)
return 0
var count = 1
fieldCopy[index(row, column)] = null
count += getNumberOfConnectedBlocks(fieldCopy, row + 1, column, type)
count += getNumberOfConnectedBlocks(fieldCopy, row, column + 1, type)
count += getNumberOfConnectedBlocks(fieldCopy, row - 1, column, type)
count += getNumberOfConnectedBlocks(fieldCopy, row, column - 1, type)
return count
}
function removeConnectedBlocks(fieldCopy) {
for(var i = 0; i < fieldCopy.length; i++) {
if(fieldCopy[i] === null) {
var block = gameArea.field[i]
if(block !== null) {
gameArea.field[i] = null
entityManager.removeEntityById(block.entityId)
}
}
}
}
}
The first step is to implement the handleClick-function. We get the position and the type of the block that was clicked as parameters of the function. We then go on with copying the whole current game field into
a new local variable fieldCopy. For this purpose the JavaScript function slice() is used, which is one of the fastest ways to copy a whole array. We will need this copy later when we search for and
remove connected blocks.
The most important function here is getNumberOfConnectedBlocks. It calculates the number of connected blocks based on four parameters:
fieldCopy
Has to be a copy of the current game field. The function will change the given field to mark blocks that have already been counted. Whenever a block of the desired type is found in the neighborhood, it will be removed from
the field to avoid checking it again.row and column
Specify the starting point for the search.type
Sets the desired block type for the search.
Each call to getNumberOfConnectedBlocks will return zero if:
- The
row or the column parameter is outside of the bounds of our game field.
- There is no block at the given position. This happens when a block has been counted and removed from the copy of the field.
- The block at the given position doesn't match the desired
type.
If neither is the case, a valid block has been found. The function then removes this block from the field copy. After that all the neighboring blocks are checked in the same way by calling
getNumberOfConnectedBlocks again, and the number of all connected blocks in the neighborhood is summed up and returned.
To really grasp the concept behind this algorithm, you should be able to fully understand what it means when a function calls itself within its function body. This concept is called "recursion". Maybe you need to read up a
bit more on this topic, but i am positive that you can master it. ;-)
Once we have the result of this awesome function, we can easily react to the number of the connected blocks we found. If there are more than three, we remove them from the actual game field based on the empty spots in the
copy of the field.
Note: JavaScript arrays are automatically passed by reference, so the changes made to the field copy by the functions won't be lost. This is necessary, because we work with these changes in other functions like the
additional recursion calls and the removeConnectedBlocks function.
Press play and you can already start removing blocks!
Filling the Holes
Now we want to move down higher blocks and create new fruits every time we remove a group. We use a new function moveBlocksToBottom for that purpose. This function will be called in our clicked-handler after we
removed a group of blocks. In addition, we also calculate and increase the player score to complete our handler function.
qml/GameArea.qml:
Item {
id: gameArea
function handleClick(row, column, type) {
var fieldCopy = field.slice()
var blockCount = getNumberOfConnectedBlocks(fieldCopy, row, column, type)
if(blockCount >= 3) {
removeConnectedBlocks(fieldCopy)
moveBlocksToBottom()
var score = blockCount * (blockCount + 1) / 2
scene.score += score
}
}
function moveBlocksToBottom() {
for(var col = 0; col < columns; col++) {
for(var row = rows - 1; row >= 0; row--) {
if(gameArea.field[index(row, col)] === null) {
var moveBlock = null
for(var moveRow = row - 1; moveRow >= 0; moveRow--) {
moveBlock = gameArea.field[index(moveRow,col)]
if(moveBlock !== null) {
gameArea.field[index(moveRow,col)] = null
gameArea.field[index(row, col)] = moveBlock
moveBlock.row = row
moveBlock.y = row * gameArea.blockSize
break
}
}
if(moveBlock === null) {
for(var newRow = row; newRow >= 0; newRow--) {
var newBlock = createBlock(newRow, col)
gameArea.field[index(newRow, col)] = newBlock
newBlock.row = newRow
newBlock.y = newRow * gameArea.blockSize
}
break
}
}
}
}
}
}
The implementation of the moveBlocksToBottom-function takes care of the following tasks:
- We will fill up every column of the game field from the bottom to the top, starting with the column on the left.
- Whenever we encounter an empty spot in a column, we search for the next block above and move it down.
- If no more blocks can be found, the whole column is filled up with new fruits. We then directly move on to checking the next column.
We apply this function after we removed a group of connected blocks. The player score is then increased in a way that considers the number of blocks that have been removed. A group of three blocks will amount to 1+2+3
= 6 points, a group of four will give 1+2+3+4 = 10 points and so on. With these changes you can already start to play and gain points!
Game Over?
A game is no fun if it is never over. Well, in fact the game is already over when there are no more blocks available to remove. At the moment, the user then is stuck with nothing to do. We want to determine if no more groups
of three are existing and trigger our gameover-signal when that happens. We can easily do that by trying the getNumberOfConnectedBlocks function on all the blocks of the field. We will cover that by adding a new
function isGameOver to our game area.
qml/GameArea.qml:
Item {
id: gameArea
function handleClick(row, column, type) {
if(blockCount >= 3) {
if(isGameOver())
gameOver()
}
}
function isGameOver() {
var gameOver = true
var fieldCopy = field.slice()
for(var row = 0; row < rows; row++) {
for(var col = 0; col < columns; col++) {
var block = fieldCopy[index(row, col)]
if(block !== null) {
var blockCount = getNumberOfConnectedBlocks(fieldCopy, row, col, block.type)
if(blockCount >= 3) {
gameOver = false
break
}
}
}
}
return gameOver
}
}
As we do not want to change the current game field when we check for connected blocks, we again operate on a copy of the field array. The function then works as follows:
- We go over all the blocks in the field and search for groups that are bigger than three blocks.
- When we find such a group, we can immediately stop the search.
- If we don't find any groups, the function returns "true" and we can emit the signal afterwards.
- Note that we might also find empty spots with no blocks, because we remove them from the field copy when we check them. In this case we just go on with the next block in the field.
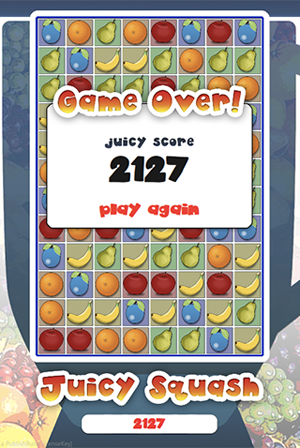
We now want to react to the signal and display a window with the player score and a "play again"-button when a gameover occurs. Let's add a new file GameOverWindow.qml.
qml/GameOverWindow.qml:
import Felgo 4.0
import QtQuick 2.0
Item {
id: gameOverWindow
width: 232
height: 160
visible: opacity > 0
enabled: opacity == 1
signal newGameClicked()
Image {
source: "../assets/GameOver.png"
anchors.fill: parent
}
Text {
font.family: gameFont.name
font.pixelSize: 30
color: "#1a1a1a"
text: scene.score
anchors.horizontalCenter: parent.horizontalCenter
y: 72
}
Text {
font.family: gameFont.name
font.pixelSize: 15
color: "red"
text: "play again"
anchors.horizontalCenter: parent.horizontalCenter
anchors.bottom: parent.bottom
anchors.bottomMargin: 15
MouseArea {
anchors.fill: parent
onClicked: gameOverWindow.newGameClicked()
}
SequentialAnimation on color {
loops: Animation.Infinite
PropertyAnimation {
to: "#ff8800"
duration: 1000
}
PropertyAnimation {
to: "red"
duration: 1000
}
}
}
function show() {
gameOverWindow.opacity = 1
}
function hide() {
gameOverWindow.opacity = 0
}
}
The window consists of an image, the player score and a "play again"-button that is already animated by combining a SequentialAnimation with two
PropertyAnimations. In addition, the window also emits a signal when the button is clicked. We can open or close this window by calling the
show- or hide-function. Note that only the opacity is set accordingly in these functions. We then use property
bindings like visible: opacity > 0 and enabled: opacity == 1 to:
- Only enable interactions like a click of the button when the window is fully visible.
- Completely hide the window when its opacity is zero.
- This allows us to fade the window in or out at a later point by animating the opacity, without any worries about it still being active in the background.
We can add this window to our scene with just a few lines of code.
qml/Main.qml:
import Felgo 4.0
import QtQuick 2.0
GameWindow {
id: gameWindow
Scene {
id: scene
GameArea {
id: gameArea
anchors.horizontalCenter: scene.horizontalCenter
y: 20
blockSize: 30
onGameOver: gameOverWindow.show()
}
GameOverWindow {
id: gameOverWindow
y: 90
opacity: 0
anchors.horizontalCenter: scene.horizontalCenter
onNewGameClicked: scene.startGame()
}
function startGame() {
gameOverWindow.hide()
gameArea.initializeField()
scene.score = 0
}
}
}
We added the GameOverWindow and implemented the handler onNewGameClicked to start a new game. We then set the onGameOver handler in our GameArea-object to show the window and hide it again when the
startGame-function is called.
Hit play and enjoy your fully playable Juicy Squash game!
Polishing the Game
The game still feels a little bit stiff. We should use animations to fade out the blocks when removing them and actually let the fruits fall down from above. Let's start with preparing the animations in our
Block.qml.
qml/Block.qml:
EntityBase {
id: block
entityType: "block"
visible: y >= 0
NumberAnimation {
id: fadeOutAnimation
target: block
property: "opacity"
duration: 100
from: 1.0
to: 0
onStopped: {
entityManager.removeEntityById(block.entityId)
}
}
NumberAnimation {
id: fallDownAnimation
target: block
property: "y"
}
Timer {
id: fallDownTimer
interval: fadeOutAnimation.duration
repeat: false
running: false
onTriggered: {
fallDownAnimation.start()
}
}
function remove() {
fadeOutAnimation.start()
}
function fallDown(distance) {
fallDownAnimation.complete()
fallDownAnimation.duration = 100 * distance
fallDownAnimation.to = block.y + distance * block.height
fallDownTimer.start()
}
}
Note that we set visible: y >= 0 to hide the freshly created fruits that will be placed outside of the game area. They will automatically show when their animation moves them into the game area. We then use
two NumberAnimations to realize the fade-out and the movement of the fruits. Before any block starts moving, it should wait for the fade-out of other
blocks in the game. To achieve this we use a Timer and set the fade-out duration as its interval. We are going to start the movement after that time has passed.
We can now use the fallDown- and remove-functions to animate the fruits:
- The
remove-function fades out the block and removes the entity from the game when the animation is finished.
- The
fallDown-function waits some time until the removing of other blocks in the grid is finished and then moves the block down by a certain distance.
Let's use them within the removeConnectedBlocks- and moveBlockToBottom-functions of our game area.
qml/GameArea.qml:
Item {
id: gameArea
function removeConnectedBlocks(fieldCopy) {
for(var i = 0; i < fieldCopy.length; i++) {
if(fieldCopy[i] === null) {
var block = gameArea.field[i]
if(block !== null) {
gameArea.field[i] = null
block.remove()
}
}
}
}
function moveBlocksToBottom() {
for(var col = 0; col < columns; col++) {
for(var row = rows - 1; row >= 0; row--) {
if(gameArea.field[index(row, col)] === null) {
var moveBlock = null
for(var moveRow = row - 1; moveRow >= 0; moveRow--) {
moveBlock = gameArea.field[index(moveRow,col)]
if(moveBlock !== null) {
gameArea.field[index(moveRow,col)] = null
gameArea.field[index(row, col)] = moveBlock
moveBlock.row = row
moveBlock.fallDown(row - moveRow)
break
}
}
if(moveBlock === null) {
var distance = row + 1
for(var newRow = row; newRow >= 0; newRow--) {
var newBlock = createBlock(newRow - distance, col)
gameArea.field[index(newRow, col)] = newBlock
newBlock.row = newRow
newBlock.fallDown(distance)
}
break
}
}
}
}
}
}
The removeConnectedBlocks-function now uses the new remove-function of the block. In the previous version of the function, we directly removed it with the entity manager.
When we move a block to the bottom or create new blocks, we simply use the fallDown-function instead of changing the y-position of the blocks. Note that when we create new blocks, we now place them
outside of the game area by setting newRow - distance as the initial grid position at the createBlock-call.
We can watch the fruits fall down now, pretty cool! But at this point it would be possible to click and remove blocks while they are fading out or moving down. We want to ignore these signals to avoid unwanted behavior that
may occur when we try to change the field while the previous changes aren't completed yet. For this purpose we will add a function to check if the field is ready.
qml/GameArea.qml:
Item {
id: gameArea
function handleClick(row, column, type) {
if(!isFieldReadyForNewBlockRemoval())
return
}
function isFieldReadyForNewBlockRemoval() {
for(var col = 0; col < columns; col++) {
var block = field[index(0, col)]
if(block === null || block.y < 0)
return false
}
return true
}
}
If the field is not ready yet, we ignore all clicked-events in our handler function. The fieldIsReady()-function only returns true when every spot in the first row of the grid is filled with a block, that has
finished moving into the game area.
That's all we need to ignore clicks while we fade out and move our fruits. To complete the animations for our game, we also let the gameover-window fade in and out by defining a Behavior on the opacity property.
qml/GameOverWindow.qml:
Item {
id: gameOverWindow
Behavior on opacity {
NumberAnimation { duration: 400 }
}
}
This is as far as we go in terms of animations.
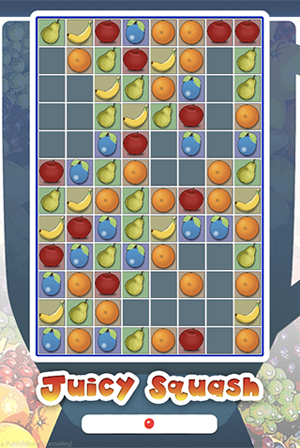
Increasing Difficulty
When we play the game now, it may be over real quick because there are so many different fruit types on the field initially. This makes it very likely to run out of matches pretty soon. We can counter that by starting with
fewer fruits and add other types later during the game. We just need to introduce some additional properties in our game area and use them accordingly.
qml/GameArea.qml:
Item {
id: gameArea
property int maxTypes
property int clicks
function initializeField() {
gameArea.clicks = 0
gameArea.maxTypes = 3
}
function createBlock(row, column) {
var entityProperties = {
width: blockSize,
height: blockSize,
x: column * blockSize,
y: row * blockSize,
type: Math.floor(Math.random() * gameArea.maxTypes),
row: row,
column: column
}
}
function handleClick(row, column, type) {
if(blockCount >= 3) {
gameArea.clicks++
if((gameArea.maxTypes < 5) && (gameArea.clicks % 10 == 0))
gameArea.maxTypes++
}
}
}
We define two new properties maxTypes and clicks to hold the number of currently available types and the number of successful moves the player made. We reset these properties every time we
initialize the field. The random type of a new block is then based on the maxTypes property. After each successful player move, we increase the click counter and based on that we may also increase the maximum
number of types. We decided to start with only three fruit types and add a new type after every 10th successful move, until we reach our maximum number of types.
Congratulations, you just completed this tutorial for the match-3 game Juicy Squash! Of course, you are welcome to include your own ideas, add some twists to the game or create your own match-3 game based on this one.
What Comes Next?
The game is still lacking some major features, you can:
You can also try adding blocks with special powers or multiple levels with different goals to make the game more interesting.
If you have any questions regarding this match-3 game tutorial, don't hesitate to visit the support forums.
Also visit Felgo Games Examples and Demos to gain more information about game creation with Felgo and to see the source code of existing apps in the app stores.