REST and RESTful web services are the most common way to access data through the Internet. Qt with Felgo provides an easy way to connect via REST. This article guides you through the most important steps to create an App and connect to a REST service. Additionally, it provides reusable code snippets.
- Spoiler: Basic REST Example with Felgo
- Real-Life Sample Project
- Basic UI for a Responsive REST Client App
- Weather Services
- REST Request & JSON Parsing with Qt / QML
- Parse the REST Response
- JSON Data Model for REST Requests
- Data Persistence
- Deploy the App to Android, iOS and Desktop
- More Posts Like This
Spoiler: Basic REST Example with Felgo
Before we jump into the details of creating the whole sample App, here is a code example of a minimum App. The function getIp() shows how a basic request to a REST service looks, using the XMLHttpRequest.
import Felgo 3.0
import QtQuick 2.0

App {
  // This signal handler is called when the app is created, like a constructor
  Component.onCompleted: getIp()

  NavigationStack {
    Page {
      AppText {
        id: ipText
        anchors.centerIn: parent
      }
    }
  }

  function getIp() {
    // Create the XMLHttpRequest object
    var xhr = new XMLHttpRequest

    // Listen to the readyStateChanged signal
    xhr.onreadystatechange = function() {
      // If the state changed to DONE, we can parse the response
      if (xhr.readyState === XMLHttpRequest.DONE) {
        // The responseText looks like this {"ip":"xxx.xxx.xxx.xxx"}
        // Parse the responseText string to JSON format
        var responseJSON = JSON.parse(xhr.responseText)
        // Read the ip property of the response
        var ip = responseJSON.ip
        // Display the ip in the AppText item
        ipText.text = "IP: " + ip
      }
    }

    // Define the target of your request
    xhr.open("GET", "https://api.ipify.org?format=json")
    // Execute the request
    xhr.send()
  }
}
Real-Life Sample Project
For the most useful results, we build a real-life Qt client. It accesses one of the web’s most popular weather services. It’s easy to adapt to any other REST service: the process is always the same. You only need to change the endpoint URL and parse the corresponding content.
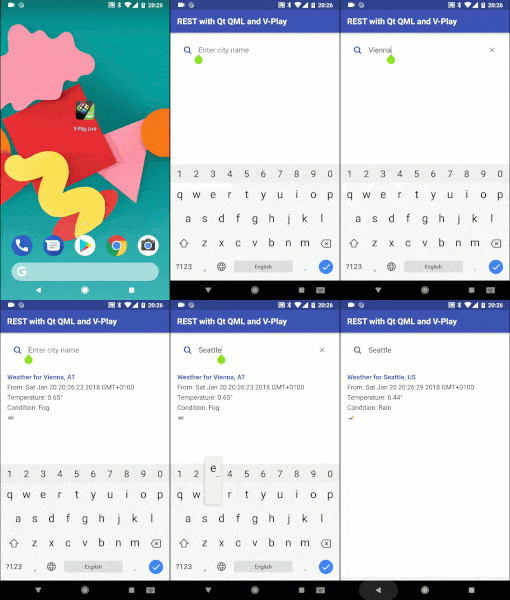
The full sample is available open-source on GitHub:
Architecture
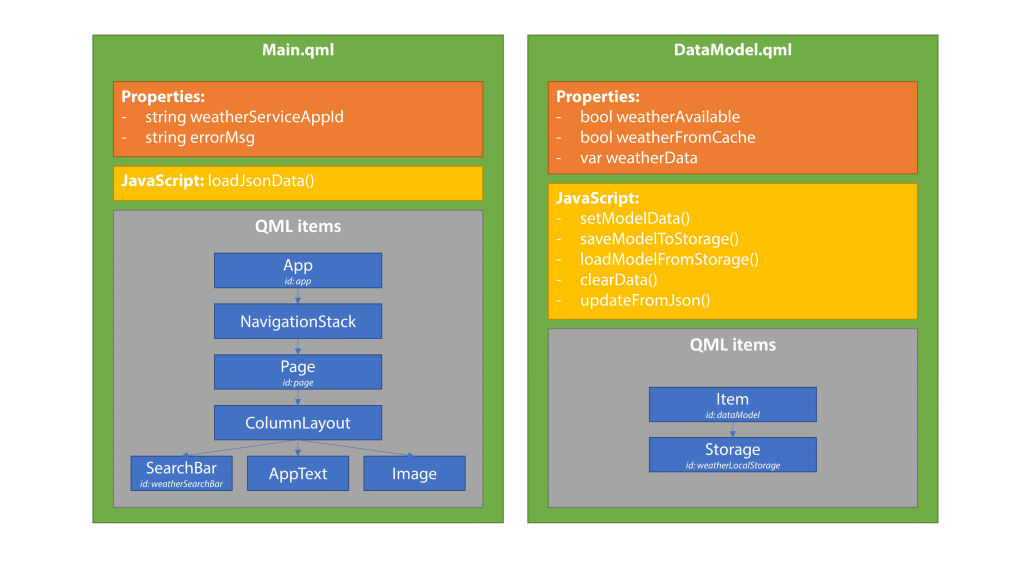
The app consists of two files:
- Main.qml: contains the UI and REST logic
- DataModel.qml: stores & caches the parsed data from the REST service
Basic UI for a Responsive REST Client App
First, we create the user interface: the QML items in “Main.qml”. We use Felgo APIs. They adapt to the style of the target platform (Desktop, Android, iOS). These three items are usually present in every Qt / QML app:
- The App component is always the top-level element in the QML file. It adds a lot of vital layout data to standard Qt classes. Two mechanisms are especially important. Device-independent pixels (dp) for sizes and scale-independent pixels (sp) for fonts.
- Initially, our REST client app only has a single page. It’s still a good idea to add the NavigationStack item as a child. Later, it could handle navigating to a detail page. In our current app, the NavigationStack ensures that the top navigation bar is visible.
- The third item is the Page. It’s the container for the automatic title bar and the visible QML items of our app. The platform-specific theming is applied automatically.
Looking for Qt Training, Consulting or Software Development?
Visualization UI
After the generic UI elements, we define the custom interface. The user enters the city name in a SearchBar. The AppText elements below show the parsed data / error message.
QML Page Layout
We need vertically stacked UI elements. The generic QML ColumnLayout is the best layout manager for this scenario. Its documentation is short. Essentially, it’s a convenient version of the GridLayout with a single column.
QML contains another class that looks similar at first sight: the Column. What’s the difference of ColumnLayout vs Column?
- Column is a Positioner. It arranges QML items in a regular fashion (i.e., below each other). The child items are responsible for their size. The Column takes care of the position.
- ColumnLayout is a Layout. In addition to the position, it also manages the child item size. This makes it more suitable for responsive user interfaces. It ensures the individual item’s place on the screen is a good compromise of the available space and the minimum item size.
We’re dealing with a mobile UI. Thus, the ColumnLayout is the better choice.
ColumnLayout {
    anchors.fill: parent
    anchors.margins: app.dp(16)
    // ... QML child items ...
}
To achieve the expected look & feel of the UI on a phone, we set two properties:
- anchors.fill: parent – this stretches the layout to the available width and height.
What happens if we don’t specify the layout size?
The layout area would adapt to the minimum requested size of its managed QML items. The text items always grab the space they need for showing their contents. But the SearchBar is flexible: it takes what it gets and doesn’t have a minimum width. Therefore, the SearchBar would be too small or even invisible if we didn’t have enough text in the rest of the UI. - anchors.margins: app.dp(16) – text shouldn’t stick to the screen edge. The Google Material Design recommends screen edge left and right margins of 16dp. Note that in iOS, you should also consider the safe area in addition to the margins. This ensures your content is not within the cutout areas of the iPhone X in landscape mode.
In our app, we use a margin of 16 density-independent pixels. This ensures a similar spacing on all mobile phones, independent of the screen’s pixel density.
Data Input: SearchBar
Entering data for searching or filtering is a common task in every mobile app. Fortunately, Felgo includes an advanced QML item. It handles interaction and platform-specific theming. You get a full-blown search text input control by specifying a handful of settings. This screenshot shows an empty SearchBar with the iOS theme:

SearchBar {
   id: weatherSearchBar
   focus: true
   Layout.fillWidth: true
   placeHolderText: qsTr("Enter city name")
   onAccepted: loadJsonData()
}
By setting the width to correspond to the parent’s width (-> the layout), we ensure the search bar always fills the available screen width. The placeHolderText is great for better usability.
Finally, with onAccepted, we call a custom JavaScript function that we will code shortly. This signal is emitted whenever the user presses the Return or Enter key.
Data Display: AppText
The AppText QML type is another component of Felgo. It is a styled QML Text item. It picks up the platform’s colors and styling by default.
Our layout consists of several AppText items. Each has a dynamic text property, which is bound to weather data from the DataModel. The layout ensures the items are below each other.
AppText {
   text: qsTr("Weather for %1").arg(DataModel.weatherData.weatherForCity)
   Layout.fillWidth: true
   wrapMode: Text.WordWrap
   color: Theme.tintColor
   font.family: Theme.boldFont.name
   font.bold: true
   font.weight: Font.Bold
   visible: DataModel.weatherAvailable
}
Let’s examine the most complex AppText item in our layout: the header of the weather information. It shows the city name and country.
- Text: the city name is bound to our data model.
- To prepare for future app translation, we wrap the text string with qsTr(). Read more: How to Make a Multi Language App or Game with Felgo
- Layout: some text might not fit in a single line. Therefore, we activate word wrapping. The QML item needs to have a width to know where to insert the line break. We set the width to fill the available space provided by the layout.
- Styling: we apply a bold and colored style to the text. The global Theme item of Felgo provides app-wide and platform-adapted color and font resources.
- Visibility: the item should only be visible if weather data is available in the model. The binding automatically adapts the visibility.
Remaining Screen Height
By default, the layout distributes the available screen height between all items. Our current layout is quite compact. We don’t want a huge unused area between each text line.
To solve this, we add an Item with an activated fillHeight property. It’s not visible on the screen but is as tall as possible. This pushes the other items together.
Item {
    Layout.fillHeight: true
}
Weather Services
The most popular weather services are OpenWeatherMap, Yahoo Weather and Weather Underground. In this tutorial, we use OpenWeatherMap. It’s quick to sign up, it provides free weather data access and is frequently used (also by Google).
API Key
Sign up for free at https://openweathermap.org/appid
Immediately afterward, you get an email with usage samples. OpenWeatherMap already generated an API key called “Default” in your account.
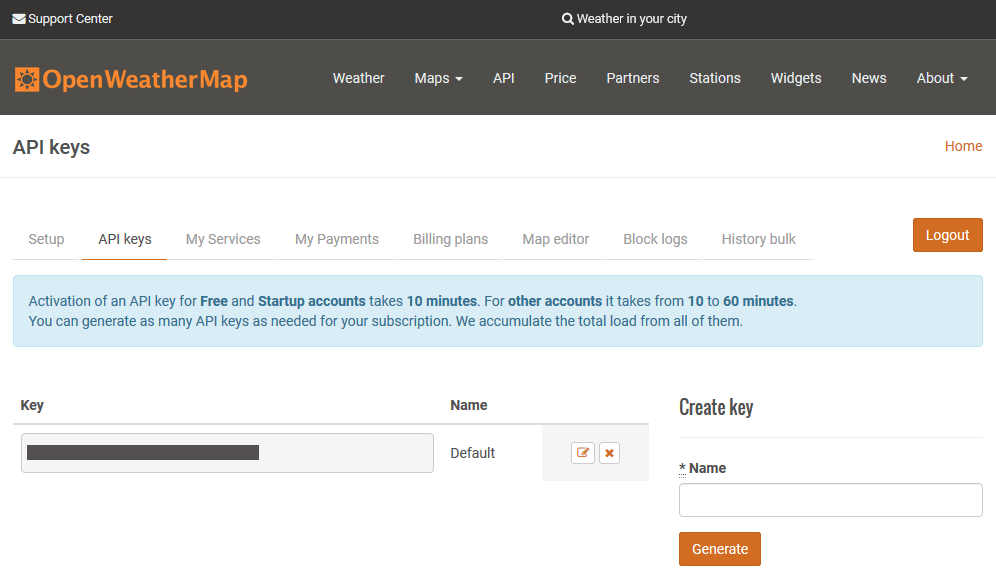
It takes around 10 minutes until the key is active. Click on the sample link in your welcome email to check if the service is already up and running for your account.
REST Request & JSON Parsing with Qt / QML
How do we fill the UI with actual weather data? Most Internet services provide a REST API. In Qt, QML and JavaScript are tightly integrated. Instead of having to resort to C++ code, we can use standard JavaScript code to access a RESTful API.
In technical terms, the XMLHttpRequest object is embedded in the QML Global Object. Its functionality corresponds to the W3C Standard. The only exception is that it doesn’t enforce the same-origin policy. This makes our life easier, as we do not have to deal with CORS (Cross-Origin Resource Sharing). In QML JavaScript, all REST requests typically go to an external web server.
You need 4 steps for a REST request:
- Instantiate XMLHttpRequest
- Register a state change listener
- Set the target URL & request properties
- Send the REST request
Let’s analyze these steps:
1. Instantiate XMLHttpRequest
In the first line, we create an instance of the XMLHttpRequest object. It’s OK to be a local object. Every REST request creates a new instance.
var xhr = new XMLHttpRequest
2. Register a State Change Listener
By default, XMLHttpRequest is asynchronous. Therefore, we define an event handler. The most flexible approach is attaching a handler function to the onreadystatechange event.
During the lifetime of the REST request, it runs through several states:
- UNSENT
- OPENED
- HEADERS_RECEIVED
- LOADING
- DONE <- request is finished. Is always called (also in case of an error!)
To provide progress indicators while loading, you could register for intermediate events. For quick requests like ours to a weather service, it’s usually enough to only handle the DONE event.
xhr.onreadystatechange = function() {
   if (xhr.readyState === XMLHttpRequest.DONE) {
       // ... handle response data ...
   }
}
3. Set the Target URL & Request Properties
Next, we configure the REST request. The open() function needs at least two parameters:
- Method: the HTTP method for the REST request. The REST protocol allows full interaction with a server.
To retrieve data, you use GET or POST methods (depending on the service definition).
An interactive RESTful web service can also implement the PUT, PATCH and DELETE methods for modifying data. - Url: target to invoke. In the case of a GET request, the parameters are part of the URL.
The open() function checks the data you supply and advances the request state to OPENED.
The OpenWeatherMap service works using GET requests. The URL needs to contain:
- Query: the city name, e.g., ?q=Vienna
We retrieve the query string from the text of the weatherSearchBar QML item. - Units: metric or imperial, e.g., &units=metric
- API key / App ID: sign up to get a free app id. E.g., &appid=xyz
It’s a good idea to store your API key / App ID as a property in your app.
The full code to construct the query URL and to open the REST request:
var params = "q=" + weatherSearchBar.text + "&units=metric&appid=" + app.weatherServiceAppId
xhr.open("GET", "http://api.openweathermap.org/data/2.5/weather?" + params)
4. Send the REST Request
A simple statement. If your RESTful service uses POST, you supply the body as parameter. For our GET method, call:
xhr.send()
Parse the REST Response
Once our REST request proceeds to the DONE state, we check the results. As we call an external service through the Internet, many things can go wrong. It’s important to handle all possible failures.
Most REST / JSON tutorials show a simplified handler. It’d fail without an Internet connection. Here, we handle all possible issues.
JSON Response
If everything went well, we received a response. The responseText property contains the JSON data, which we parse through JSON.parse(). This is the shortened JSON response. The full OpenWeatherMap response contains more data.
{
  "weather": [
    {
      "main": "Snow",
      "description": "light snow",
      "icon": "13n"
    }
  ],
  "main": {
    "temp": -0.32,
  },
  "name": "Vienna",
  "cod": 200
}
Identify Failed REST Requests
A request can fail because of several reasons:
- Connection issues: e.g., no Internet connection or the server is down
- Request issues: the server/service does not understand your request, e.g., due to a typo in the URL
- Access issues: the RESTful service can’t fulfill your request. Examples: unauthorized client, invalid API key
- Service issues: unable to send a positive response. E.g., because the requested city doesn’t exist, or because no weather is currently available for the city
Usually, REST services only send the positive HTTP status code 200 if everything worked well. In all other cases, they send a different HTTP status code (e.g., 404 if the city wasn’t found). Additionally, it may send a response text even in case of a failure. This provides extra information on what went wrong.
But, some REST services always return the successful HTTP code 200. They only report an error in the response text. Check the service documentation and test the REST APIs.
OpenWeatherMap is a well-designed RESTful service. It always sends a response JSON. The JSON data includes a response code (called “cod”). So, it’s best to parse the responseText (if available). If parsing the JSON was successful (!= null) and the JSON contains a “cod” of 200, we know that everything went well. Otherwise, we need to analyze the error.
var parsedWeather = xhr.responseText ? JSON.parse(xhr.responseText) : null
if (parsedWeather && parsedWeather.cod === 200) {
   // Success: received city weather data
} else {
   // Issue with the REST request
}
Successful REST Request
If the REST service returned data, we reset any previous error message in our UI. Then, we update our DataModel.
// Success: received city weather data
app.errorMsg = ""
DataModel.updateFromJson(parsedWeather)
REST Response Error Handling
In technical terms, we differentiate 3 types of REST request failures:
- The status code of the XMLHttpRequest is still 0, even though its status already changed to DONE. This indicates that the request didn’t go through.
Potential reasons: no Internet connection, server is down, … - We received a response text, but it contains an error description. For our weather app, we show the message to the user.
Potential reasons: city not found, API key is wrong, … - No response text, but a HTTP response status code. Create a custom error message for the user.
Potential reasons: REST service crashed (e.g., 500 Internal Server Error), …
This code snippet handles all 3 cases. It formulates a brief error message for the app user.
// Issue with the REST request
if (xhr.status === 0) {
   // The request didn't go through, e.g., no Internet connection or the server is down
   app.errorMsg = "Unable to send weather request"
} else if (parsedWeather && parsedWeather.message) {
   // Received a response, but the server reported the request was not successful
   app.errorMsg = parsedWeather.message
} else {
   // All other cases - print the HTTP response status code / message
   app.errorMsg = "Request error: " + xhr.status + " / " + xhr.statusText
}
JSON Data Model for REST Requests
An architecture that separates the model from the view makes your app easy to extend. So, we create an extra class to manage the data model.
Right-click the qml folder in Qt Creator’s “Project”-window and select “Add new…”. Choose the Item template in the Felgo Apps category. Call the file “DataModel.qml”.
Singleton Pattern in QML
We want our model to be accessible in the whole app. Thus, we use the Singleton pattern. This requires three steps:
1. Prepare the QML file
In the very first line of DataModel.qml – before the import statements – add:
pragma Singleton
2. Register the singleton
Create a new file called “qmldir” in Other files > qml in the Projects window.
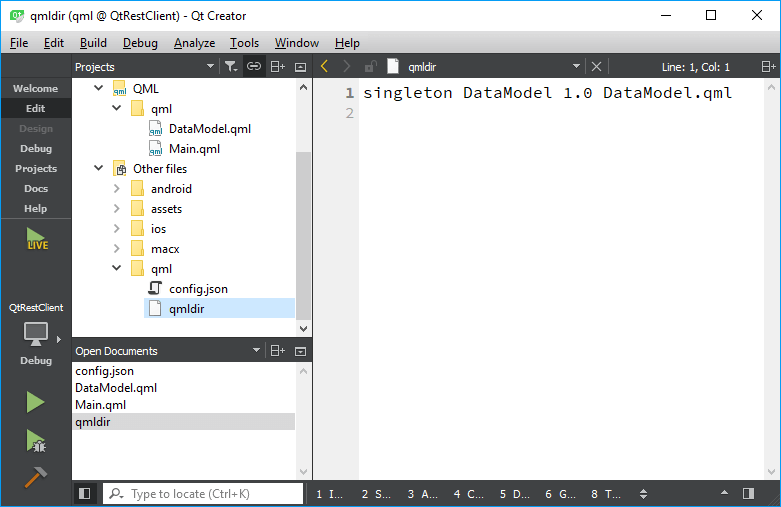
Add the following line to the qmldir file:
singleton DataModel 1.0 DataModel.qml
In the next step, we’ll import a directory to access our singleton file. When importing a directory, Qt always looks first for a qmldir file. It’s using that to customize the way it sees and imports qml files. In our case, the QML engine now knows to treat the DataModel.qml file as a singleton.
3. Import the Singletons
In Main.qml, add the following import after all the other import statements:
import "."This causes Qt to scan the directory. From now on, our DataModel.qml file is accessible via the “DataModel” identifier in Main.qml.
QML Data Model Structure
Our data model requires three properties. Two contain information about the state of the data (weatherAvailable and weatherFromCache).
The third property is weatherData. It’s defined with the type var and initialized as an array with []. This allows assigning key-value pairs for the actual data. It lets us cache and restore the data with a single statement. Dynamic binding to the UI is still possible.
The basic structure of our data model:
pragma Singleton
import Felgo 3.0
import QtQuick 2.7

Item {
   id: dataModel

   property bool weatherAvailable: false
   property bool weatherFromCache: false

   property var weatherData: []
}
Save Weather Data to the Model
We want to keep the model generic. You could add a different data provider later, or the JSON layout changes.
Our app extracts the data it needs from the weather JSON. The app then stores the relevant data in its own model. If we’d later migrate to a different data provider, it wouldn’t influence the model or the UI.
The most efficient way to achieve this: create a setModelData() function. It takes the parsed parameters and saves it to our weatherData property.
function setModelData(weatherAvailable, weatherForCity, weatherDate, weatherTemp, weatherCondition, weatherIconUrl, weatherFromCache) {
    dataModel.weatherData = {
           'weatherForCity': weatherForCity,
           'weatherDate': weatherDate,
           'weatherTemp': weatherTemp,
           'weatherCondition': weatherCondition,
           'weatherIconUrl': weatherIconUrl
           }

    dataModel.weatherAvailable = weatherAvailable
    dataModel.weatherFromCache = weatherFromCache
}
Parse JSON Data from the Weather Service
In a previous step, we already converted the JSON text to objects with JSON.parse(xhr.responseText).
The QML runtime implements the ECMAScript language specification. Thus, working with JSON data in QML is like standard JavaScript. Every JSON object is accessible as a property. You retrieve JSON array values using the [] accessor.
The updateFromJson() method extracts the useful information from JSON and forwards it to our model.
function updateFromJson(parsedWeatherJson) {
   // Use the new parsed JSON file to update the model and the cache
   setModelData(true,
                parsedWeatherJson.name + ", " + parsedWeatherJson.sys.country,
                new Date(),
                parsedWeatherJson.main.temp,
                parsedWeatherJson.weather[0].main,
                "http://openweathermap.org/img/w/" + parsedWeatherJson.weather[0].icon + ".png",
                false)
}
Note: JavaScript and QML are very similar. The differences are hard to spot.
- date.now() generates a JavaScript date object.
- new Date() instantiates a Qt Date object.
We choose the Qt variant, as it makes serialization easier. Qt provides platform-independent storage and transmission of all Qt data types.
Now, the app is functional! Go ahead and test it on any platform or device.
Data Persistence
REST requests over the Internet take time. To improve the user experience, we add data persistence to our app. With this enhancement, our app immediately shows cached data when it’s started. The update request to the webservice then runs in the background.
We stored our weather data in DataModel.qml. Now, we extend our model to encapsulate its own caching.
Storage QML Type
File handling is different on every platform. Felgo includes a powerful cross-platform type called Storage. It handles the most common use-case: key-value data storage. You don’t need to write complex SQL statements like in the base Qt Quick Local Storage QML type.
At the same time, all built-in QML types are serializable to Strings. With a single line of code, we export the whole model to persistent storage.
Initialize the Storage by adding the element as a child of our dataModel item:
Storage {
   id: weatherLocalStorage

   Component.onCompleted: {
       // After the storage has been initialized, check if any weather data is cached.
       // If yes, load it into our model.
       loadModelFromStorage()
   }
}
Load QML Data from Persistent Storage
The ready-made implementation from Felgo calls onCompleted() once the storage is accessible. We use this to check if cached data is available. We access stored data using getValue(). If no data is available, it returns undefined. A simple if(savedWeatherData) statement lets us execute code accordingly.
function loadModelFromStorage() {
   var savedWeatherData = weatherLocalStorage.getValue("weatherData")
   if (savedWeatherData) {
       dataModel.weatherData = savedWeatherData
       dataModel.weatherAvailable = true
       dataModel.weatherFromCache = true
   }
}
The powerful APIs de-serialize the storage into the live model data. To inform the user that he’s now seeing cached data, we set the other model properties accordingly.
Save QML Data to Persistent Storage
To serialize our weather data to the storage, we use setValue(). The second argument is our whole weather data storage object. Felgo automatically serializes it to the storage.
function saveModelToStorage() {
   weatherLocalStorage.setValue("weatherData", dataModel.weatherData)
}
What’s the best place to update the storage? Especially in mobile apps, it’s recommended to immediately update persistent storage. A mobile operating system may shut down apps at any time, e.g., for an incoming call and low system resources. Thus, call saveModelToStorage() at the end of our setModelData() method.
Deploy the App to Android, iOS and Desktop
Felgo provides platform-independent styling and a responsive layout. The Felgo Live Service features live code reloading every time you save changes to QML files. The PC client simulates the app appearance on iOS, Android or Desktop platforms.
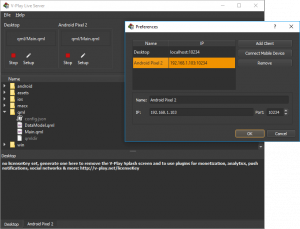
With the Felgo Live Scripting App for Android or iOS, you can extend testing to a real mobile device. Your development PC and the phone communicate over the local area network.
This screenshot shows a sample configuration of the Felgo Live Server. Two clients are connected. The app is running on a Google Pixel 2 phone (with the Felgo Live App) and on a desktop client.
![]()
Download the final, open source QML REST client sample code from GitHub:
It extends the code from this article with several comments. It’s a great starting point for your own REST projects!
More Posts Like This
Release 2.14.0: Live Code Reloading for Desktop, iOS & Android

