
Artificial intelligence and smart applications are steadily becoming more popular. Companies strongly rely on AI systems and machine learning to make faster and more accurate decisions based on their data.
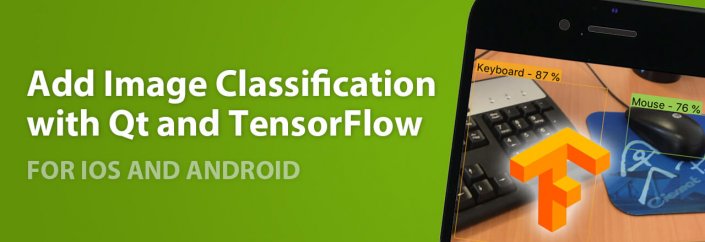
This guide provides an example for Image Classification and Object Detection built with Google’s TensorFlow Framework.
By reading this post, you will learn how to:
- Build TensorFlow for Android, iOS and Desktop Linux.
- Integrate TensorFlow in your Qt-based Felgo project.
- Use the TensorFlow API to run Image Classification and Object Detection models.
Why Add Artificial Intelligence to Your Mobile App
As of 2017, a quarter of organizations already invest more than 15 percent of their IT budget in machine learning. With over 75 percent of businesses spending money and effort in Big Data, machine learning is set to become even more important in the future.
Real-World Examples of Machine Learning
Artificial intelligence is on its way to becoming a business-critical technology, with the goal of improving decision-making with a far more data-driven approach. Regardless of the industry, machine learning helps to make computing processes more efficient, cost-effective, and reliable. For example, it is used for:
- Financial Services: To track customer and client satisfaction, react to market trends or calculate risks. E.g. PayPal uses machine learning to detect and combat fraud.
- Healthcare: For personalized health monitoring systems, to enable healthcare professionals to spot potential anomalies early on. Have a look at the latest examples of AI in healthcare.
- Retail: Offer personalized recommendations based on your previous purchases or activity. For example, recommendations on Netflix or Spotify.
- Voice Recognition Systems, like Siri or Cortana.
- Face Recognition Systems, like DeepLink by Facebook.
- Spam Email Detection and Filtering.
Image Classification and Object Detection Example
TensorFlow is Google’s open machine learning framework. Its flexible architecture allows easy deployment of computation across a variety of platforms (CPUs, GPUs, TPUs), and architectures (desktops, clusters of servers, mobile, and edge devices). It supports Linux, macOS, Windows, Android, and iOS among others.
About TensorFlow
TensorFlow has different flavors. The main one is TensorFlow. Another one is TensorFlow Lite which is TensorFlow’s lightweight solution for mobile and embedded devices. However, TensorFlow Lite is currently at technological preview state. This means that not all TensorFlow features are currently supported, although it will be the reference for mobile and embedded devices in the near future.
There is plenty of online material about how to build applications with Tensorflow. To begin with, we highly recommend the free ebook Building Mobile Applications with TensorFlow by Pete Warden, lead of the TensorFlow mobile/embedded team.
The example of this guide makes use of the original TensorFow flavor. It shows how to integrate TensorFlow with Qt and Felgo to create a simple multiplatform app that includes two pre-trained neural networks, one for image classification and another one for object detection. The code of this example is hosted on GitHub.
Clone the Repository
To clone this repository execute the following command, clone it recursively since the TensorFlow repository is inside it. The Tensorflow version included is 1.8.
git clone --recursive https://github.com/FelgoSDK/TensorFlowQtVPlay.gitMany thanks to the project developers for sharing this example and preparing this guide:
- Javier Bonilla, Ph.D. in Computer Science doing research about modeling, optimization and automatic control of concentrating solar thermal facilities and power plants at CIEMAT – Plataforma Solar de Almería (PSA), one of the largest concentrating solar technology research, development and test centers in Europe.
- Jose Antonio Carballo, Mechanical Engenieer and Ph.D. student from University of Almería working on his doctoral thesis on modeling, optimization and automatic control for an efficient use of water and energy resources in concentrating solar thermal facilities and power plants at CIEMAT – Plataforma Solar de Almería (PSA).
Advantages of using Felgo and Qt with TensorFlow
Felgo and Qt are wonderful tools for multiplatform applications. Qt has a rich set of ready-to-use multiplatform components for diverse areas such as multimedia, network and connectivity, graphics, input methods, sensors, data storage and more. Felgo further contributes to ease the deployment to mobile and embedded devices and adds nice features such as resolution and aspect ratio independence and additional components and controls. Felgo also provides easier access to native features, as well as plugins for monetization, analytics, cloud services and much more.
One nice feature of Felgo is that it is not restricted to mobile devices, so you can test and prototype your app in your development computer, which is certainly faster than compiling and deploying your app to emulators. You can even use Felgo live reloading to see changes in code almost instantaneously. Live reloading is also supported on Android and iOS devices, which is perfect for fine-tuning changes or testing code snippets on mobile devices.
So Tensorflow provides the machine learning framework, whereas Felgo and Qt facilitate the app deployment to multiple platforms: desktop and mobile.
Get Qt training and consulting service if you need help with that.
How to Build TensorFlow for Qt
We need to build TensorFlow for each platform and architecture. The recommended way is to use bazel build system. However, we will explore how to use make to build TensorFlow for Linux, Android and iOS in this example. Check that you have installed all the required libraries and tools, TensorFlow Makefile readme.
If you are interested in building Tensorflow for macOS, check the Supported Systems section on the Makefile readme. For Windows, check TensorFlow CMake build.
If you have issues during the compilation process have a look at open Tensorflow issues or post your problem there to get help.
Once you have built Tensorflow, your app can link against these three libraries: libtensorflow-core.a, libprotobuf.a and libnsync.a.
Note: When you build for different platforms and architectures, in the same Tensorflow source code folder, Tensorflow may delete previous compiled libraries, so make sure you back them up. These are the paths where you can find those libraries, with MAKEFILE_DIR=./tensorflow/tensorflow/contrib/makefile:
- Linux
- libtensorflow-core:
$(MAKEFILE_DIR)/gen/lib - libprotobuf:
$(MAKEFILE_DIR)/gen/protobuf/lib64 - libsync:
$(MAKEFILE_DIR)/downloads/nsync/builds/default.linux.c++11/
- libtensorflow-core:
- Android ARM v7
- libtensorflow-core:
$(MAKEFILE_DIR)/gen/lib/android_armeabi-v7a - libprotobuf:
$(MAKEFILE_DIR)/gen/protobuf_android/armeabi-v7a/lib/ - libsync:
$(MAKEFILE_DIR)/downloads/nsync/builds/armeabi-v7a.android.c++11/
- libtensorflow-core:
- Android x86
- libtensorflow-core:
$(MAKEFILE_DIR)/gen/lib/android_x86 - libprotobuf:
$(MAKEFILE_DIR)/gen/protobuf_android/x86/lib/ - libsync:
$(MAKEFILE_DIR)/downloads/nsync/builds/x86.android.c++11/
- libtensorflow-core:
- iOS
- libtensorflow-core:
$(MAKEFILE_DIR)/gen/lib - libprotobuf:
$(MAKEFILE_DIR)/gen/protobuf_ios/lib/ - libsync:
$(MAKEFILE_DIR)/downloads/nsync/builds/arm64.ios.c++11/
- libtensorflow-core:
The shell commands in the following sections only work if executed inside the main Tensorflow folder.
Building for Linux
We just need to execute the following script for Linux compilation.
./tensorflow/contrib/makefile/build_all_linux.shIf you are compiling for the 64-bit version, you might run into the following compilation error:
ld: cannot find -lprotobufIn this case, change the $(MAKEFILE_DIR)/gen/protobuf-host/lib references to $(MAKEFILE_DIR)/gen/protobuf-host/lib64 in the tensorflow/tensorflow/contrib/makefile/Makefile file.
With some GCC 8 compiler versions you can get the following error.
error: ‘void* memset(void*, int, size_t)’ clearing an object of type ‘struct
nsync::nsync_counter_s_’ with no trivial copy-assignment; use value-initialization
instead [-Werror=class-memaccess]
To avoid it, include the -Wno-error=class-memaccess flag in the PLATFORM_CFLAGS variable for Linux (case "$target_platform" in linux) in the tensorflow/tensorflow/contrib/makefile/compile_nsync.sh file.
Building for Android (on Linux)
First, you need to set the NDK_ROOT environment variable to point to your NDK root path. You cand download it from this link. Second, you need to compile the cpu features library in NDK. This example was tested with Android NDK r14e.
mkdir -p $NDK_ROOT/sources/android/cpufeatures/jni
cp $NDK_ROOT/sources/android/cpufeatures/cpu-features.*
   $NDK_ROOT/sources/android/cpufeatures/jni
cp $NDK_ROOT/sources/android/cpufeatures/Android.mk
   $NDK_ROOT/sources/android/cpufeatures/jni
$NDK_ROOT/ndk-build NDK_PROJECT_PATH="$NDK_ROOT/sources/android/cpufeatures"
   NDK_APPLICATION_MK="$NDK_ROOT/sources/android/cpufeatures/Android.mk"
Then, execute the following script to compile Tensorflow for ARM v7 instructions.
./tensorflow/contrib/makefile/build_all_android.sh
If you want to compile for x86 platforms. For instance for debugging in an Android emulator, execute the same command with the following parameters.
Note: If you face issues compiling for Android x86 whith Android NDK r14, use the Android NDK r10e and set the NDK_ROOT accordingly to its path.
./tensorflow/contrib/makefile/build_all_android.sh -a x86The Tensorflow Android supported architectures are the following.
-a [architecture] Architecture of target android [default=armeabi-v7a] (supported
architecture list: arm64-v8a armeabi armeabi-v7a mips mips64 x86 x86_64 tegra)
Building for iOS (on macOS)
The following script is available to build Tensorflow for iOS on macOS.
/tensorflow/contrib/makefile/build_all_ios.sh
If you get the following error while building Tensorflow for iOS.
error: thread-local storage is not supported for the current target
You can avoid it performing the changes given in this comment. That is changing -D__thread=thread_local \ to -D__thread= \ in the Makefile (for the i386 architecture only).
How to Use TensorFlow in Your Qt Mobile App
The source code of the app is in a GitHub repository. This section walks through the app code.
Link TensorFlow in Your Project
The following code shows the lines added to our qmake project file in order to include the TensorFlow header files and link against TensorFlow libraries depending on the target platform.
For Android, ANDROID_NDK_ROOT was set to the path of Android NDK r14e and ANDROID_NDK_PLATFORM was set to android-21 in Qt Creator (Project -> Build Environment).
# TensorFlow - All
TF_MAKE_PATH = $$PWD/tensorflow/tensorflow/contrib/makefile
INCLUDEPATH += $$PWD/tensorflow/ \
               $$TF_MAKE_PATH/gen/host_obj \
               $$TF_MAKE_PATH/downloads/eigen

# TensorFlow - Linux
linux:!android {
      INCLUDEPATH += $$TF_MAKE_PATH/gen/protobuf/include
      LIBS += -L$$TF_MAKE_PATH/downloads/nsync/builds/default.linux.c++11/ \
              -L$$TF_MAKE_PATH/gen/protobuf/lib64/ \
              -L$$TF_MAKE_PATH/gen/lib/ \
              -lnsync \
              -lprotobuf \
              -ltensorflow-core \
              -ldl
      QMAKE_LFLAGS += -Wl,--allow-multiple-definition -Wl,--whole-archive
}

# TensorFlow - Android
android {
    QT += androidextras
    LIBS += -ltensorflow-core -lprotobuf -lnsync -lcpufeatures \
            -L${ANDROID_NDK_ROOT}/sources/android/cpufeatures/obj/
              local/$$ANDROID_TARGET_ARCH
    QMAKE_LFLAGS += -Wl,--allow-multiple-definition -Wl,--whole-archive

    # Platform: armv7a
    equals(ANDROID_TARGET_ARCH, armeabi-v7a) | equals(ANDROID_TARGET_ARCH, armeabi):\
    {
        INCLUDEPATH += $$TF_MAKE_PATH/gen/protobuf_android/armeabi-v7a/include
        LIBS += -L$$TF_MAKE_PATH/gen/lib/android_armeabi-v7a \
                -L$$TF_MAKE_PATH/gen/protobuf_android/armeabi-v7a/lib \
                -L$$TF_MAKE_PATH/downloads/nsync/builds/armeabi-v7a.android.c++11
    }
    # Platform: x86
    equals(ANDROID_TARGET_ARCH, x86):\
    {
        INCLUDEPATH += $$TF_MAKE_PATH/gen/protobuf_android/x86/include
        LIBS += -L$$TF_MAKE_PATH/gen/lib/android_x86 \
                -L$$TF_MAKE_PATH/gen/protobuf_android/x86/lib \
                -L$$TF_MAKE_PATH/downloads/nsync/builds/x86.android.c++11
    }
}

# TensorFlow - iOS - Universal libraries
ios {
    INCLUDEPATH += $$TF_MAKE_PATH/gen/protobuf-host/include
    LIBS += -L$$PWD/ios/lib \
            -L$$PWD/ios/lib/arm64 \
            -framework Accelerate \
            -Wl,-force_load,$$TF_MAKE_PATH/gen/lib/libtensorflow-core.a \
            -Wl,-force_load,$$TF_MAKE_PATH/gen/protobuf_ios/lib/libprotobuf.a \
            -Wl,-force_load,$$TF_MAKE_PATH/downloads/nsync/builds/
                            arm64.ios.c++11/libnsync.a
}
Create the GUI with QML
The GUI is pretty simple, there are only two pages.
- Live video output page: The user can switch between the front and rear cameras.
- Settings page: Page for setting the minimum confidence level and selecting the model: one for image classification and another one for object detection.
Main.qml
In main.qml, there is a Storage component to load/save the minimum confidence level, the selected model and if the inference time is shown. The inference time is the time taken by the Tensorflow neural network model to process an image. The storage keys are kMinConfidence, kModel and kShowTime. Their default values are given by defMinConfidence, defModel and defShowTime. The actual values are stored in minConfidence, model and showTime.
// Storage keys
readonly property string kMinConfidence: "MinConfidence"
readonly property string kModel: "Model"
readonly property string kShowTime: "ShowTime"

// Default values
readonly property double defMinConfidence: 0.5
readonly property string defModel: "ImageClassification"
readonly property bool defShowTime: false

// Properties
property double minConfidence
property string model
property bool showTime

// Local storage component
Storage {
    id: storage

    Component.onCompleted: {
        minConfidence = getValue(kMinConfidence) !== undefined ?
                        getValue(kMinConfidence) : defMinConfidence
        model = getValue(kModel) !== undefined ? getValue(kModel) : defModel
        showTime = getValue(kShowTime) !== undefined ? getValue(kShowTime) :
                                                       defShowTime
    }
}
There is a Navigation component with two NavigationItem, each one is a Page. The VideoPage shows the live video camera output. It reads the minConfidence, model and showTime properties. The AppSettingsPage reads also those properties and set their new values in the onMinConfidenceChanged, onModelChanged and onShowTimeChanged events.
import Felgo 3.0
import QtQuick 2.0

App {
    id: app

    ....

    Navigation {

        NavigationItem{
            title: qsTr("Live")
            icon: IconType.rss

            NavigationStack{
                VideoPage{
                    id: videoPage
                    minConfidence: app.minConfidence
                    model: app.model
                    showTime: app.showTime
                }
            }
        }

        NavigationItem{
            title: qsTr("Settings")
            icon: IconType.sliders

            NavigationStack{
                AppSettingsPage{
                    id: appSettingsPage
                    minConfidence: app.minConfidence
                    model: app.model
                    showTime: app.showTime

                    onMinConfidenceChanged: {
                        app.minConfidence = appSettingsPage.minConfidence
                        storage.setValue(kMinConfidence,app.minConfidence)
                    }

                    onModelChanged: {
                        app.model = appSettingsPage.model
                        storage.setValue(kModel,app.model)
                    }

                    onShowTimeChanged: {
                        app.showTime = appSettingsPage.showTime
                        storage.setValue(kShowTime,app.showTime)
                    }
                  }
                }
            }
        }
    }
}
VideoPage.qml
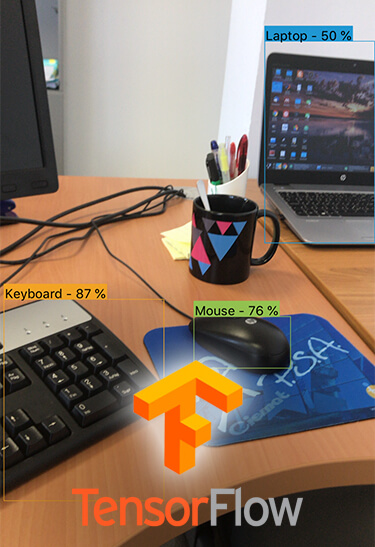
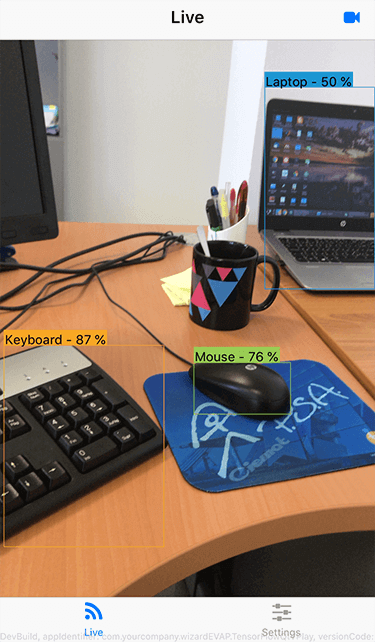
An screenshot of the VideoPage for object detection on iOS is shown below.
The QtMultimedia module is loaded in this page.
import Felgo 3.0
import QtQuick 2.0
import QtMultimedia 5.9
The VideoPage has the minConfidence, model and showTime properties. It also has another property to storage the camera index, cameraIndex.
// Properties
property double minConfidence
property string model
property bool showTime

// Selected camera index
property int cameraIndex: 0
There is a camera component which is started and stopped when the page is shown or hidden. It has two boolean properties. The first one is true if there is at least one camera and the second one is true if there are at least two cameras.
Camera{
    id: camera
    property bool availableCamera:  QtMultimedia.availableCameras.length>0
    property bool availableCameras: QtMultimedia.availableCameras.length>1
}

// Start and stop camera
onVisibleChanged: {
    if (visible) camera.start()
    else camera.stop()
}
There is also a button in the navigation bar to switch the camera. This button is visible only when there is more than one camera available. The initialRotation() function is required due to the Qt bug 37955, which incorrectly rotates the front camera video output on iOS.
// Right-hand side buttons
rightBarItem: NavigationBarRow {

    // Switch camera button
    IconButtonBarItem {
        title: qsTr("Switch camera")
        visible: QtMultimedia.availableCameras.length>1
        icon: IconType.videocamera
        onClicked: {
            cameraIndex = cameraIndex+1 % QtMultimedia.availableCameras.length
            camera.deviceId = QtMultimedia.availableCameras[cameraIndex].deviceId
            videoOutput.rotation = initialRotation()
        }
    }
}
// BUG: front camera rotation on iOS [QTBUG-37955]
function initialRotation()
{
    return Qt.platform.os === "ios" && camera.position === Camera.FrontFace ? 180 : 0
}
When no camera is detected, an icon and a message are shown to the user.
// No camera found
Item{
    anchors.centerIn: parent
    width: parent.width
    visible: QtMultimedia.availableCameras.length<=0
    Column{
        width: parent.width
        spacing: dp(25)

        Icon{
            anchors.horizontalCenter: parent.horizontalCenter
            icon: IconType.videocamera
            scale: 3
        }

        AppText{
            anchors.horizontalCenter: parent.horizontalCenter
            text: qsTr("No camera detected")
        }
    }
}
When the camera is loading, an icon with a cool animation and a message are also
shown to the user.
// Loading camera
Item{
    anchors.centerIn: parent
    width: parent.width
    visible: QtMultimedia.availableCameras.length>=0 &&
             camera.cameraStatus !== Camera.ActiveStatus
    Column{
        width: parent.width
        spacing: dp(25)

        Icon{
            id: videoIcon
            anchors.horizontalCenter: parent.horizontalCenter
            icon: IconType.videocamera
            scale: 3

            SequentialAnimation {
                   running: true
                   loops: Animation.Infinite
                   NumberAnimation { target: videoIcon; property: "opacity";
                   from: root.maxVal; to: root.minVal; duration: root.aTime }
                   NumberAnimation { target: videoIcon; property: "opacity";
                   from: root.minVal; to: root.maxVal; duration: root.aTime }
             }
        }

        AppText{
            anchors.horizontalCenter: parent.horizontalCenter
            text: qsTr("Loading camera") + " ..."
        }
    }
}
The camera video output fills the whole page. It is only visible when at least
one camera is detected and active. We define a filter objectsRecognitionFilter which is implemented in a C++ class. This filter get each video frame, transforms it as input data to TensorFlow, invokes TensorFlow and draws the results over the video frame. This C++ class will be later introduced.
VideoOutput {
    id: videoOutput
    anchors.fill: parent
    source: camera
    visible: camera.availableCamera && camera.cameraStatus == Camera.ActiveStatus
    autoOrientation: true
    fillMode: VideoOutput.PreserveAspectCrop
    rotation: initialRotation()

    filters: [objectsRecognitionFilter]
}
AppSettingsPage.qml
An screenshot of this page on iOS is shown below.
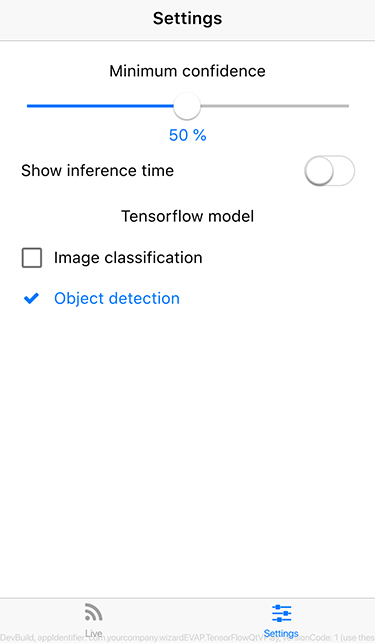
The AppSettingsPage allows the user to select the minimum confidence level for
the detections with a slider. The slider value is stored in minConfidence.
AppSlider {
    id: slider
    anchors.horizontalCenter: parent.horizontalCenter
    width: parent.width - 2*dp(20)
    from:  0
    to:    1
    value: minConfidence
    live:  true
    onValueChanged: minConfidence = value
}
The inference time, the time Tensorflow takes to process an image, can be also shown on the screen. It can be enabled or disabled by means of a switch. The boolean value is stored in showTime.
AppSwitch{
    anchors.verticalCenter: parent.verticalCenter
    id: sShowInfTime
    checked: showTime
    onToggled: showTime = checked
}
There are also two exclusive check boxes to select the model: one for image classification and another for object detection. The selected model is stored in the `model` property. If the currently selected model is unchecked, the other model is automatically checked, as one of them should be always selected.
ExclusiveGroup { id: modelGroup }

AppCheckBox{
    anchors.horizontalCenter: parent.horizontalCenter
    width: parent.width - 2*dp(20)
    text: qsTr("Image classification")
    exclusiveGroup: modelGroup
    checked: model === "ImageClassification"
    onCheckedChanged: if (checked) model = "ImageClassification";
                      else chkDetection.checked = true
}

AppCheckBox{
    anchors.horizontalCenter: parent.horizontalCenter
    width: parent.width - 2*dp(20)
    text: qsTr("Object detection")
    exclusiveGroup: modelGroup
    checked: model === "ObjectDetection"
    onCheckedChanged: if (checked) model = "ObjectDetection";
                      else chkClassification.checked = true
        }
}
C++ TensorFlow Interface and Video Frame Filter
Two main tasks are programmed in C++.
- Interfacing with TensorFow
- Managing video frames
The source code of the C++ classes is not presented here in detail, instead the process is sketched and explained, links to further details are also given. Nevertheless, you can have a look at the source code hosted on GitHub.
Interfacing with Tensorflow
The Tensorflow C++ class interfaces with the TensorFlow library, check the code for a detailed description of this class. This class is a wrapper, check the Tensorflow C++ API documentation for further information.
Managing video frames
The workflow for managing video frames is shown in the next flow diagram.
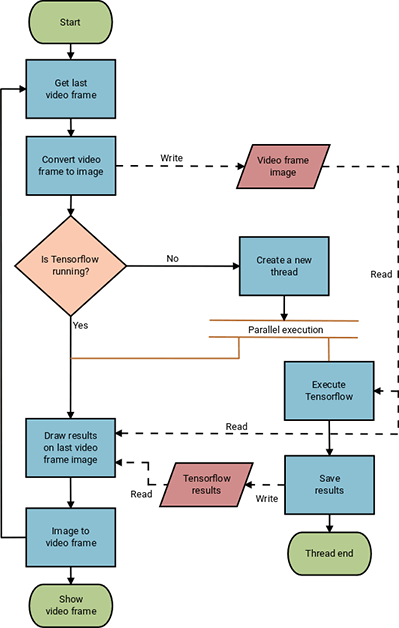
A object filter, ObjectsRecognizer, is applied to the VideoOutput to process frames. This filter is implemented by means of the C++ classes: ObjectsRecogFilter and ObjectsRecogFilterRunable, for further information about how to apply filters, check introducing video filters in Qt Multimedia.
The filter is processed in the `run` method of the ObjectsRecogFilter class. The general steps are the following.
- We need to convert our
QVideoFrameto aQImageso we can manipulate it. - We check if Tensorflow is running. Since Tensorflow is executed in another thread, we used the
QMutexandQMutexLockerclasses to thread-safety check if it is running. A nice example is given in QMutexLocker Class documentaion.- If Tensorflow is running – nothing is done
- If Tensorflow is NOT running – we execute it in another thread by means of the C++ classes:
TensorflowThreadandWorkerTF, signals and slot are used to communicate the main thread and these classes, check [QThreads general usage](https://wiki.qt.io/QThreads_general_usage) for further details. We provide as input the video frame image. When Tensorflow is finished we store the results given be the selected model also by means of signals and slots.
- We get the stored results (if any) and apply them to the current video frame image. If our model is image classification, we just draw the name and score of the top image class if the score is above the minimum confidence value. If our model is object detection, we iterate over all the detections and draw the bounding boxes, names of objects and confidence values if they are above the minimum confidence level. There is an auxiliary C++ class,
AuxUtils, which provides functions to draw on frames, such asdrawTextanddrawBoxes. - The last step is to convert back our
QImageto aQVideoFrameto be processed by our QMLVideoOutputcomponent and then we go back to process a new video frame.
Neural Network Models for Image Classification and Object Detection
We need neural network models to perform the image classification and object detection tasks. Google provides a set of pre-trained models that do this. The file extension for Tensorflow frozen neural network models is .pb. The example on Github already includes MobileNet models: MobileNet V2 1.0_224 for image classification and SSD MobileNet V1 coco for object detection. MobileNets is a class of efficient neural network models for mobile and embedded vision applications.
Image Classification Models
Image classification models can be download from the TensorFlow-Slim image classification model library. Our example code is designed for MobileNet neural networks. For example, download mobilenet_v2_1.0_224.tgz, uncompress it, and copy the mobilenet_v2_1.0_224_frozen.pb file to our assets folder as image_classification.pb. The image size in this case, 224 x 224 pixels, is set in the constants fixed_width and fixed_height defined in our Tensorflow C++ class. The output layer, MobilenetV2/Predictions/Reshape_1 in this case, is also specified in the constant list variable listOutputsImgCla in the Tensorflow class. Labels for these models are already set in the image_classification_labels.txt file. Labels belong to ImageNet classes.
Object Detection Models
Check Tensorflow detection model Zoo for a comprehensive list of object detection models. Any SSD MobileNet model can be used. This kind of models provides caption, confidence and bounding box outputs for each detected object. For instance, download ssd_mobilenet_v1_coco_2018_01_28.tar.gz and uncompress it, copy the frozen_inference_graph.pb to our assets folder as object_detection.pb. Labels for this kind of models are already given by the object_detection_labels.txt file. Labels belong to COCO labels.
Known Issues
Although the presented example is functional, there is still room for improvement. Particularly in the C++ code where naive solutions were considered for simplicity.
There are also some issues to address, the following list summarizes them.
-
- The app performance is much higher on iOS than on Android even for high-end mobile devices. Finding the root cause of this requires further investigation.
- The
spmethod of theAuxUtilsC++ class is intended to provide font pixel sizes independently on the screen size and resolution, although it does not work for all devices. Therefore, same implementation that the one provided by the Felgo QMLspfunction should be considered. - Asset files can be easily accessed from QML and Qt classes. For instance,
assets:/assets/model.pbgives access to a file calledmodel.pbstored in the assets folder on Android. However, accessing assets from general C++ classes is not so easy because those classes can not resolveassets:/. This is the case for the Tensorflow C++ class. The current solution is to copy the file to a well known path, for example toQStandardPaths::writableLocation(QStandardPaths::AppLocalDataLocation), but this involves checking if the destination folder exists (and create it otherwise), checking if the asset file exists and has not changed (and copy it otherwise). QVideoFrameconversion toQImageis performed in order to draw on it in therunmethod of theObjectsRecogFilterRunableC++ class. Currently, this is done using theqt_imageFromVideoFramefunction included in a Qt private module:multimedia-private. Therefore, the app is tied to this specific Qt module build version and running the app against other versions of the Qt modules may crash at any arbitrary point. Additionally, the conversion of BGR video frames is not properly managed by theqt_imageFromVideoFramefunction. Therefore, they are converted to images without using this function.- The current implementation continuously executes Tensorflow in a separated thread processing video frames. That is when the Tensorflow thread finishes, it is executed again with the latest frame. This approach provides a fluent user experience, but on the other hand it makes the device to considerably heat up and drain the battery fast.
If you have a business request for assistance to integrate TensorFlow in your Felgo apps, don’t hesitate to drop a line at support@felgo.com or contact us here. The Felgo SDK is free to use, so make sure to check it out!
If you enjoyed this post, feel free to share it on Facebook or Twitter.
More Relevant App Development Resources
- Qt AR: Why and How to Add Augmented Reality to Your Mobile App
- Handle Safe Area Insets, Notch & Display Cutout for iPhone X, iPad X and Android P
The Best App Development Tutorials & Free App Templates
All of these tutorials come with full source code of the mobile apps! You can copy the code to make your own apps for free!
- How to create a mobile app for iOS & Android with a single code base
- How to support multiple languages and internationalization in your mobile app
- Common Widgets & Controls in a cross-platform App
- How to support multiple screen sizes & screen densities – Responsive App Guide
- Guide for App Layout
- Guide for App Navigation
- How to add native code to your mobile App
- How to easily style your App with Themes
- How to add Animations to your App
- How to add a Chat to your Mobile App
- How to make a Weather App accessing a REST weather service
- Conference App Template
- Widget Gallery App Template
- Twitter App Template
- Messenger App Template
- Property Finder App Template
App Development Video Tutorials
Make Cross-Platform Apps with Qt: Felgo Apps
How to Add In-App Chat or Gamification Features to Your Mobile App
How to Make a Mobile App with Qt Quick Designer (QML Designer) & Felgo


