This guide describes how to prepare your app or game ready for publishing in app stores.
Note: This guide assumes that you already built and deployed your app to a test device once, meaning that all tools are set up successfully. For a guide on how to deploy your app to test on devices, see Deploying Felgo Games & Apps.
Felgo Cloud Builds CI/CD Service for Desktop, Android, iOS, Embedded and Web
Boost your Qt and Felgo development with continuous integration and delivery for Qt and Felgo projects. As the only CI/CD exclusively for Felgo/Qt, it enables you to build and distribute apps with minimum effort and maximum
speed.
Visit Felgo Cloud Builds.
You can find more info here.
Project Configuration
Every update in app stores is identified by a product identifier and a version number that you need to set in your project before building a new update.
Product Identifier
Every app in the app stores is identified by a product identifier or bundle identifier that's unique across all apps and games in the stores. It is recommended to choose a product identifier with your organizational domain
name in reverse dot notation. A valid example is com.yourcomany.yourapp.
To set the product identifier, open your CMakeLists.txt project file and set the PRODUCT_IDENTIFIER property to apply the product identifier to all platforms, e.g.:
set(PRODUCT_IDENTIFIER "com.yourcompany.yourapp")
If you want to set individual identifiers per platform, you can use conditional statements like:
 if(CMAKE_SYSTEM_NAME STREQUAL "iOS")
   set(PRODUCT_IDENTIFIER "com.yourcompany.yourapp.ios")
 elseif(CMAKE_SYSTEM_NAME STREQUAL "Android")
   set(PRODUCT_IDENTIFIER "com.yourcompany.yourapp.android")
 else()
   set(PRODUCT_IDENTIFIER "com.yourcompany.yourapp.yourapp")
 endif()
For projects you create with the Felgo project wizards, the value is then automatically set in your iOS Project-Info.plist, Android build.gradle and qml/config.json file every time you run CMake
for your project.
Every time you release a new version of your project to the app stores, you need to increase the version number.
Felgo projects make use of two different versions:
Version Code
The version code is an internal version number identifying a specific update of your app. This version information is not visible to the user when downloading the app from the app stores.
Every new update you want to publish to the app stores needs a higher version than the previous one. The most common solution is to increase the last used value by one. The version code must be an integer number greater
0.
To set the version code, open your CMakeLists.txt project file and set the PRODUCT_VERSION_CODE variable to apply the version to all platforms, e.g.:
set(PRODUCT_VERSION_CODE 1)
If you want to set individual version codes per platform, you can use the block like:
 if(CMAKE_SYSTEM_NAME STREQUAL "iOS")
   set(PRODUCT_VERSION_CODE 1)
 elseif(CMAKE_SYSTEM_NAME STREQUAL "Android")
   set(PRODUCT_VERSION_CODE 2)
 endif()
For projects you create with the Felgo project wizards, the value is then automatically set in your iOS Project-Info.plist, Android build.gradle and qml/config.json file every time you run CMake
for your project.
Version Name
The version name is the user-facing version number that's visible when downloading the app from the app stores.
Every new update you want to publish to the app stores needs a higher version than the previous one. The version number is usually a semantic version like x.y.z, i.e. 1.0.0.
To set the version number, open your CMakeLists.txt project file and set the PRODUCT_VERSION_NAME variable to apply the version to all platforms, e.g.:
set(PRODUCT_VERSION_NAME "1.0.0")
If you want to set individual version numbers per platform, you can use the block like:
 if(CMAKE_SYSTEM_NAME STREQUAL "iOS")
   set(PRODUCT_VERSION_NAME "1.0.0")
 elseif(CMAKE_SYSTEM_NAME STREQUAL "Android")
   set(PRODUCT_VERSION_NAME "1.0.1")
 endif()
For projects you create with the Felgo project wizards, the value is then automatically set in your iOS Project-Info.plist, Android build.gradle and qml/config.json file every time you run CMake
for your project.
Felgo License
To publish your app or game, you need a valid Felgo license, either with the Felgo Free Plan or a paid subscription. This allows you to create a license key that's required for your
project.
By default, your Felgo installation already comes with your individual user license key and you can start developing apps or games from one of our project wizards. This license key is bound to your very own Felgo account you
used during installation login.
If you want to use a project-specific license key or use one of your provided Felgo Plugins, you need to create an individual project license key from our dashboard, found here: https://felgo.com/developers/license/.
Here are the differences between those license keys:
|
User License Key |
Project License Key |
| Location |
Implicitly set for every Felgo project |
App::licenseKey for your app or AppItem::licenseKey for your game
|
| Version code |
All |
Specific |
| Project identifier |
All |
Specific |
| Needs to be updated for an app update |
No |
Yes |
| Plugin usage |
No |
Yes |
| Recommended usage |
Single developer project without plugins |
Project with multiple developers or plugin usage in your project |
Note: If you use a project license key and increase the PRODUCT_VERSION_CODE for an update, you also need to generate a new license key for the updated version and update your App::licenseKey of your app or AppItem::licenseKey of your game. You can also see the current PRODUCT_IDENTIFIER and
PRODUCT_VERSION_CODE while running a development build: It is displayed as a white overlay text on the bottom of the screen.
For local builds and if using Felgo Cloud Builds, you can also set the Project License Key from within your project file. For that, open your CMakeLists.txt project
file and set the PRODUCT_LICENSE_KEY variable to your generated license key:
set(PRODUCT_LICENSE_KEY "<generate one from https://felgo.com/licenseKey>")
Note: Make sure to run CMake and clean your project to apply changes from the PRODUCT_LICENSE_KEY variable.
If you want to set individual license keys per platform, you can use the block like:
if(CMAKE_SYSTEM_NAME STREQUAL "iOS")
set(PRODUCT_LICENSE_KEY "<generate one from https://felgo.com/licenseKey>)
elseif(CMAKE_SYSTEM_NAME STREQUAL "Android")
set(PRODUCT_LICENSE_KEY "<generate one from https:
endif()
Note: A license key set within the project file is not applied when using Felgo Live because Felgo Live loads the app information during runtime. If using Felgo Live, you can still set your license key with App::licenseKey for your app or AppItem::licenseKey of your game.
Project Stage
You can run a Felgo app or game in two different modes. You set the specific mode in your project's config.json file in the qml folder (e.g. "stage": "publish").
|
Test Build |
Publish Build |
| Purpose |
Used during development |
Used for publishing your app or game |
| Stage property value |
"stage": "test" |
"stage": "publish" |
| Logging |
Enabled |
Disabled |
| Development info watermark |
Yes |
No |
| Performance |
Optimized for development |
Optimized for publishing |
| App works after Felgo license expired |
No |
Yes |
Publish builds have a better performance, disable logging so your app cannot be introspected, and they will continue working when your Felgo license is expired. So if you released an app or game in the app stores and later
your license expires, you do not need a new license. For submitting a new game or an updated version with increased PRODUCT_VERSION_CODE of your existing game to the app stores, you will need a valid Felgo license to generate a new license key.
Publish Builds
Update Project Stage
To create a publish build, set "stage": "publish" in your config.json file in the qml folder and build a Release Build from Qt Creator.
Open the CMakeLists.txt project file and update the PRODUCT_VERSION_CODE and PRODUCT_VERSION_NAME variables.
Changes to those variables are then automatically set in your iOS Info.plist file and Android AndroidManifest.xml file every time you run CMake for your project. You don't need to update that information
manually anymore.
Protect your Source Code with the Qt Resource System
With Felgo, you can easily protect the source code of your app. Felgo supports to compile your QML and JavaScript files to your application binary. This makes sure that your source files are bundled in plain text and
prevents external use and piracy.
Note: With the default settings in your CMakeLists.txt file, your QML and JavaScript files are not protected. In order to protect them, follow these steps:
- Remove or comment the line
deploy_resources("${QmlFiles};${AssetsFiles}") from your CMakeLists.txt file, to avoid shipping your qml files with the application (instead they get compiled to the
app binary with the next step).
- Enable
QML_FILES and RESOURCES in the qt_add_qml_module() call in your CMakeLists.txt file. This compiles your QML files with the Qt Quick Compiler. Then it automatically generates a QRC resource file for all your QML sources and assets.
Example:
 # Add QML files and resources to QML module to included them via QRC automatically:
 qt_add_qml_module(appBasic
     URI BasicApp
     VERSION 1.0
 # uncomment for publishing:
     QML_FILES ${QmlFiles}
     RESOURCES ${AssetsFiles}
     NO_RESOURCE_TARGET_PATH
 )
- Set the main qml file to
"qrc:/qml/Main.qml" in your main.cpp file.
- Run CMake and re-build your project.
The Felgo approach to support both resource deployment and the Qt Resource System (qrc files) has the following benefits:
- During development, you can re-run an application when you disable the shadow build option. This saves the time for re-compilation and allows much faster application startup times. Note: This only applies
when you change QML or JavaScript files - a change of C++ files always requires a new compilation of your project.
- Felgo abstracts the file access for you, i.e. you don't need a prefix
assets:/... for your images, or mix up your code with any qrc:/... prefixes. Just enter the relative directory from your qml
file and use e.g. Qt.resolvedUrl("../assets/img.png") in your qml code. The file access automatically works with both deployment methods, qrc and resource deployment.
For more details about the decision to support both qrc and resource deployment, see this Qt Project Forum Thread and our comments at the Qt Blog Post about Qt Creator 3.1 Release.
Publishing in iOS App Store
Prepare Your iOS Project
If you create your project with one of our project wizards, you are almost ready for building your project for distribution.
Set iOS App Icon
Our project wizard comes with a set of default app icons. To replace them with your own simply open the ios subfolder within your project's root folder and replace all images named icon-*.png with your own,
preserving the image sizes.
Set iOS Bundle Identifier
The project wizard prefilled the bundle identifier with the one you provided during creating the project. If you want to adapt it, open the CMakeLists.txt project file of your project and change the
PRODUCT_IDENTIFIER setting.
 # configure the product's bundle identifier
 set(PRODUCT_IDENTIFIER "com.your.company.YourApp")
Please also make sure that the <key>CFBundleIdentifier</key> in your ios/Project-Info.plist references this value with $(PRODUCT_BUNDLE_IDENTIFIER).
 <key>CFBundleIdentifier</key>
 <string>$(PRODUCT_BUNDLE_IDENTIFIER)</string>
Build Your iOS Project For Distribution
Your project is now ready for building a binary for distribution. This involved two major steps:
Create the Xcode project
- Open your project in Qt Creator and select the Felgo SDK for iOS target and the release option like shown here:
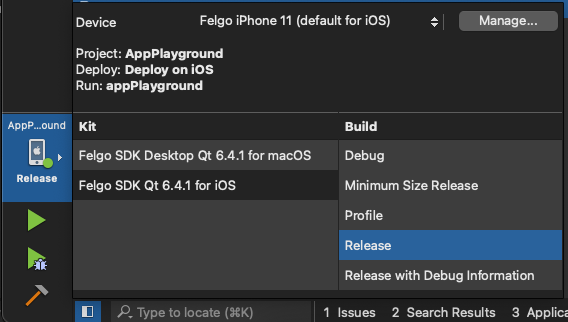
- Run Clean Project and Run CMake from the Build menu. This creates an Xcode project in your shadow build directory, usually beside your project's directory named
build-XYZ-Felgo_SDK_Qt_6_4_1_for_iOS.
Prepare Your Apple Developer Account
Before you are able to build and upload your app perform the following steps:
- Get an Apple Developer Account (use an existing Apple ID or create a new one), select if you want to register as an individual or as a company,
enter your contact information and then select the “iOS Developer Program".
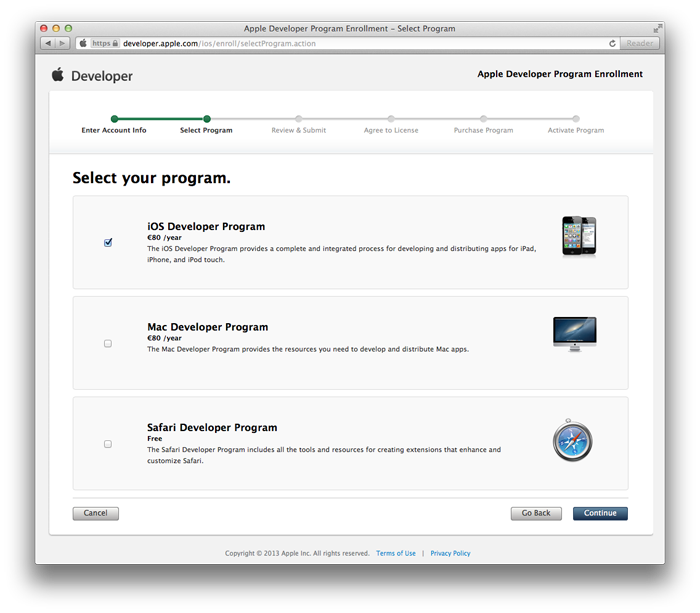
The iOS Developer Program costs $99 per year, for a successful registration a valid credit card (and if enrolling as a company a D-U-N-S number) is required. After applying for the program Apple checks your information,
this step usually takes five to ten business days.
Note: For more information on program enrollment please have a look at Program Enrollment.
- After you successfully enrolled in the iOS Developer Program it's now time to prepare a distribution certificate and a provisioning profile, which are required for App Store publishing.
Login to the iOS Provisioning Portal using your credentials provided during signing up.
Select “Certificates" in the left column and afterward the tab “Distribution". Request a certificate as described under the tab “How To".
Next, be sure to create an explicit App ID for your game, this is needed if you're using one of the Felgo Plugins. Be sure that the App ID matches the PRODUCT_IDENTIFIER
value you entered in your project file, otherwise you won't be able to upload your iOS app.
After that, you are finally able to create a distribution provisioning profile in the left column under “Provisioning" and the tab “Distribution". Again, be sure to have a look at the “How To" tab for further
information.
Finally, download your certificate and provisioning profile created in the previous steps. Import the certificate (along with the "WWDR intermediate certificate" if not already done) in your macOS Keychain Access
application and drop the provisioning profile on the Xcode icon in your dock (or simply double-click the file).
These steps are likewise the most error-prone, if there are any problems check the Apple How To's, use Google or also ask your questions in our support forums. Especially this document provides a lot of background information and step-by-step guides.
- The next step is to create your application in iTunes Connect. Log in, click “Manage your applications", select the button “Add New App" and provide the requested Meta
information about your app.

Now click the button "Ready to Upload Binary". For more information on how to add a new app entry to iTunes Connect, have a look at the Developer
Guide.
Build the Xcode project
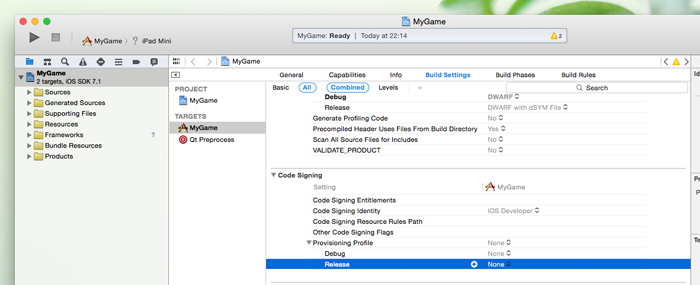
- Open the generated Xcode project in your shadow build directory, usually beside your project's directory named build-XYZ-Qt_5_10_1_iOS_V_Play-Release.
- Set your distribution provisioning profile from the previous steps by selecting your project in the project tree, select your build target and set the profile from the release drop down menu:
- Make sure to select the iOS device item (or your device if anyone plugged into your Mac, like the "iPad Mini" in the screenshot above) in the upper left menu.
- Select Archive from the Build menu. If all was successful Xcode's Organizer window opens and you can upload your game by hitting the Distribute... button.
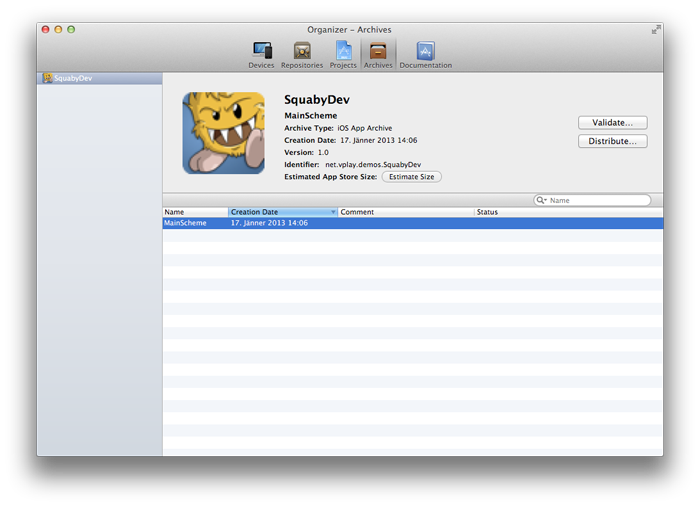
Click "Distribute", select the first option "Submit to the iOS App Store", provide your iTunes Connect credentials, select the previously imported distribution provisioning profile for signing and then finally upload
your app.
If all steps were successful all you have to do is to wait for Apple to review your uploaded app.
Make sure to send us a link to your game as soon as it is available in iOS App Store and post it to our Announcements Forum, so we can help you promote your
game.
Publishing in Google Play Store
As a first step get a Google Play Developer Account (there is a one time $25 registration fee and you need a Google Checkout account too, which is free of charge).
Prepare Your Android Project
If you create your project with one of our project wizards you are almost ready for building your project for distribution.
Set Android App Icon
Our project wizard comes with a set of default app icons. To replace them with your own simply open the android/res subfolder within your project's root folder and replace all images named ic_launcher.png in
their respective subfolders with your own, preserving the image sizes.
Set Android Package Identifier
The project wizard prefilled the package identifier with the one you provided during creating the project. If you want to adapt it, open the CMakeLists.txt project file of your project and change the
PRODUCT_IDENTIFIER setting.
 # configure the product's bundle identifier
 set(PRODUCT_IDENTIFIER "com.your.company.YourApp")
Note: If you use one of Felgo project wizards, the value from AndroidManifest.xml file gets overridden with the PRODUCT_IDENTIFIER variable.
Build Your Android Project For Distribution
Your project is now ready for building a binary for distribution. This involved the following steps:
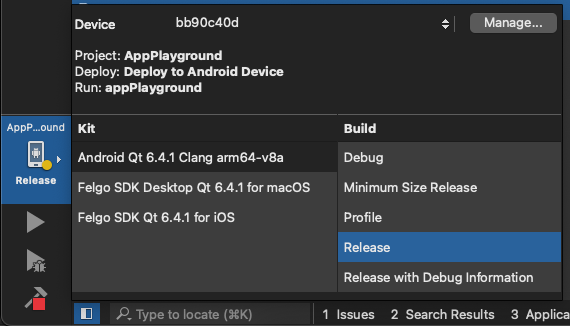
- Open your project in Qt Creator and select an Android target and the release option like illustrated here:
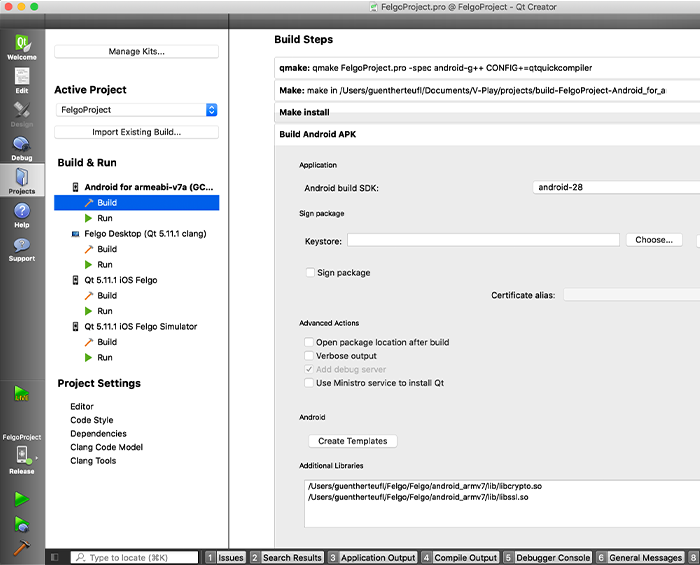
- Select your existing Android signing keystore or create a new one within the Projects - Android Kit - Run - Deploy configurations pane:
Note: Please keep your private key secure and create a backup in a safe place, if you lose it you are not able to update your game in the future! For more information on the keystore and certificate have a look
at the official Android guide.
- For convenience, you can also select Open package location after build.
- Run Clean Project and Run CMake from the Build menu and finally build your project. Qt Creator builds the .apk and opens the folder containing the .apk.
- Finally, upload your Android game according to Google's upload guide.
If all steps went successfully your Felgo powered game can be found in Play Store within a couple of minutes.
Google Play Privacy Guidelines
When you submit an app to the Google Play Store, you need to add a link to your privacy policy.
Note: The privacy policy can be omitted if your app does not use so-called dangerous permissions, such as \c{CAMERA} or MICROPHONE. You can find the full list of dangerous permissions at the
Android developer page.
By default, Qt apps and thus Felgo apps and games automatically include all permissions potentially used by Felgo components. These permissions include CAMERA, and thus you require a privacy policy for Google
Play.
If you don't use specific features and therefore don't want to include those permissions in your app, you can turn off default permissions by disabling "Include default permissions for Qt modules" in Qt Creator's
AndroidManifest.xml editor:
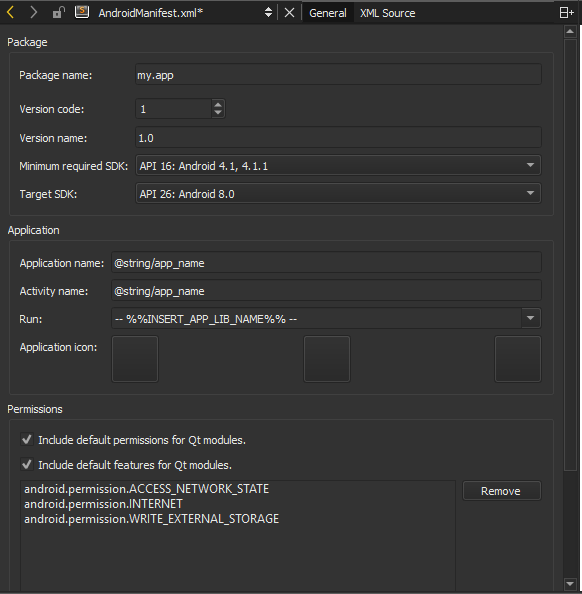
Alternatively, you can also remove the INSERT_PERMISSIONS line from the source of AndroidManifest.xml:
 <manifest ...>

     <!-- The following comment will be replaced upon deployment with default permissions based on the dependencies of the application.
      Remove the comment if you do not require these default permissions. -->
     <!-- %%INSERT_PERMISSIONS -->

 </manifest>
After turning off default permissions, <uses-permission ...> tags are not added anymore and you need to add all required permissions manually. As an example, you need can add INTERNET,
ACCESS_NETWORK_STATE andCAMERA permission like this:
 <manifest ...>

   <uses-permission android:name="android.permission.INTERNET"/>
   <uses-permission android:name="android.permission.ACCESS_NETWORK_STATE"/>
   <uses-permission android:name="android.permission.CAMERA"/>

 </manifest>
Official Android Qt Guides
For further information please also have a look at:
Make sure to send us a link to your game as soon as it is available in Android App Store and post it to our Announcements Forum, so we can help you promote
your game.


