Introduction
Cool graphics are essential to probably every game, but you always have to keep in mind that memory is limited, especially on older devices. In this tutorial you will learn how to use the available memory more efficiently,
speed up loading sprites and even drawing them, with the help of TexturePacker.
First, follow this link and download TexturePacker.
While downloading, take a look at these 2 short and great videos by Code'n'Web, explaining the very basics of what we are talking about in this tutorial (about 3 minutes each):
SpriteSheets - TheMovie - Part 1
SpriteSheets - TheMovie - Part 2
In short, sprite sheets have these advantages:
- Sprite sheets reduce the size of textures on the storage and in the memory a lot.
- Sprite sheets speed up the drawing process.
- Sprite sheets keep the frame rate high.
After you finish installing, run TexturePacker. You can use the free trial version for this guide.
What Are the Problems and How Do Sprite Sheets Solve Them?
Loading every sprite from a separate file has many disadvantages, especially in memory usage and performance.
Texture Size
First of all, using file formats such as png or jpeg can reduce the total size of your game, but it won't affect the memory (RAM) usage while your game is running. The sprites have to be uncompressed into the RAM where they
"become" textures the graphics processor can use. This means that every single pixel of the sprite consumes the same amount of memory (4 Byte per pixel with the standard RGBA8888 image format). E.g. a 512x512 pixel png
completely filled with black color has a file size of under 5KB, but will still use 1MB (4 Bytes per pixel * width * height) of RAM.
The rectangular shape of the sprite usually doesn't match the particular sizes that hardware demands and needs to be changed by the system before they can get passed to the GPU. Worst case would be a hardware that can only
process square sprites with width and height matching a power of 2 (128x128,256x256,...). If we have a 140x140 sprite, it will automatically be altered to match the hardware constraints. Since a square of 128x128 would be too
small, it will be packed in a 256x256 square, and all the remaining space is unused, but still consumes memory when loading the sprite into the RAM. So instead of 76 KB (4 Bytes per pixel * width * height) for the 140x140
sprite, we will now need 256KB of memory space. That's more than 3 times the original space.
This adds up quickly, because lots of sprites will be used in a game. E.g. a 512x512 sprite needs 1MB. Some might say: "Calm down bro, I got 1GB of RAM in my iPhone 5, I can handle your 200 single sprites, no worries!". But
you have to keep in mind that your game should maybe also run on an iPod Touch 4 with only 256MB. Also consider that you can't fill all this memory just with sprites of your application. Other applications will use parts of the
RAM for their data at the same time. Here is a list of iOS devices and their RAM (Memory): List of iOS devices.
But don't worry, you will learn below how sprite sheets can be created with a power-of-two size by combining several sprites so that less to no extra padding is added.
Also the standard RGBA8888 image format with 4 Byte per pixel can be an unnecessary waste of memory. By default, images are stored with 8 bit per color channel. This is 32 bits (= 4 Bytes) for red, green, blue and alpha.
With 32 bits you can represent 2^32 = 4,294,967,296 different colors, which you don't always need. Background images can be optimized very well by choosing a different format. They don't need the alpha channel because they are
always behind everything else. The color channels' bit depth can be reduced to e.g. 5 bits for red, 6 bits for green (more for green because the human eye is more accurate with green colors) and 5 bits for blue. Suddenly you
need only half of the memory you needed before. Furthermore, dithering randomizes the errors introduced by the reduction of the color depth and makes it less visible. This is
all supported by TexturePacker.
Fewer draw calls usually improve the performance. Draw calls are expensive because each draw call needs state changes. The CPU will wait for the GPU to finish its current draw command and set the new states. This disturbs
the pipelining in the GPU and causes a lot of idle time in the CPU. Additionally, transferring data, e.g. vertex data, to the graphics device is quite slow. In theory, there is a point where more draw calls with less data each
are better. Since we have mostly rectangles with 4 vertices each in a 2D-engine and hardly any other data this point cannot be reached in practice. In a nutshell, sprite sheets help that the game and the graphics device can
work better in parallel because of fewer interruptions.
Because several game objects share the same texture with a sprite sheet they can be displayed through one draw call. This doesn't work if the rectangles are overlapping because they must be blended in the correct order.
Fortunately, the Qt renderer puts as many non-overlapping items as possible in one draw call. This speeds up the rendering performance a lot, even in crowded scenes.
Workflow
You probably want to have different texture sizes for different screen resolutions. Creating the three different versions for sd, hd and hd2 of all images is an annoying and tedious task for the artists. Fortunately,
TexturePacker makes it easy and fast to export the sprite sheets with different scaling settings. Read the section about Automatic Content Scaling for more information.
Benefits of TexturePacker with Felgo over Qt 5
We made a quick performance test comparing our new TexturePackerAnimatedSprite component with the native Qt AnimatedSprite
component. In this test we added instances of them at random positions on the screen until the frame rate dropped below 30 frames per second. Here are the results:
| Device |
Number of AnimatedSprite at 30 FPS
|
Number of TexturePackerAnimatedSprite at 30 FPS
|
| Laptop (Intel i5-4210U, Nvidia GeForce 840M) |
7000 |
9500 |
| Laptop (Intel i5-4210U, Intel HD 4400) |
2000 |
2850 |
| Nexus 7 2012 |
124 |
224 |
| Huawei Ascend G300 |
80 |
160 |
As you can see here, the difference between the Qt and our sprite implementation is bigger on slower hardware. Felgo can show about 35% more sprites on high-end devices and 100% more on low-end mobile devices! If the
Qt renderer wouldn't use an own internal sprite sheet the differences would be even greater.
The Felgo implementation is also better in terms of memory consumption. The test program, compiled by MinGW in release mode, with 8000 of our sprites used 145 MB memory space. It used 185
MB with 8000 Qt sprites. So our sprite implementation needs about 25% less memory.
Internally, Qt automatically creates sprite sheets at runtime of normal Image components. While this is great if you have few images of small size, the Qt
solution has several disadvantages:
- If you have some bigger images (e.g. image sizes >1024), the maximum texture size of your device can quickly be reached. If the maximum texture size is reached (in most devices this is 4096x4096), each additional Image
that is drawn is not packed into a sprite sheet any more and you get bad performance because each image is drawn with an additional draw call.
- While normal Image elements get packed into sprite sheets automatically up until the texture size limit is reached, this is not the case with Sprite and SpriteSequence components! This means, you have one draw call for each animated sprite you use in your application and thus is a performance bottleneck!
- Changing the z values and opacity of objects within the same sprite sheet is possible. However, as you cannot change which image is packed into the auto-generated sprite sheet by Qt, you can run into z fighting issues.
The explicit approach with custom sprite sheets generated with TexturePacker and Felgo solves this issue.
The Felgo solution solves all of the above Qt issues. Thus we recommend using a custom sprite sheet created with TexturePacker over the Image and Sprite solutions of Qt.
However, when beginning to prototype a game, using the QML Image element and SpriteSequence or AnimatedSprite is perfectly fine. For the best performance in published games though, switch to the TexturePacker components by
Felgo.
TexturePacker
You can get TexturePacker from here.
TexturePacker is an extremely powerful, easily accessible and well-designed tool. It supports all required features and can export to arbitrary resolutions, which makes
it a great fit to export the sd, hd and hd2 textures based from your high-res versions. The best thing is, it is written with Qt so it is available for all desktop platforms!
Output Files
The advantage of texture packing tools is that you can automatically put all your images into a single texture. At exporting, you can then change the resolution of the image for the 3 main resolutions sd, hd and hd2 (see the
How to create mobile games for different screen sizes and resolutions guide for more information). So you can work with a single version of your graphics in highest resolution,
and scale them down in no time.
TexturePacker generates 2 kind of files:
-
Packed sprite sheet image: You can try to put all your images and animations into one texture. You are only limited to the maximum texture size of mobile devices. Textures of up to 2048x2048 are supported on most
devices. On higher-end devices, 4096x4096 and even bigger texture sizes are supported as well. To support a wide range of devices, it is advisable to limit the maximum texture size to 2048x2048. Split up the file into
different sprite sheets if it gets bigger than that. Try to keep images in one texture if they are visible on the same screen. Otherwise, rendering needs more draw calls and can't use the advantages of the sprite sheet. You
could, for example, create a sprite sheet for every level, because no 2 levels will be shown simultaneously.
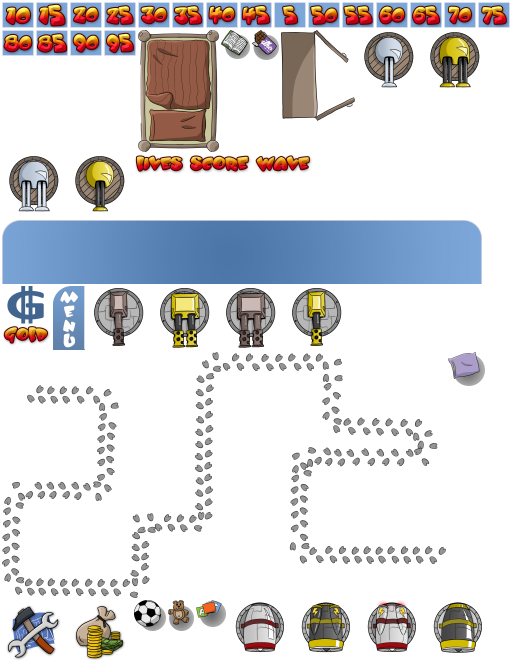
The packed sprite sheet of the Squaby Demo for example looks like this:
-
JSON file: This file contains the information about the single frames. The images are accessible with their names. The property "frame" contains its position and size within the texture. The property
"spriteSourceSize" contains the position and size of the frame within the original image. It may have an offset and a smaller size if the frame is trimmed. When the frame is rotated the width and height in the "frame" and
"spriteSourceSize" are swapped. The property "sourceSize" says how big the original image was. The "image" property of the "meta" object says, which image file the corresponding sprite sheet is. The "size" property of the
"meta" object gives the size of that sprite sheet. An example of the JSON file contents for the example above looks like this:
{"frames": {
"10.png":
{
"frame": {"x":2,"y":2,"w":32,"h":26},
"rotated": false,
"trimmed": false,
"spriteSourceSize": {"x":0,"y":0,"w":32,"h":26},
"sourceSize": {"w":32,"h":26}
},
"15.png":
{
"frame": {"x":36,"y":2,"w":32,"h":26},
"rotated": false,
"trimmed": false,
"spriteSourceSize": {"x":0,"y":0,"w":32,"h":26},
"sourceSize": {"w":32,"h":26}
},
...
...
}},
"meta": {
"app": "http://www.texturepacker.com",
"version": "1.0",
"image": "squaby.png",
"format": "RGBA8888",
"size": {"w":128,"h":256},
"scale": "0.25",
"smartupdate": "$TexturePacker:SmartUpdate:e5683c69753f891cee5b8fcf8d21cf93$"
}
}
}
Usage Example
Let's take a look at this great tool and let's use it to create a little project.
We are using some sprites of the Felgo game Squaby for this guide. You can download the resources here: resources

In the TexturePacker GUI, click Add smart folder, navigate to our Felgo project, and add the texturepacker-resources folder or simply drag and drop
your raw assets folder into the window.
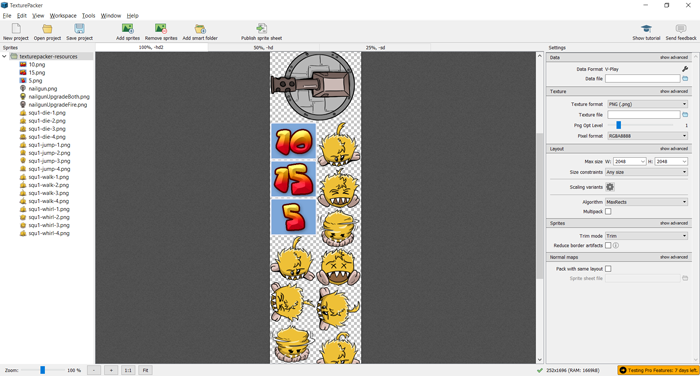
Now you can see all the sprites from that folder on the left hand side. If you change anything within the folder, TexturePacker will automatically pick up all the
changes. It's also possible to arrange your sprites in subfolders and refer to them with their relative path later, or even add multiple folders to the same sprite sheet - this can be handy for larger games where you have the
same items on multiple sprite sheets/levels.
Below that, in the bottom right corner, is the size of your sprite sheet and the amount of memory it will use in the RAM.
In the center you can see how TexturePacker arranges all the sprites in a optimized way, representing your resulting sprite sheet.
We will take a closer look at some of the most important options on the right hand side.
- Data Format: This provides you the ability to select the format for your data files to match your game framework. If you don't find Felgo in the list, you can also select JSON (HASH).
- Texture Format: This specifies the graphics file format desired for the sprite sheet. We will use PNG (.png).
-
Image Format: This specifies the pixel format to use in the texture file. It affects the number of Bytes used for each pixel of the sprite sheet.
Like I mentioned above, the standard format would be RGBA8888 with 4 Bytes per pixel (Red, Green, Blue and Alpha for transparency). With this setting our sprite sheet will use 2048KB of memory, as you can see in
the bottom right of the TexturePacker GUI. If we change it to RGB4444, we discard half of the color information, ending up with half the memory used, which is a
huge improvement. Go ahead and try it out!
Saving 1MB didn't convince you about this features strength? Then we will do the math again with a hd2 texture. 2048 * 2048 * 4 Bytes results in 16MB (!) of memory needed in the RAM for just one texture. So with
RGB4444 we can save 8MB (!!!) with each texture. HUUUUGE!
Of course, half the color can also cause problems, especially with gradients. This is where TexturePacker's killer feature Dithering comes into play.
-
Dithering: Dithering is an intentionally applied form of noise to approximate the colors of the original image, e.g. to make gradients look smoother at lower quality. If you change the image format from RGB8888 to
RGB4444 you take away half of the colors from the sprite, dithering will try to compensate those missing colors. To demonstrate it in an extreme case, look at the following picture:
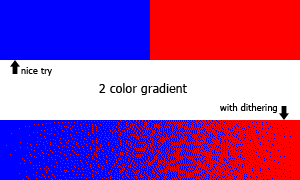
Try out the different dithering options and take a close look at the sprites. While the towers and Squabies still look very good, the digit sprites (5, 10, 15) are designed so gradient heavy (especially with the shadow)
that even with dithering we are not fully satisfied with the outcome.
In this case the best way would probably be splitting the sprite sheets into one with gradient heavy sprites and one with the others, and chose different image formats for each of them. Of course it always depends on the
number of sprites you have, if the memory win is worth the trade-off from having more sprite sheets.
In this tutorial we will just stick to RGBA8888 so we can go on, make sure you changed the image format back to it.
-
AutoSD: With this great feature you save the time to create different sized images for different display resolutions. TexturePacker will do the work for you and
add suffixes that Felgo then uses to select the appropriate file on each device.
You simply create your images for the highest resolution and let TexturePacker scale them down for lower resolutions. Regarding this, I highly recommend reading
How to create mobile games for different screen sizes and resolutions if you haven't done so already.
This will be the different resolutions of your scene on different devices (while the logical size of your scene stays 480x320 to not affect the game logic):
- sd - 480x320
- hd - 960x640
- hd2 - 1920x1280
This means, the common work-flow would be:
- design your sprites for a resolution of 1920x1280
- let TexturePacker scale them down for you
- so much time saved, you could take a nap now :)
In the scaling variants menu, enter the settings like in the picture below and click apply.

And what's the thought behind saving the same images 3 times in different sizes? Again, saving RAM is the answer. On lower resolution devices you don't need huge hd2 sprites, so Felgo uses the smaller ones instead, to
save memory.
-
Allow Rotation: This option allows TexturePacker to rotate sprites in order to use the space in the sprite sheet even more effectively. Not every framework
supports this, because those images must be automatically de-rotated by the framework when using them. This does not work if you want to interpolate
between frames.
Felgo DOES support it, so make sure it's activated!
-
Trim: This removes unused transparent space around your sprites to pack them into the sprite sheets even more efficiently. They will be added again when reading the sprite from the sprite sheet. It's enabled by
default, which is perfectly fine. If you use the smooth feature make sure to have at least 1 pixel of padding around the single frames. Otherwise, the linear
interpolation will cause the border pixels of one frame "bleed" into another frame's border pixels.
If you want to find out more about any of the options, just hover your mouse above them and read the tool-tips.
Just one more thing to add regarding image formats. RGB565 saves some of the color information and completely discards the alpha information, which makes it perfect to reduce the size of background images. This is
also used internally in Felgo when you use the BackgroundImage component.
Fine, we covered the most important options for our tutorial, and are nearly ready to publish our sprite sheet, we are just missing a name for our data file and the texture file.
Click the button with (...) next to Data File, locate the assets/img folder within your Felgo project and save the file as {v}squaby.json. The "{v}" is a placeholder for the scaling subfolders like "+hd"
and "+hd2". The path should now be something like ".../squaby/assets/img/{v}squaby.json". TexturePacker will automatically fill in the Texture File name for you.
Now click Publish sprite sheet and all your sprite sheets for the different resolutions are created.
You can also save this settings as a *.tps file by clicking Save project.
Automatic Content Scaling
TexturePackerAnimatedSprite, TexturePackerSpriteSequence and TexturePackerSprite support content scaling like the MultiResolutionImage component. This allows you to create the game only once for a
logical scene size and automatically resize the images based on the screen.
To use content scaling together with the TexturePacker components, export 3 different versions of your high-res graphics: The high-res hd2 version with a scene
resolution of 1920x1280, the hd version with 960x640 and the sd version with 480x320. Just modify the Scale setting in TexturePacker. When your images are made for
the hd2 resolution, export it with scale = 1 for the hd2 texture, with scale = 0.5 for the hd texture and with scale = 0.25 for the sd texture. The setting is displayed in the following image. TexturePacker also creates the corresponding JSON file.
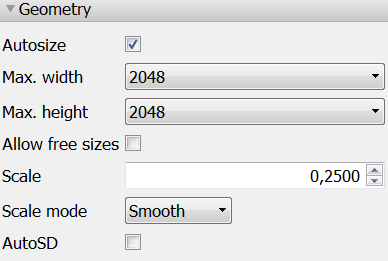
The Scale is set to 0.25 for exporting the sd image and json file.
Place the image and JSON files in the correct directories like in this example:
- ...[project folder]/assets/img/ (place files for scale = 0.25 here)
- squaby.png
- squaby.json
- +hd/ (place files for scale = 0.5 here)
- +hd2/ (place files for scale = 1 here)
Use Sprite Sheets with Felgo
If you thought this simple tutorial will finally become super tricky now, I have to disappoint you - more simple stuff is about to come. :)
Jump into our main.qml, and delete most of it to look like this
import Felgo 3.0
import QtQuick 2.0
GameWindow {
Scene {
}
}
Now we got a GameWindow with an empty Scene where we will place our sprites next.
Static Image
Let's add a single sprite to our Scene
import Felgo 3.0
import QtQuick 2.0
GameWindow {
Scene {
TexturePackerAnimatedSprite {
id: nailgunSprite
source: "../assets/img/squaby.json"
frameNames: ["nailgun.png"]
x: 100
y: 100
}
}
}
All we needed is the TexturePackerAnimatedSprite component and set the name of the sprite as the TexturePackerAnimatedSprite::frameNames and the path to the json file to TexturePackerAnimatedSprite::source. As you can see, the name of the sprite in the sprite sheet is exactly the same as it was as a single sprite.
Did you notice the plural of "frameNames" and its usage as list? Although the TexturePackerAnimatedSprite is mainly for sprite animations it can also be used for static
images. It does only update its graphics if necessary and has therefore a good performance. Keep in mind that the frameNames property is actually a list of strings.
Additionally we added an id and moved the sprite to the defined x/y coordinates.
If you run the project, you can see our nail gun sprite, pretty easy.
Let's modify this sprite at runtime. If you already played Squaby, you know that the towers can be upgraded. With every upgrade, the nailgun will look different. We will quickly
simulate this behavior.
Add this after your sprite:
MouseArea {
anchors.fill: nailgunSprite
onClicked: {
if(nailgunSprite.frameNames[0] === "nailgun.png") {
nailgunSprite.frameNames = ["nailgunUpgradeFire.png"];
}
else if(nailgunSprite.frameNames[0] === "nailgunUpgradeFire.png") {
nailgunSprite.frameNames = ["nailgunUpgradeBoth.png"];
}
else{
nailgunSprite.frameNames = ["nailgun.png"];
}
}
}
This is the reason we gave the sprite an id; so we can access its properties with the id. What we are doing here is changing the frameNames of the sprite with each click on it. The sprite
automatically gets redrawn if its frameNames have been changed.
Run the project and try it out!
Sprite Animation
This looks too static for your taste? You want some animations? No problem sir, your wish is my command:
 import Felgo 3.0
 import QtQuick 2.0

 GameWindow {
   Scene {
     TexturePackerAnimatedSprite {
       id: squabySprite
       source: "../assets/img/squaby.json"
       frameNames: ["squ1-walk-1.png", "squ1-walk-2.png", "squ1-walk-3.png", "squ1-walk-4.png"]
       interpolate: false
       anchors.centerIn: parent
       frameRate: 3
     }
   }
 }
We just added a walking Squaby, quite similar to the static sprite. We added the TexturePackerAnimatedSprite component, set the path to our json file to the
filename. Additionally we added an id and centered the sprite sequence in our scene.
If you run the project you can admire that cute little walking Squaby. But everyone knows, this little monsters do not only walk around, they jump and scare the sh** out of us!
Sprite Sequence
This time we use a TexturePackerSpriteSequence with multiple TexturePackerSprite children to control several animations at
once.
Each of these TexturePackerSprite describes an animation. For example, the animation has the name "walk", and it runs at 20 frames per second. All the sprites used for this
animation are set to frameNames in the correct order.
Although I'm already totally frightened of what's about to come, replace our sprite animation with this:
import Felgo 3.0
import QtQuick 2.0
GameWindow {
Scene {
TexturePackerSpriteSequence {
id: squabySprite
anchors.centerIn: parent
TexturePackerSprite {
name: "walk"
source: "../assets/img/squaby.json"
frameNames: ["squ1-walk-1.png", "squ1-walk-2.png", "squ1-walk-3.png", "squ1-walk-4.png"]
frameRate: 3
}
TexturePackerSprite {
name: "jump"
source: "../assets/img/squaby.json"
frameNames: ["squ1-jump-1.png", "squ1-jump-2.png", "squ1-jump-3.png", "squ1-jump-4.png"]
to: {"jump": 1, "walk": 3}
frameRate: 3
}
MouseArea {
anchors.fill: squabySprite
onClicked: {
squabySprite.jumpTo("jump")
}
}
}
}
}
By clicking you can switch to the "jump" animation. When one cycle ends it has a 75% chance switch to the "jump" animation and a 25% chance to play "jump" again.
Now we only need to tell the Squaby to stop running and jump instead. This is done in our MouseArea below the sprite sequence. If we click the Squaby, we use
the TexturePackerSpriteSequence::jumpTo() function to change the animation.
Take a deep breath, fasten your seatbelt and then run your project to try it out!
What? That didn't scare you? I guess that means you are pretty damn tough! Compared to you I'm a total wreck right now, so let's stop here with this lesson.
If you have any questions regarding this tutorial, don't hesitate to visit the support forums.
Visit Felgo Games Examples and Demos to gain more information about game creation with Felgo and to see the source code of existing apps in the app stores.


