Introduction
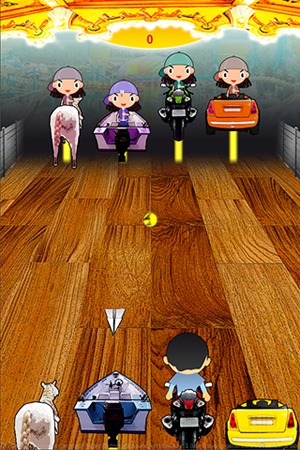
The idea behind Crazy Carousel is a mini-game with the goal to collect as many coins as possible while avoiding to get hit by paper planes. These planes are thrown at you from the top of the screen. You can collect the coins
or avoid the paper planes by jumping from one carousel ride to another by swiping to the left or the right.
This tutorial will cover the setup of multiple game scenes, how to support different screen sizes and aspect ratios, different forms of moving the entities and the basic mechanics for the game like handling user input or
collision detection.
If you are not yet familiar with the basic setup of projects, QML, how to create your own entities, the usage of components like PhysicsWorld and Timer or the dynamic creation of entities with the EntityManager please consider taking a look at the following tutorials to help you
get started:
We also provide the full source code of Crazy Carousel made with Felgo in the Felgo SDK. See here where to find the demo in your SDK directory.
For an overview of the game features, see Crazy Carousel Game.
Resources
All the resources for the game will be placed within the assets directory of the project. You can download them here.
Setting Up the Project
To get you started we first need to create a new empty project in QtCreator. Please don't forget to set the interface orientation to portrait mode when configuring the project properties. When you're done, place the
downloaded game resources in the assets folder of your project. You should be able to see them at Other files\assets in the project tree. Please do not place the downloaded resources in a subdirectory, which might
be created when you unpack the archive. Now we're ready to go!
Creating the Scenes
We will now start to create the basic Scene structure of our game. Scenes in Felgo are a great way to implement a game that should allow switching between different game screens like the menu
screen, the actual game and a game-over screen. Our game will have three scenes:
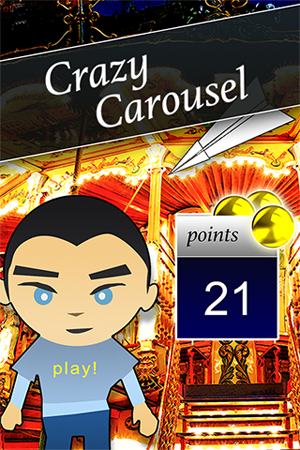
- The TitleScene will be shown at the beginning of the game and displays the startup image of the game.
- The GameScene contains the game with all the game entities and logic needed. This scene will be the most complex scene in the game.
- When the player is hit by a paper plane, the GameOverScene will be shown and the points are displayed.
Before implementing the scenes it is common to start with a base component for all scenes. Just create a new folder common within the qml directory of the project and add a file
SceneBase.qml:
qml/common/SceneBase.qml:
import Felgo 4.0
import QtQuick 2.0
Scene {
id: sceneBase
opacity: 0
visible: opacity > 0
enabled: visible
}
By using this component as the base for all scenes, they will be invisible by default. We can show a specific scene by setting its opacity to 1. In addition, by binding the property visible to opacity >
0 the renderer will automatically skip invisible scenes. Each time the opacity is changed the value for the property visible will be calculated automatically due to property binding.
We can now implement our three scenes. They will be placed in a new subdirectory qml/scenes that you should create now. Let's start with the title scene by implementing the file TitleScene.qml in
your qml/scenes folder:
qml/scenes/TitleScene.qml:
import Felgo 4.0
import QtQuick 2.0
import "../common"
SceneBase {
id:titleScene
width: 320
height: 480
property alias backgroundImage: background
MultiResolutionImage {
id: background
anchors.centerIn: titleScene.gameWindowAnchorItem
source: "../../assets/CarouselTitle.jpg"
}
}
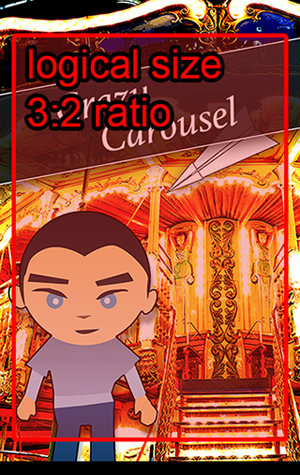
We first have to import ../common to make use of our previously defined SceneBase. We set the size of the scene to 320x480px, which is the screen resolution of small devices like the iPhone 3GS. Every content we
place within the scene will be automatically scaled up proportionally on devices with a higher resolution. As we want the game to be playable on all devices, we should use a logical scene size of 320x480px for all our scenes,
which represents a fixed aspect ratio of 3:2 for the main game area. The background image of the scene is actually bigger than the basic 320x480px and uses a different aspect ratio. On devices with bigger screens, more of the
background image is shown to avoid dark borders - even though the main game area has always a 3:2 ratio.
Note: The content scaling as described above refers to the default scaling mode of Felgo. You may also use other scaling modes for your own games, check the tutorial about scaling
modes and support of multiple screen sizes.
The recommended background image size for a 320x480px game scene is 360x570px to cover the screen for every possible aspect ratio. As you might know, it is common to use higher resolution images on more modern devices with
higher pixel densities. Luckily, the MultiResolutionImage we just added already takes care of the automatic image swapping. The used background image
assets/CarouselTitle.jpg actually refers to the image with the lowest quality. The subfolders assets/+hd and assets/+hd2 contain images double and quadruple the original size. It is common
practice to create images in the best quality (+hd2) and scale them down for the lower resolution versions.
Now let us move on to creating the remaining scenes! The game-over scene is very similar to the title scene, we just need to set a different background image - so we can use the title scene as the base this time:
qml/scenes/GameOverScene.qml:
import Felgo 4.0
import QtQuick 2.0
TitleScene {
id: gameOverScene
backgroundImage.source: "../../assets/CarouselGameOver.jpg"
}
We can easily overwrite the source of the previous background image by using the property alias that we added to the title scene before. That's all we need to do for now. Up next is the game scene, which will be the most
complex scene in our game.
qml/scenes/GameScene.qml
import Felgo 4.0
import QtQuick 2.0
import "../common"
SceneBase {
id:gameScene
width: 320
height: 480
MultiResolutionImage {
anchors.centerIn: gameScene.gameWindowAnchorItem
source: "../../assets/CarouselBackground.jpg"
}
BackgroundMusic {
id: backgroundMusic
source: "../../assets/sound/Carousel.mp3"
}
property int points: 0
function startNewGame() {
gameScene.points = 0
}
}
The scene already contains a few additional elements. We added the background music, a property for counting points and a function to reset the game properties back to their default values when a new game is started. Before
we can check out what we achieved so far, we need to add the scenes to our Main.qml file to display them. Also we added a state machine to display the correct scene depending on the value of the state property of our GameWindow. Note that we are switching the scenes only by changing their opacity, they don't actually get unloaded. Just replace the default code of the Main.qml file with the following
implementation:
qml/Main.qml:
import Felgo 4.0
import QtQuick 2.0
import "scenes"
GameWindow {
id: gameWindow
screenWidth: 640
screenHeight: 960
EntityManager {
id: entityManager
entityContainer: gameScene
}
TitleScene {
id: titleScene
onBackButtonPressed: {
NativeUtils.displayMessageBox("Really quit the game?", "", 2)
}
Connections {
target: NativeUtils
onMessageBoxFinished: {
if(accepted && gameWindow.activeScene === titleScene)
Qt.quit()
}
}
}
GameScene {
id: gameScene
onBackButtonPressed: {
gameWindow.state = "title"
}
}
GameOverScene {
id: gameOverScene
onBackButtonPressed: {
NativeUtils.displayMessageBox("Really quit the game?", "", 2)
}
Connections {
target: NativeUtils
onMessageBoxFinished: {
if(accepted && gameWindow.activeScene === gameOverScene)
Qt.quit()
}
}
}
state: "title"
states: [
State {
name: "title"
PropertyChanges {target: titleScene; opacity: 1}
PropertyChanges {target: gameWindow; activeScene: titleScene}
},
State {
name: "game"
PropertyChanges {target: gameScene; opacity: 1}
PropertyChanges {target: gameWindow; activeScene: gameScene}
},
State {
name: "gameover"
PropertyChanges {target: gameOverScene; opacity: 1}
PropertyChanges {target: gameWindow; activeScene: gameOverScene}
}
]
}
When you start the game at this point, you will already see the title scene since we set the initial value of the state property to “title”. We also hear the background music of the invisible game scene, because by default
the BackgroundMusic component starts playing automatically. This is ok for us as the music can be played all the time. If we don't want it to play during some scenes, we would have to
start and stop it manually when switching scenes.
Another scene can now be loaded just by changing the state property of the GameWindow. Let's add a play button and start a new game when clicking it by using a MouseArea. We also play a click sound using the GameSoundEffect component and implement a simple button effect by adding a
Timer to alternate the colors of the button between black and yellow.
qml/scenes/TitleScene.qml:
import Felgo 4.0
import QtQuick 2.0
import "../common"
SceneBase {
Text {
id: text
text: "play!"
color: "black"
x: 60
y: 380
z: 1
font.pixelSize: 20
font.family: "Arial"
MouseArea {
width: parent.width
height: parent.height
onClicked: {
clickSound.play()
gameScene.startNewGame()
gameWindow.state = "game"
}
}
}
Timer {
id: colorTimer
interval: 1000
repeat: true
running: true
onTriggered: {
if(text.color == "#000000")
text.color = "yellow"
else
text.color = "black"
}
}
GameSoundEffect {
id: clickSound
source: "../../assets/sound/Click.wav"
}
}
We are now able to easily switch scenes. To learn more about scenes you can check out the tutorial on how to create a game with multiple scenes and levels.
Enemies
Before we create any new entities, please take a look at the following picture to get the general idea of how the game screen is going to be composed in terms of entities:
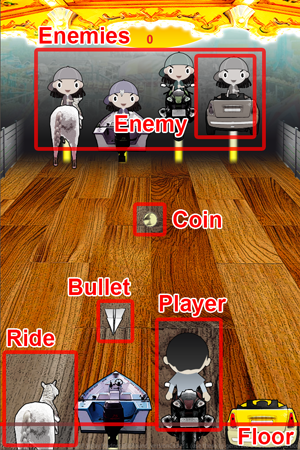
The player is going to jump between rides (horse, boat, bike, car) to avoid dynamically created bullets and coins. The bullets and coins start at the height of the enemies and either hit the player or the invisible floor.
Each enemy is described using an Enemy entity and all of them are then grouped within a single Enemies entity. So let's add the enemies to our game scene. They will be moving up and down like on a real carousel! First we have
to create a new directory qml/entities for our own entities and then add a new file Enemy.qml. Here's the generic code for the enemies:
qml/entities/Enemy.qml:
import QtQuick 2.0
import Felgo 4.0
EntityBase {
id: enemy
entityType: "enemy"
property alias image: image
property double speed: 10
MultiResolutionImage {
id: image
width: parent.width
height: parent.height
}
MovementAnimation {
id: upDownMovement
target: enemy
property: "y"
velocity: -enemy.speed
running: true
minPropertyValue: -(Math.random() * 10 + 5)
maxPropertyValue: Math.random() * 10 + 5
onLimitReached: {
if(upDownMovement.velocity > 0)
upDownMovement.velocity = -enemy.speed;
else
upDownMovement.velocity = enemy.speed;
}
}
}
Each enemy is displayed as an image. By using the MultiResolutionImage component we get an automatic image swapping mechanism for the correct image quality. The MovementAnimation component allows us to animate the y-position of the enemy constantly by a fixed velocity and is set to start the animation automatically. When reaching a limit of the
y-position the movement velocity is reversed, thus creating an alternating up- and down-movement. As we want to set different images for each enemy entity, we use a property alias for the image object to allow setting it from
the outside.
We then create the Enemies entity, that contains four Enemy objects.
qml/entities/Enemies.qml:
 import QtQuick 2.0
 import Felgo 4.0

 EntityBase {
    id: enemies
    entityType: "enemies"

    Enemy {
        id: enemy1
        width: 95.5; height: 112
        image.source: "../../assets/enemy1.png"
    }

    Enemy {
        id: enemy2
        x: 95.5
        width: 69.5; height: 112
        image.source: "../../assets/enemy2.png"
    }

    Enemy {
        id: enemy3
        x: 165
        width: 49.5; height: 112
        image.source: "../../assets/enemy3.png"
    }

    Enemy {
        id: enemy4
        x: 214.5
        width: 105.5; height: 112
        image.source: "../../assets/enemy4.png"
    }
 }
The Enemies entity now contains all four enemies with their different images and their correct positions from left to right. All that's left is to add the enemies to our game scene.
qml/scenes/GameScene.qml:
import Felgo 4.0
import QtQuick 2.0
import "../common"
import "../entities"
SceneBase {
id:gameScene
Enemies { id: enemies; y: 61 }
}
After we use the import command to load our entities we can simply place all of them in our scene at once. Press play and watch our enemies moving up and down on the carousel! Looks pretty cool!
Player - Let's Move
Next up is our player entity, but we will keep it simple for the beginning and add the complex movement animations later.
qml/entities/Player.qml:
import QtQuick 2.0
import Felgo 4.0
EntityBase {
id: player
entityType: "player"
width: 65
height: 96
MultiResolutionImage {
id: image
width: parent.width
height: parent.height
x: -width / 2
y: -height / 2
source: "../../assets/player.png"
}
BoxCollider {
id: boxCollider
width: 25
height: 50
anchors.centerIn: image
collisionTestingOnlyMode:
            true
}
}
In addition to the image for the player, we also add a BoxCollider to be able to check collisions with coins or bullets later. Please note that we set collisionTestingOnlyMode:
true in order to prevent the player from any movement based on gravity and physics calculations, as it is easier for us to move the player explicitly from one ride to another by defining the movement using a fixed
MovementAnimation.
We will use two separate MovementAnimations for the player, one for the jump (y-position) and one for switching between lines (x-position).
qml/entities/Player.qml:
EntityBase {
id: player
entityType: "player"
width: 65
height: 96
property bool isMoving: false
property string nextMove: ""
MovementAnimation {
id: switchMovement
target: player
property: "x"
}
MovementAnimation {
id: jumpMovement
target: player
property: "y"
minPropertyValue: 0
maxPropertyValue: gameScene.playerY
onLimitReached: {
isMoving = false
image.source = "../../assets/player.png"
if(nextMove !== "") {
if(nextMove === "right")
moveRight()
else
moveLeft()
}
}
}
function moveLeft() {
if(player.x - gameScene.laneWidth < 0)
return
if(!isMoving) {
var distance = gameScene.laneWidth
switchMovement.velocity = -distance * 4.5
switchMovement.minPropertyValue = player.x - distance
switchMovement.maxPropertyValue = gameScene.width
isMoving = true
nextMove=""
switchMovement.start()
jump()
}
else {
nextMove = "left"
}
}
function moveRight() {
if(player.x + gameScene.laneWidth > gameScene.width)
return
if(!isMoving) {
var distance = gameScene.laneWidth
switchMovement.velocity = distance * 4.5
switchMovement.minPropertyValue = 0
switchMovement.maxPropertyValue = player.x + distance
isMoving = true
nextMove = ""
switchMovement.start()
jump()
}
else {
nextMove = "right"
}
}
function jump() {
jumpMovement.velocity = -500
jumpMovement.acceleration = 3000
jumpMovement.start()
jumpSound.stop()
jumpSound.play()
image.source = "../../assets/player_jump.png"
}
function stopMovement() {
jumpMovement.stop()
switchMovement.stop()
isMoving = false
nextMove = ""
}
GameSoundEffect {
id: jumpSound
source: "../../assets/sound/Jump.wav"
}
}
That's already a lot of code, but I'm sure you will get it after we take a closer look. Our Player entity now provides two important functions: The moveRight()-function will be called when the user wants to jump
to the right, the moveLeft()-function handles jumping to the left. Each of these two functions won't work if the player is already at the end of the screen (the last or first ride). Before initiating any movement
the property isMoving is checked, because we don't want the player to jump again while already in the air. But for the players convenience, we will memorize the intended move to execute it after we landed again.
The switchMovement allows animating the x-position of the player and is configured to automatically stop once the desired position is reached. This is done by setting the limits of the movement. For moving to
the left or moving to the right different limits are set for the movement. We must also set the velocity property to define the direction and speed of the movement. The functions then start the switchMovement and
additionally call the jump()-function to make the player jump.
When jumping, we also play the jump sound using the GameSoundEffect component and simply swap the player image to a jump image. For the jumpMovement animation the event
handler onLimitReached is used to perform actions after the player landed again. This includes changing the player image back from jumping to standing and triggering a second jump if we memorized one during the
last jump.
Alright, then let's add the player to our scene:
qml/scenes/GameScene.qml:
import Felgo 4.0
import QtQuick 2.0
import "../common"
import "../entities"
SceneBase {
id:gameScene
property int lanes: 4
property double laneWidth: gameScene.width / gameScene.lanes
property int startLane: 0
property double playerY: 400
function startNewGame() {
gameScene.points = 0
player.stopMovement()
gameScene.startLane = Math.random() * gameScene.lanes + 1
player.x = (gameScene.startLane * gameScene.laneWidth) - (gameScene.laneWidth / 2)
player.y = gameScene.playerY
}
Player {
id: player
z: 10
x: (gameScene.startLane * gameScene.laneWidth) - (gameScene.laneWidth / 2)
y: gameScene.playerY
}
Enemies { id: enemies; y: 61 }
}
We define a few properties to set up our game layout, like the number of lanes (number of available rides), the width in pixels of each lane and the default y-Position of the player. These parameters are used to calculate
the distance for the players switch-movement or to determine the landing point (limit) of the jump-movement. We also calculate a random starting point for the player each time a new game is started. If you start the game, you
can already see the player at a random position, but it is a bit boring if we can't jump to other rides, so let's check the user input.
qml/scenes/GameScene.qml
SceneBase {
id:gameScene
MouseArea {
anchors.fill: gameScene.gameWindowAnchorItem
property bool touch: false
property int firstX: 0
onPressed: {
if(touch == false)
firstX = mouseX
touch = true
}
onReleased: {
if(touch == true)
checkSwipe(15)
touch = false
}
onPositionChanged: {
if(touch)
checkSwipe(50)
}
function checkSwipe(minDistance) {
var distance = mouseX - firstX
if(Math.abs(distance) > minDistance) {
if(distance > 0)
player.moveRight()
else
player.moveLeft()
touch = false
}
}
}
}
We check for swipes whenever the user touches the screen (presses the mouse). When moving 50 pixels without releasing the mouse we already recognize a swipe - even if the player is still touching the screen. In addition,
when the mouse is released we check for a swipe using a minimum swipe distance of 15 pixels. Based on the swipe direction the according movement functions of the player entity are called. Hit play and enjoy our main character
jumping around!
Bullets and Coins - Make Them Fall!
So let's add bullets and coins that move from the enemies toward the player area. The structure of both entities is nearly the same, each consisting of an image, a sound effect, and a collider for collision detection.
qml/entities/Bullet.qml:
import QtQuick 2.0
import Felgo 4.0
EntityBase {
id: bullet
entityType: "bullet"
width: 32
height: 37
MultiResolutionImage {
id: image
width: parent.width
height: parent.height
x: -width / 2
y: -height / 2
source: "../../assets/bullet.png"
}
BoxCollider {
id: boxCollider
width: 15
height: 15
anchors.centerIn: image
collisionTestingOnlyMode: true
fixture.onBeginContact: {
var collidedEntity = other.getBody().target
var collidedEntityType = collidedEntity.entityType
if(collidedEntityType === "floor") {
bulletSound.play()
parent.visible = false
}
else {
gameScene.logic.gameOver()
entityManager.removeEntityById(parent.entityId)
}
}
}
GameSoundEffect {
id: bulletSound
source: "../../assets/sound/Bullet.wav"
onPlayingChanged: {
if(bulletSound.playing === false) {
entityManager.removeEntityById(parent.entityId)
}
}
}
}
qml/entities/Coin.qml:
import QtQuick 2.0
import Felgo 4.0
EntityBase {
id: coin
entityType: "coin"
width: 32
height: 33
MultiResolutionImage {
id: image
width: parent.width
height: parent.height
x: -width / 2
y: -height / 2
source: "../../assets/coin.png"
}
BoxCollider {
id: boxCollider
width: 20
height: 20
anchors.centerIn: image
collisionTestingOnlyMode: true
fixture.onBeginContact: {
var collidedEntity = other.getBody().target
var collidedEntityType = collidedEntity.entityType
if(collidedEntityType === "player") {
boxCollider.active = false
parent.visible = false
coinSound.play()
gameScene.logic.increasePoints()
}
else {
entityManager.removeEntityById(parent.entityId)
}
}
}
GameSoundEffect {
id: coinSound
source: "../../assets/sound/Coin.wav"
onPlayingChanged: {
if(coinSound.playing === false) {
entityManager.removeEntityById(parent.entityId)
}
}
}
}
When a collision is detected, we remove the entity from the game and call an appropriate handler function if necessary. We will provide these handler functions within a designated entity for our game logic. By calling
gameScene.logic.increasePoints() or gameScene.logic.gameOver() we can react to the player collecting a coin or getting hit by a paper plane. Note that in case a sound effect is played, the entity is
removed after the sound has finished playing. This is handled by implementing the onPlayingChanged handler of the GameSoundEffect component.
The movement of the bullets and coins in our game is a bit tricky, as we want them to move from the enemies to special target spots within the player area. They should move along the lanes of the carousel. We also need them
to get bigger when moving to their target points to make it look like they are coming closer. We can achieve this by adding the following lines to both of our entities.
qml/entities/Bullet.qml:
EntityBase {
property double goalX: 0
property double startX: 0
property double startY: 0
property double speed: 3000
scale: 0.2
ParallelAnimation {
running: true
NumberAnimation {
target: bullet
property: "x"
from: startX
to: goalX
duration: speed
easing.type: Easing.InCubic
}
NumberAnimation {
target: bullet
property: "y"
from: startY
to: gameScene.gameWindowAnchorItem.height
duration: speed
easing.type: Easing.InCubic
}
NumberAnimation {
target: bullet
property: "scale"
to: 1.0
duration: speed
easing.type: Easing.InCubic
}
}
}
qml/entities/Coin.qml:
EntityBase {
property double goalX: 0
property double startX: 0
property double startY: 0
property double speed: 3000
scale: 0.2
ParallelAnimation {
running: true
NumberAnimation {
target: coin
property: "x"
from: startX
to: goalX
duration: speed
easing.type: Easing.InCubic
}
NumberAnimation {
target: coin
property: "y"
from: startY
to: gameScene.gameWindowAnchorItem.height
duration: speed
easing.type: Easing.InCubic
}
NumberAnimation {
target: coin
property: "scale"
to: 0.9
duration: speed
easing.type: Easing.InCubic
}
}
}
We define some additional properties to be able to set the target point of the movement for each entity. Based on these properties the x-position, y-position and scale of the objects are continuously modified by a NumberAnimation, that allows changing a property from a start value to a goal within a set period of time. We also add easing.type: Easing.InCubic to
let the animation begin slow and speed up over time. The ParallelAnimation is used for combining multiple small animations, that will all be executed at
the same time whenever the ParallelAnimation is started.
To be able to dynamically add the entities to the game, we already defined the EntityManager in our Main.qml beforehand. So now we need to implement timers to add them during the game.
For handling the timers and their configuration we create a new Logic object.
qml/entities/Logic.qml:
import QtQuick 2.0
import Felgo 4.0
QtObject {
id: logic
property double speedUp: 1.0
property int minBulletTimeout: 1000
property int minCoinTimeout: 2000
property int bulletTimeout: 4000
property int coinTimeout: 2000
function increasePoints(coin) {
gameScene.points++
}
function gameOver() {
gameWindow.state = "gameover"
}
property Timer bulletTimer: Timer {
id: bulletTimer
interval : Math.random() * logic.bulletTimeout + logic.minBulletTimeout
running: gameScene.visible
onTriggered: {
var randomLane = Math.floor(Math.random() * 4 + 1)
var enemyWidth = gameScene.laneWidth * 0.74
var laneOffset = gameScene.width * 0.13
var xPosition = Math.round(laneOffset + (randomLane * enemyWidth) - (enemyWidth / 2))
var xGoal = randomLane * gameScene.laneWidth - (gameScene.laneWidth/2)
var newEntityProperties = {
x: xPosition,
y: 95,
z: 12,
goalX: xGoal,
startX: xPosition,
startY: 95,
speed: 3000
}
entityManager.createEntityFromUrlWithProperties(
Qt.resolvedUrl("Bullet.qml"),
newEntityProperties)
interval = Math.random() * logic.bulletTimeout + logic.minBulletTimeout
bulletTimer.restart()
}
}
property Timer coinTimer: Timer {
id: coinTimer
interval : Math.random() * logic.coinTimeout + logic.minCoinTimeout
running: gameScene.visible
onTriggered: {
var randomLane = Math.floor(Math.random() * 3 + 1)
var enemyWidth = gameScene.laneWidth * 0.74
var laneOffset = gameScene.width * 0.13
var xPosition = Math.round(laneOffset + (randomLane * enemyWidth))
var xGoal = randomLane * gameScene.laneWidth
var newEntityProperties = {
x: xPosition ,
y: 75,
z: 12,
goalX: xGoal,
startX: xPosition,
startY: 75,
speed: 3000
}
entityManager.createEntityFromUrlWithProperties(
Qt.resolvedUrl("Coin.qml"),
newEntityProperties)
interval = Math.random() * logic.coinTimeout + logic.minCoinTimeout
coinTimer.restart()
}
}
}
We base our logic object on QtObject instead of EntityBase so it won't be affected by operations like
entityManger.removeAllEntities(), which is what we expect to happen because the logic has no visual representation in our game scene. The timers for coins and bullets are nearly the same. They just use different
intervals and set different properties for positioning the entities. In addition to the x, y and z values for bullets and coins, the special properties goalX, startX, startY and speed are set to define the movement of entities.
We also have the previously mentioned functions for handling player collisions with coins or bullets, that increase player points or switch from the game scene to the game-over scene.
After the entities are added to the scene we want them to be removed if they reach the bottom of the screen. To achieve that, we need to create a simple invisible Floor entity that will be placed at the bottom of our game
window.
qml/entities/Floor.qml:
import QtQuick 2.0
import Felgo 4.0
EntityBase {
id: floor
entityType: "floor"
width: parent.width
height: 5
BoxCollider {
anchors.fill: parent
bodyType: Body.Static
}
}
Now let's add the logic entity to our GameScene, along with the Floor, the PhysicsWorld and a Text component to show the
points.
qml/scenes/GameScene.qml
SceneBase {
id:gameScene
property alias logic: logic
Logic {
id: logic
}
function startNewGame() {
gameScene.points = 0
gameScene.logic.speedUp = 1.0
gameScene.logic.bulletTimeout = 4000
gameScene.logic.coinTimeout = 2000
player.stopMovement()
gameScene.startLane = Math.random() * gameScene.lanes + 1
player.x = (gameScene.startLane * gameScene.laneWidth) - (gameScene.laneWidth / 2)
player.y = gameScene.playerY
}
PhysicsWorld {
gravity.y: 0
z: 5
updatesPerSecondForPhysics: 60
velocityIterations: 5
positionIterations: 5
debugDrawVisible: false
}
Text {
text: gameScene.points
color: "#e52222"
y: 36
z: 1
font.pixelSize: 12
font.family: "Arial"
font.weight: Font.Bold
width: gameScene.width
horizontalAlignment: Text.AlignHCenter
}
Floor {
z: 100
anchors.bottom: gameScene.gameWindowAnchorItem.bottom
}
}
Please don't forget to reset the logic configuration parameters within the startNewGame()-function. We will be able to slow down or speed up the bullets and player movement with the speedUp property
later in this tutorial. The floor is anchored at the bottom of the gameWindow and not the bottom of the scene, because we want the bullets to fly all the way to the bottom on every screen size.
One small thing that's still missing is to show the points in our game-over scene:
qml/scenes/GameOverScene.qml:
SceneBase {
id: gameOverScene
Text {
text: gameScene.points
color: "white"
x: 188
y: 300
z: 1
font.pixelSize: 34
font.family: "Arial"
width: 108
horizontalAlignment: Text.AlignHCenter
}
}
Let's hit play and see how it works!
Rides - Horse, Boat, Bike and Car
What is still missing? Right! The rides where the player has to sit or stand on! The modeling of the rides is a bit tricky and best described using an image, please take a look:
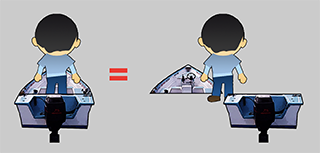
Each ride consists of two images, one for the front and one for the backside. The player is then positioned between the front and back by setting the appropriate z-position values for all the entities. If correctly
positioned above one another it should look like the player is standing or sitting on the ride! So let's start with the front side of the rides.
qml/entities/RideFront.qml:
import QtQuick 2.0
import Felgo 4.0
EntityBase {
id: rideFront
entityType: "rideFront"
z: 9
property alias image: image
property alias minY: upDownMovement.minPropertyValue
property alias maxY: upDownMovement.maxPropertyValue
property alias velocity: upDownMovement.velocity
property double speed: 10
MultiResolutionImage {
id: image
width: parent.width
height: parent.height
}
MovementAnimation {
id: upDownMovement
target: rideFront
property: "y"
velocity: -rideFront.speed
running: true
onLimitReached: {
if(rideFront.velocity > 0)
rideFront.velocity = -rideFront.speed
else
rideFront.velocity = rideFront.speed
}
}
}
The code is quite similar to the Enemy entity we created before. But there are some important differences:
- We set the appropriate value for the z-position.
- Properties of the MovementAnimation are made public with an alias, as we want to synchronize the movement of the front of the ride, the back of the ride and the player.
The implementation of the RideBack entity then uses the matching FrontRide object as a reference for its values and calculations:
qml/entities/RideBack.qml:
import QtQuick 2.0
import Felgo 4.0
EntityBase {
id: rideBack
entityType: "rideBack"
z: 11
x: frontRide.x
y: frontRide.y
width: frontRide.width
height: frontRide.height
property QtObject frontRide: null
property alias image: image
MultiResolutionImage {
id: image
width: parent.width
height: parent.height
}
MovementAnimation {
id: upDownMovement
target: rideBack
property: "y"
velocity: frontRide.velocity
running: true
minPropertyValue: frontRide.minY
maxPropertyValue: frontRide.maxY
onLimitReached: {
upDownMovement.velocity = frontRide.velocity
}
}
}
Let's add the rides to the game scene:
qml/scenes/GameScene.qml:
SceneBase {
id:gameScene
property alias logic: logic
property alias ride1: horse
property alias ride2: boat
property alias ride3: bike
property alias ride4: car
RideFront {
id: horse
x: -20; y: 397
minY: 397 - (Math.random() * 10 + 5); maxY: 397 + Math.random() * 10 + 5
width: 92.5; height: 128
image.source: "../../assets/ride1_f.png"
}
RideBack {
frontRide: horse
image.source: "../../assets/ride1_b.png"
}
RideFront {
id: boat
x: 73.5; y: 397
minY: 397 - (Math.random() * 10 + 5); maxY: 397 + Math.random() * 10 + 5
width: 94.5; height: 128
image.source: "../../assets/ride2_f.png"
}
RideBack {
frontRide: boat
image.source: "../../assets/ride2_b.png"
}
RideFront {
id: bike
x: 167; y: 397
minY: 397 - (Math.random() * 10 + 5); maxY: 397 + Math.random() * 10 + 5
width: 67.5; height: 128
image.source: "../../assets/ride3_f.png"
}
RideBack {
frontRide: bike
image.source: "../../assets/ride3_b.png"
}
RideFront {
id: car
x: 234.5; y: 397
minY: 397 - (Math.random() * 10 + 5); maxY: 397 + Math.random()* 10 + 5
width: 105.5; height: 128
image.source: "../../assets/ride4_f.png"
}
RideBack {
frontRide: car
image.source: "../../assets/ride4_b.png"
}
Enemies { id: enemies; y: 61 }
}
For the RideBack entities we set a reference to the matching FrontRide and define the correct image. Note: this only works because the images for the front and the back of each ride have the same size and perfectly match
each other at the same position.
We now want to move the player character along with the correct ride in the same way as the back of the ride moves with its respective front. To achieve this, we add another MovementAnimation for the up- and down-movement of the player, which will be active whenever the player is not in the process of jumping between rides.
qml/entities/Player.qml:
import QtQuick 2.0
import Felgo 4.0
EntityBase {
id: player
entityType: "player"
width: 65
height: 96
property QtObject frontRide: null
MovementAnimation {
onLimitReached: {
isMoving = false
image.source = "../../assets/player.png"
if(nextMove !== "") {
if(nextMove === "right")
moveRight()
else
moveLeft()
}
else {
jumpMovement.stop()
startUpDownMovement()
}
}
}
function moveLeft() {
isMoving = true
nextMove=""
upDownMovement.stop()
switchMovement.start()
jump()
}
function moveRight() {
isMoving = true
nextMove=""
upDownMovement.stop()
switchMovement.start()
jump()
}
function stopMovement() {
jumpMovement.stop()
switchMovement.stop()
upDownMovement.stop()
isMoving = false
nextMove = ""
}
MovementAnimation {
id: upDownMovement
target: player
property: "y"
onLimitReached: {
upDownMovement.velocity = frontRide.velocity
}
}
function startUpDownMovement() {
var laneNr = 0
for(var i = 1; i <= gameScene.lanes; i++) {
var minX = (i - 1) * gameScene.laneWidth
var maxX = i * gameScene.laneWidth
var playerOnRide = player.x < maxX && player.x > minX
if(playerOnRide) {
laneNr = i
break
}
}
switch(laneNr) {
case 1: player.frontRide = gameScene.ride1; break
case 2: player.frontRide = gameScene.ride2; break
case 3: player.frontRide = gameScene.ride3; break
case 4: player.frontRide = gameScene.ride4; break
default: player.frontRide = null
}
if(player.frontRide === null)
player.y = gameScene.playerY
else {
player.y = player.frontRide.y + 3
upDownMovement.stop()
upDownMovement.velocity = frontRide.velocity
upDownMovement.maxPropertyValue = frontRide.maxY + 3
upDownMovement.minPropertyValue = frontRide.minY + 3
upDownMovement.start()
}
}
}
One problem that might arise from this implementation is, that due to the movement of the player along the ride, the players y-position might actually be lower than the minimum y-position limit of the jump animation. This
might cause the players jumpMovement to fail. We can avoid this error by moving the player to the correct position right before the jump is executed:
qml/entities/Player.qml:
import QtQuick 2.0
import Felgo 4.0
EntityBase {
function jump() {
if(player.y > gameScene.playerY)
player.y = gameScene.playerY
}
}
We can now move the player along with the rides, we just need to start the movement whenever the player starts on a random ride of a new game.
qml/scenes/GameScene.qml:
SceneBase {
id:gameScene
function startNewGame() {
gameScene.points = 0
gameScene.logic.speedUp = 1.0
gameScene.logic.bulletTimeout = 4000
gameScene.logic.coinTimeout = 2000
player.stopMovement()
gameScene.startLane = Math.random() * gameScene.lanes + 1
player.x = (gameScene.startLane * gameScene.laneWidth) - (gameScene.laneWidth / 2)
player.startUpDownMovement()
}
}
That's all there is to it, press play and see it in action!
Let's Get Faster!
To add some spice to the game it would be nice to speed it up little by little and make it more difficult! We already have the possibility to lower the interval timers for the bullets and coins. In addition, we also want the
bullets and coins to move faster. Let us start by modifying our logic object.
qml/entities/Logic.qml:
EntityBase {
id: logic
entityType: "logic"
property Timer bulletTimer: Timer {
var newEntityProperties = {
x: xPosition,
y: 95,
z: 12,
goalX: xGoal,
startX: xPosition,
startY: 95,
speed: 3000 / (1 + logic.speedUp / 8 * 1.5)
}
}
property Timer coinTimer: Timer {
var newEntityProperties = {
x: xPosition ,
y: 75,
z: 12,
goalX: xGoal,
startX: xPosition,
startY: 75,
speed: 3000 / (1 + logic.speedUp / 8 * 2)
}
}
property Timer speedUpTimer: Timer {
id: speedUpTimer
interval: 15000
running: gameScene.visible
onTriggered: {
logic.speedUp += 0.7
bulletTimer.stop()
logic.bulletTimeout -= 300
bulletTimer.interval = Math.random() * logic.bulletTimeout +
logic.minBulletTimeout
bulletTimer.restart()
coinTimer.stop()
logic.coinTimeout -= 100
coinTimer.interval = Math.random() * logic.coinTimeout +
logic.minCoinTimeout
coinTimer.restart()
if(logic.speedUp < 8)
speedUpTimer.restart()
}
}
}
We now use the speedUp property of our logic object to calculate the speed property of the bullets and coins to make them faster if the speedUp is higher. We also add a third Timer to increase the speed-up and lower the timeouts every 15 seconds until a maximum speed-up factor of 8.0 is reached.
Furthermore, it would be fun to speed up the movement of the rides and enemies to make the game as a whole look faster! We will begin with speeding up the enemies movement. To be able to increase the speed, we simply need to
include our speedUp property in the movement speed calculation of the Enemy entity.
qml/entities/Enemy.qml:
EntityBase {
id: enemy
entityType: "enemy"
property double speed: 10 * gameScene.logic.speedUp
}
In the same way, we speed up the player rides.
qml/entities/RideFront.qml:
EntityBase {
id: rideFront
entityType: "rideFront"
property double speed: 10 * gameScene.logic.speedUp
}
This will also speed up the RideBack objects, because they use the movement speed and limits of their respective RideFront entities. With these changes the game will gradually speed up. But in contrast to all the other
objects, the player movement still stays the same. It might be a good idea to also make the player move faster.
qml/entities/Player.qml:
EntityBase {
id: player
entityType: "player"
function moveLeft() {
if(player.x - gameScene.laneWidth < 0)
return
if(!isMoving) {
var distance = gameScene.laneWidth
var multiplier = 1 + (logic.speedUp / 8 * 3)
switchMovement.velocity = -distance * 4.5 * multiplier
switchMovement.minPropertyValue = player.x - distance
switchMovement.maxPropertyValue = gameScene.width
isMoving = true
nextMove=""
upDownMovement.stop()
switchMovement.start()
jump()
}
else {
nextMove = "left"
}
}
function moveRight() {
if(player.x + gameScene.laneWidth > gameScene.width)
return
if(!isMoving) {
var distance = gameScene.laneWidth
var multiplier = 1 + (logic.speedUp / 8 * 3)
switchMovement.velocity = distance * 4.5 * multiplier
switchMovement.minPropertyValue = 0
switchMovement.maxPropertyValue = player.x + distance
isMoving = true
nextMove = ""
upDownMovement.stop()
switchMovement.start()
jump()
}
else {
nextMove = "right"
}
}
function jump() {
if(player.y > gameScene.playerY)
player.y = gameScene.playerY
var multiplier1 = 0.8 + (logic.speedUp / 8 * 1.0)
var multiplier2 = 1 + (logic.speedUp / 8 * 4)
jumpMovement.velocity = -500 * multiplier1
jumpMovement.acceleration = 2000 * multiplier2
jumpMovement.start()
jumpSound.stop()
jumpSound.play()
image.source = "../../assets/player_jump.png"
}
}
All the velocities for the players movement animations are now influenced by a multiplier based on the general speed-up. With this final change this tutorial is complete, press play and enjoy your Crazy Carousel game!
So What's Next?
If you are motivated to further improve the game, try adding a player highscore using the FelgoGameNetwork or improve the animations using the GameAnimatedSprite or GameSpriteSequence components!
If you have any questions regarding this tutorial, don't hesitate to visit the support forums.
Also visit Felgo Games Examples and Demos to gain more information about game creation with Felgo and to see the source code of existing apps in the app stores.