Live Scripting Tutorial
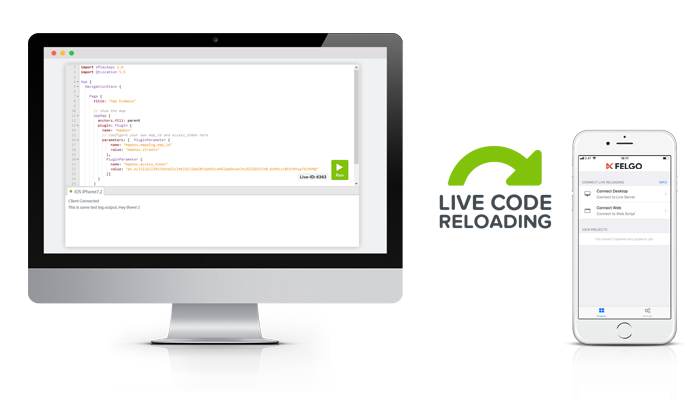
The Felgo Live Scripting App
Before we can proceed, please make sure you downloaded, started and connected the Felgo Live Scripting app on your mobile phone.
Once connected, you can switch between Android and iOS native layout of your application, in the lower right corner of the app.
The Editor
On the right, you can see the code editor, used to write your code.
Any time you want to run your code, just press the green button in the lower right corner of the editor, and the app on your mobile will automatically be updated with the latest code.
This tutorial will show you how to use some of the Felgo app components to create a traditional app, that looks native on both Android and iOS.
Hello Felgo
The editor already contains the code for a simple 'Hello Felgo' app. Try to change the text property of the AppText component and press run, to see the changes in your app.
Display an Image
As a first step of this short tutorial, we'll add a scary image to our app. This is super easy, using the AppImage component.
Note: In the code below, I stripped the contents of the AppText and just added { ... } instead, to make the code more readable. I will do this frequently in this tutorial, make sure not to copy this to the editor on the right. If you have problems in any step, just use the Insert Code button after each code block.
App {
id: app
Page {
AppText {}
AppImage {
width: dp(150)
height: dp(150)
anchors.horizontalCenter: parent.horizontalCenter
y: dp(40)
source: "https://felgo.com/qml-live/monster.jpg"
}
}
}
import Felgo 3.0
import QtQuick 2.5

App {
  id: app

  Page {

    AppText {
      anchors.centerIn: parent
      text: "Hello Felgo"
    }

    AppImage {
      width: dp(150)
      height: dp(150)
      anchors.horizontalCenter: parent.horizontalCenter
      y: dp(40)
      source: "https://felgo.com/qml-live/monster.jpg"
    }
  } // Page
} //App
Insert Code
If you run the app, you'll see the image. If you have a look at the source property of the AppImage, you'll see that it is possible to use an URL, not only local images. We also applied a custom width, height and centered the image horizontally.
Pages
An app usually shows different informations on different pages. In order to manage the visibility of the different pages, we need to wrap our content with Page components. We already did this for you, as you can see in the code.
Push another Page
Next we want to add a very simple form of navigation: Pushing a new page on the stack and navigate back to the initial page.
To do this, first of all we wrap our page in a NavigationStack component to enable push and pop of pages, as well as displaying the navigationbar.
NavigationStack {
Page {
AppText {}
AppImage {}
}
}
import Felgo 3.0
import QtQuick 2.5

App {
  id: app

  NavigationStack {

    Page {

      AppText {
        anchors.centerIn: parent
        text: "Hello Felgo"
      }

      AppImage {
        width: dp(150)
        height: dp(150)
        y: dp(40)
        anchors.horizontalCenter: parent.horizontalCenter
        source: "https://felgo.com/qml-live/monster.jpg"
      }
    } //Page
  } //NavigationStack
} //App
Insert Code
We also add a title to the Page and an id to the NavigationStack in order to interact with it.
NavigationStack {
id: stack
Page {
title: "First Page"
AppText {}
AppImage {}
}
}
import Felgo 3.0
import QtQuick 2.5

App {
  id: app

  NavigationStack {
    id: stack

    Page {
      title: "First Page"

      AppText {
        anchors.centerIn: parent
        text: "Hello Felgo"
      }

      AppImage {
        width: dp(150)
        height: dp(150)
        y: dp(40)
        anchors.horizontalCenter: parent.horizontalCenter
        source: "https://felgo.com/qml-live/monster.jpg"
      }
    } //Page
  } //NavigationStack
} //App
Insert Code
Next, we add a button to trigger the push of a sub-page. First of all, we'll add the button and anchor it to the bottom of the page.
Page {
title: "First Page"
AppText {}
AppImage {}
AppButton {
anchors.horizontalCenter: parent.horizontalCenter
anchors.bottom: parent.bottom
text: "Push"
onClicked: {
}
}
}
import Felgo 3.0
import QtQuick 2.5

App {
  id: app

  NavigationStack {
    id: stack

    Page {
      title: "First Page"

      AppText {
        anchors.centerIn: parent
        text: "Hello Felgo"
      }

      AppImage {
        width: dp(150)
        height: dp(150)
        anchors.horizontalCenter: parent.horizontalCenter
        y: dp(40)
        source: "https://felgo.com/qml-live/monster.jpg"
      }

      AppButton {
        anchors.horizontalCenter: parent.horizontalCenter
        anchors.bottom: parent.bottom
        text: "Push"
        onClicked: {

        }
      }
    } //Page
  } //NavigationStack
} //App
Insert Code
Now you may notice that the onClicked signal handler of the AppButton is empty. That's on purpose, because before we can push a sub-page, we need to create one.
I already prepared a quick minimal page that we can push, just add this to your code.
NavigationStack {
id: stack
Page {}
Component {
id: subPage
Page {
title: "Sub Page"
AppText {
anchors.centerIn: parent
text: "Hello Sub Page"
}
}
}
}
import Felgo 3.0
import QtQuick 2.5

App {
  id: app

  NavigationStack {
    id: stack

    Page {
      title: "First Page"

      AppText {
        anchors.centerIn: parent
        text: "Hello Felgo"
      }

      AppImage {
        width: dp(150)
        height: dp(150)
        anchors.horizontalCenter: parent.horizontalCenter
        y: dp(40)
        source: "https://felgo.com/qml-live/monster.jpg"
      }

      AppButton {
        anchors.horizontalCenter: parent.horizontalCenter
        anchors.bottom: parent.bottom
        text: "Push"
        onClicked: {

        }
      }
    } //Page

    Component {
      id: subPage
      Page {
        title: "Sub Page"
        AppText {
          anchors.centerIn: parent
          text: "Hello Sub Page"
        }
      }
    } //Component
  } //NavigationStack
} //App
Insert Code
Now all we are missing is pushing the sub page on our stack. For this, we add one line of code to our button.
AppButton {
  parent.horizontalCenter
  anchors.bottom: parent.bottom
  text: "Push"
  onClicked: {
    stack.push(subPage)
  }
}
import Felgo 3.0
import QtQuick 2.5

App {
  id: app

  NavigationStack {
    id: stack

    Page {
      title: "First Page"

      AppText {
        anchors.centerIn: parent
        text: "Hello Felgo"
      }

      AppImage {
        width: dp(150)
        height: dp(150)
        anchors.horizontalCenter: parent.horizontalCenter
        y: dp(40)
        source: "https://felgo.com/qml-live/monster.jpg"
      }

      AppButton {
        anchors.horizontalCenter: parent.horizontalCenter
        anchors.bottom: parent.bottom
        text: "Push"
        onClicked: {
          stack.push(subPage)
        }
      }
    } //Page

    Component {
      id: subPage
      Page {
        title: "Sub Page"
        AppText {
          anchors.centerIn: parent
          text: "Hello Sub Page"
        }
      }
    } //Component
  } //NavigationStack
} //App
Insert Code
Run the app and check out the page transitions!
More Navigation
While a NavigationStack is great for pages like e.g. a settings page with sub-settings, Android and iOS apps also use other concepts to navigate between the main pages of an app.
We wrap our NavigationStack in a combination of Navigation and NavigationItem.
Navigation {
NavigationItem {
title: "First"
icon: IconType.heart
NavigationStack {}
}
}
import Felgo 3.0
import QtQuick 2.5

App {
  id: app

  Navigation {

    NavigationItem {
      title: "First"
      icon: IconType.heart

      NavigationStack {
        id: stack

        Page {
          title: "First Page"

          AppText {
            anchors.centerIn: parent
            text: "Hello Felgo"
          }

          AppImage {
            width: dp(150)
            height: dp(150)
            anchors.horizontalCenter: parent.horizontalCenter
            y: dp(40)
            source: "https://felgo.com/qml-live/monster.jpg"
          }

          AppButton {
            anchors.horizontalCenter: parent.horizontalCenter
            anchors.bottom: parent.bottom
            text: "Push"
            onClicked: {
              stack.push(subPage)
            }
          }
        } //Page

        Component {
          id: subPage
          Page {
            title: "Sub Page"
            AppText {
              anchors.centerIn: parent
              text: "Hello Sub Page"
            }
          }
        } //Component
      } //NavigationStack
    } //NavigationItem
  } //Navigation
} //App
Insert Code
Now if you run the code and switch between platforms on your device, you'll see how the navigation automatically changes to platform specific layout, tabs on iOS and a drawer on Android.
We add another page, to make our navigation a little more useful.
Navigation {
NavigationItem {}
NavigationItem {
title: "Second"
icon: IconType.star
NavigationStack {
Page {
title: "Second Page"
AppText {
text: "Hello Again"
anchors.centerIn: parent
}
}
}
}
}
import Felgo 3.0
import QtQuick 2.5

App {
  id: app

  Navigation {

    NavigationItem {
      title: "First"
      icon: IconType.heart

      NavigationStack {
        id: stack

        Page {
          title: "First Page"

          AppText {
            anchors.centerIn: parent
            text: "Hello Felgo"
          }

          AppImage {
            width: dp(150)
            height: dp(150)
            anchors.horizontalCenter: parent.horizontalCenter
            y: dp(40)
            source: "https://felgo.com/qml-live/monster.jpg"
          }

          AppButton {
            anchors.horizontalCenter: parent.horizontalCenter
            anchors.bottom: parent.bottom
            text: "Push"
            onClicked: {
              stack.push(subPage)
            }
          }
        } //Page

        Component {
          id: subPage
          Page {
            title: "Sub Page"
            AppText {
              anchors.centerIn: parent
              text: "Hello Sub Page"
            }
          }
        } //Component
      } //NavigationStack
    } //NavigationItem

    NavigationItem {
      title: "Second"
      icon: IconType.star

      NavigationStack {

        Page {
          title: "Second Page"

          AppText {
            text: "Hello Again"
            anchors.centerIn: parent
          }
        } //Page
      } //NavigationStack
    } //NavigationItem
  } //Navigation
} //App
Insert Code
Full Source Code
We reached the end of this short tutorial, we hope you liked it. Here's the full source code of this tutorial as a reference.
import FelgoApps 1.0
import QtQuick 2.5
App {
id: app
Navigation {
NavigationItem {
title: "First"
icon: IconType.heart
NavigationStack {
id: stack
Page {
title: "First Page"
AppText {
anchors.centerIn: parent
text: "Hello Felgo"
}
AppImage {
width: dp(150)
height: dp(150)
anchors.horizontalCenter: parent.horizontalCenter
y: dp(40)
source: "https://felgo.com/qml-live/monster.jpg"
}
AppButton {
parent.horizontalCenter
anchors.bottom: parent.bottom
text: "Push"
onClicked: {
stack.push(subPage)
}
}
}
Component {
id: subPage
Page {
title: "Sub Page"
AppText {
anchors.centerIn: parent
text: "Hello Sub Page"
}
}
}
}
}
NavigationItem {
title: "Second"
icon: IconType.star
NavigationStack {
Page {
title: "Second Page"
AppImage {
anchors.fill: parent
fillMode: AppImage.PreserveAspectCrop
source: "https://felgo.com/qml-live/monster.jpg"
}
AppText {
text: "Hello Again"
anchors.centerIn: parent
}
}
}
}
}
}
import Felgo 3.0
import QtQuick 2.5

App {
  id: app

  Navigation {

    NavigationItem {
      title: "First"
      icon: IconType.heart

      NavigationStack {
        id: stack

        Page {
          title: "First Page"

          AppText {
            anchors.centerIn: parent
            text: "Hello Felgo"
          }

          AppImage {
            width: dp(150)
            height: dp(150)
            anchors.horizontalCenter: parent.horizontalCenter
            y: dp(40)
            source: "https://felgo.com/qml-live/monster.jpg"
          }

          AppButton {
            anchors.horizontalCenter: parent.horizontalCenter
            anchors.bottom: parent.bottom
            text: "Push"
            onClicked: {
              stack.push(subPage)
            }
          }
        } //Page

        Component {
          id: subPage
          Page {
            title: "Sub Page"
            AppText {
              anchors.centerIn: parent
              text: "Hello Sub Page"
            }
          }
        } //Component
      } //NavigationStack
    } //NavigationItem

    NavigationItem {
      title: "Second"
      icon: IconType.star

      NavigationStack {

        Page {
          title: "Second Page"

          AppText {
            text: "Hello Again"
            anchors.centerIn: parent
          }
        } //Page
      } //NavigationStack
    } //NavigationItem
  } //Navigation
} //App
Insert Code