This guest post by Peter Bouda explains how he got Felgo’s Flappy Bird game working on a Raspberry Pi and the birth of his project, μbrew gaming.
Update: Unfortunately the µbrew project was discontinued. We offer building Raspberry Pi libraries for our customers, contact us if you are interested.
For a few months, I spent a lot of my free time on Raspberry Pi projects and thought that the tool provided some amazing opportunities to learn about embedded devices. I’ve always been very interested in building hardware and low-level programming, especially graphics programming and game development, pretty much since I programmed 3D graphics on my Intel 80286 in Assembler in the 1990s.
Since around 2008, I also developed mobile applications based on the Qt framework, and was able to run a custom port of Qt 4.8 and the Qt Asteroids demo on the Dingoo A320 game console. Running Qt games on my own mobile game console based on an embedded platform was the idea that began to grow in my mind…
Raspberry Pi goes to Vienna
After following the development of Felgo for more than a year I knew that Felgo and the Qt ecosystem in general provided some great development tools that already supported embedded development. I had already developed some Qt applications that ran on my own embedded Linux on the Raspberry Pi, which was really easy to do with the help of the Buildroot project.
“So what else do I need to do to run Felgo games?” I thought. I decided to get in touch with the Felgo guys and asked them if they were interested in a Raspberry Pi port of the Felgo libraries. They were definitely interested! I was planning a trip to Munich at the time and I’d never visited Vienna before, so I offered to come to Vienna to visit the Felgo office and meet the team.
Those were two exciting days in Vienna. Not only because the city itself is definitely worth a visit, but because I only managed to finish the port during the last few hours of my stay. I had prepared everything in the Buildroot environment, but still had to solve some issues with the build process of Felgo.
In the end, I finally played some Flappy Bird on the Raspberry Pi 🙂 Thanks again to the team for the hospitality and the opportunity to do something cool like this!
Gamepad and remote deployment
As soon as I returned home to Portugal I still had two things to finish: Gamepad support and remote deployment via Qt Creator. I understood that Felgo doesn’t support physical gamepads yet however Chris told me that gamepad support is on the list of future Felgo features. They do have a really nice virtual gamepad, but for this project I wanted to start without a touch screen.
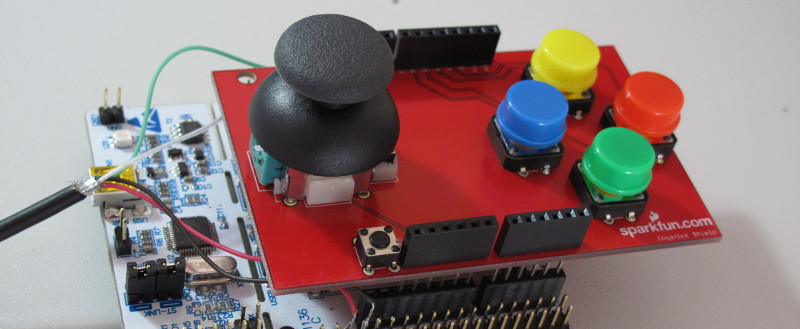
I searched the internet and soon found the QtGamepad module on Qt Labs. Nice! I cross-compiled it with the Buildroot toolchain, added a few lines of Gamepad-QML code to the Flappy Bird game and the one-button-flap functionality was working.
The last thing to do was to enable remote deployment via Qt Creator, which JavaScript supported now with the help of an OpenSSH server in the embedded Linux. Now you can develop Felgo games on your desktop within Qt Creator, then just press play and the game runs on your Raspberry Pi!
Do-It-Yourself: μbrew gaming
The project around our DIY game console is now called “μbrew“. You can find a detailed step-by-step tutorial to build the embedded Linux system with Felgo and the Buildroot cross-compilation toolchain on our website!

It’s the first step to a DIY mobile game console, but an important one. Felgo is an amazing cornerstone for game development in general, and now it works on the first embedded platform!
Our goal is to support open source and independent projects around DIY gaming and we hope to contribute our part to promote those great projects, like Felgo, in the future.
By the way, if you need to run any other Qt application on the Raspberry Pi, the Buildroot environment is available in a separate GitHub project and allows you to run Qt applications on the Raspberry Pi in a custom and minimal embedded Linux system.
Build and run a game with Felgo
After reading this section you will be able to compile Felgo games with Qt Creator and run them on your Raspberry Pi. Make sure that you successfully installed the μbrew development.
1. Clone the μbrew Flappy Bird repository
As an example game, we will build and run the Flappy Bird demo that is also part of Felgo and that’s covered in an excellent tutorial on the Felgo website. For μbrew we will use a specific fork of the code from the μbrew repository, as this version supports gamepads and contains landscape mode graphics for monitors. To clone the repository, open a terminal and type:
$ git clone https://github.com/ubrew-it/FlappyBird.git
This will download the μbrew code of Flappy Bird.
2. Open the project in Qt Creator
Next, open the project file of Flappy Bird in Qt Creator. Start Qt Creator that came with Felgo and choose File -> Open File or Project… from the menu. Browse to the Flappy Bird folder and open FlappyBird.pro.
Qt Creator will open a page with the title “Configure Project”. Make sure you select the Raspberry Pi kit that you created for the μbrew development kit, as shown in this screenshot:
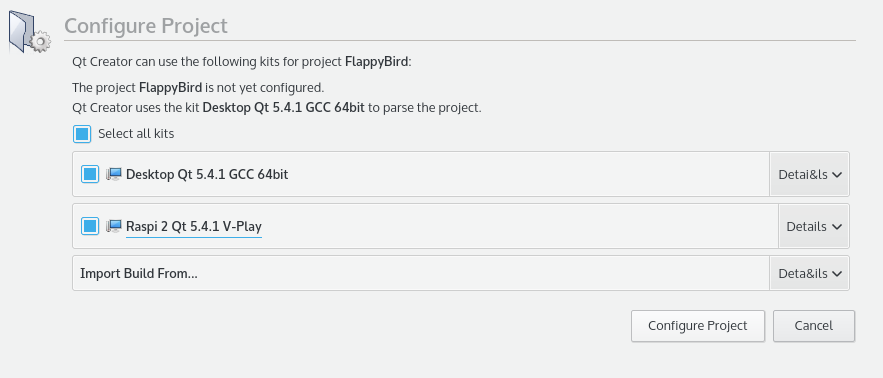
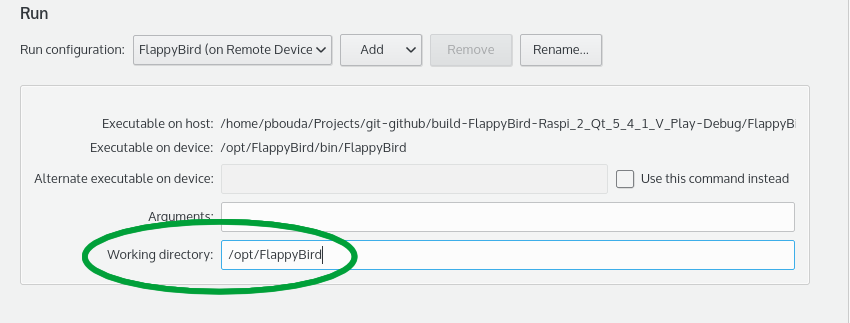
Then click on “Configure Project” to close the dialog and save your settings. Qt Creator will now parse the project files and generate Makefiles to compile the game later. Before we run the project, we still have to set the working directory on the Raspberry Pi in the project settings. Click on “Projects” in the left pane of Qt Creator and choose the “Run” tab of the Raspberry Pi kit:
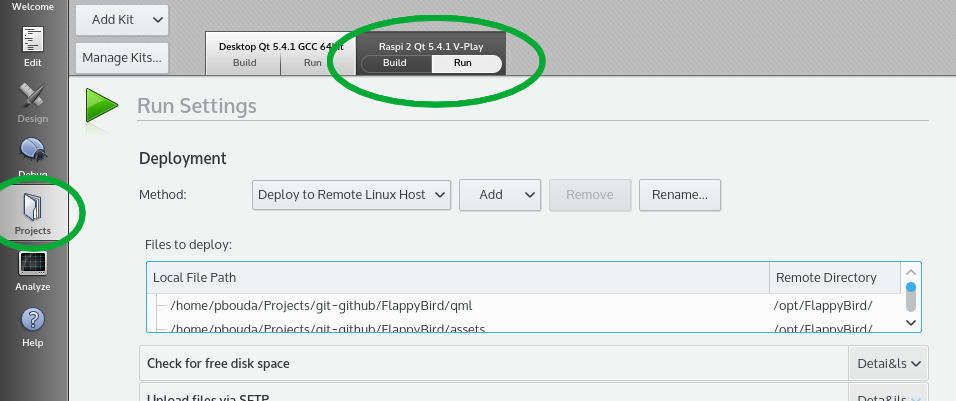
Under the heading “Run” you will find the setting for the Working directory. Enter /opt/FlappyBird into the input field:
You are now ready to start the game on the Raspberry Pi. Make sure the Raspberry Pi is turned on and accessible over the local network. Qt Creator will try to access the remote device via SSH, so make sure the login works.
If you followed the instructions to install the μbrew development kit, the connection settings are already stored in Qt Creator as part of the Qt kit. Click on the “Run” button of Qt Creator in the lower left corner (the big green Play button). Qt Creator will now compile, deploy and run the game on the Raspberry Pi!
Feel free to play around with the Flappy Bird code to make yourself familiar with Qt Creator and the development process. Whenever you change some code now you can simply press “Run”, and the modified version will be started on the Raspberry Pi. Happy coding and gaming!
Raspberry Pi Support for Felgo
We’d like to thank Peter for doing this proof-of-concept of Felgo running on a Raspberry Pi and for taking the time to write this post. We’d also like to wish him a happy new year and best of luck with all his projects in 2016!
Would you like to run your game on the Raspberry Pi too? Then get in touch with us here to request access.
If you enjoyed reading, then please make sure to tell your friends and colleagues using the buttons to the left. Thanks for reading!
More Posts like This
16 Great Sites Featuring Free Game Graphics for Developers

16 Great Websites Featuring Free Game Sounds for Developers

The 13 Best Qt, QML & Felgo Tutorials and Resources for Beginners

21 Tips That Will Improve Your User Acquisition Strategy