Integrate with Facebook to help you build engaging social apps and get more installs.

Share
Allow people using your app to publish content to Facebook. When people of Facebook engage with these posts they are directed to your app or your app's App Store page (if they don't have your app installed).
Login
Let your users easily sign in to your app with their Facebook account. If they have already signed in, they don't have to reenter their username and password again.
Graph API
The Graph API is the primary way to get data in and out of Facebook's social graph. You can use it to query data like the user profile or friends.
Custom Stories
Allow your users using your app to publish from your app to Facebook. When people of Facebook engage with these posts they are directed to your app or your app's App Store page (if they don't have your app
installed).
Overview
You can use the Facebook item to retrieve information about a logged in user and to send graph requests.
Use Cases
Facebook can help your apps & games become more popular and engaging for your users.
Apps
Retrieve information about your users and their friends
Integrating the Facebook plugin allows your app to get additional information about your users. You can greet them by their first name or save time during a registration process by prefilling the gender or birth date from
Facebook.
Add a Log In to your App
The Facebook plugin integration allows people to log into your app quickly without having to remember another username and password and therefore improves your conversion. A Facebook login also allows to login to the same
account across different devices and platforms.
Like a Facebook Page or App
There is no default interaction of liking Facebook app pages, as initially opening a session with openSession() already registers a user with your app. Instead of liking an app, you can like specific objects in your app or
game, e.g. different levels, achievements, etc. These are called stories that follow the "actor verb noun" syntax, for example "Karen likes MyGame Level 1".
Games
Additionally to the use cases for your apps you can also make advantage of the Facebook plugin when integrating in your games. In the following sections, the most popular use-cases are explained:
Invite Friends
Allowing to invite the player's friends to your game can be a major driver of game downloads. You can filter the friends who did not download your game yet to avoid multiple requests.
Match-Making with other Facebook Users
If you are using any kind of multiplayer functionality like in turn-based games, you can select other players that are already using your game as gaming partners. These do not necessarily need to be friends with the logged
in player.
Further Game-Related Functionality Available with Facebook
For more information on gaming-related functionality that Facebook offers have a look at http://developers.facebook.com/docs/guides/games/.
Facebook SSO
The Facebook plugin supports single sign-on (SSO) which makes it convenient for your users to login to Facebook.
The SSO feature allows your users, to login to your app with their existing Facebook account and therefore simplifies the login process.
There are 3 different scenarios for SSO:
- The user uses a device with native Facebook integration (e.g. devices with iOS 6 and above)
- The user has installed the native Facebook app
- The user has neither a device with native Facebook integration nor installed the native Facebook app
In scenario 1 and 2 the user is asked to give your app the requested permission defined in Facebook::readPermissions and Facebook::publishPermissions without the need of entering his Facebook credentials beforehand. These are the most convenient methods for your users.
In all other cases the plugin open a web view as a fallback which asks your users to enter their login credentials and afterwards to grant the app permissions. Once the users are logged in, the credentials are stored as
cookies in the web view and it's not required to enter the credentials again for every continuing openSession() calls.
So in both cases, either native Facebook integration or not, the user only needs to log in once for the lifetime of your application.
Logout from Facebook Account
Since the login credentials are stored as explained before, changing to another Facebook user which is often needed during development requires some additional steps. If the native Facebook app is installed, you need to
logout in the native app to be able to login with another user after the next call of openSession(). If you are testing on iOS and do not have the native Facebook app installed, open Safari and also logout there, because the
login credentials are stored as cookies. Also make sure, to log out your Facebook account in the iOS Settings in the Facebook section, where the application-wide login credentials are stored.
Step-By-Step Tutorial How to Add Facebook to Your Mobile Game or App
The following sections describe the steps required for adding Facebook connection to your game.
Here is a quick overview of the steps needed:
-
Setup your Facebook App Settings
-
Add Facebook Components to Your Game/App
-
Submit your Facebook App for Review
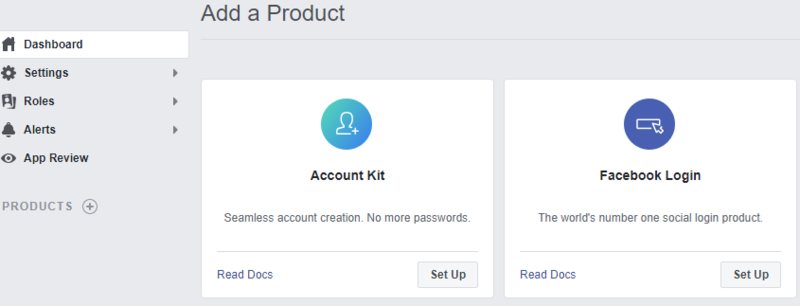
Facebook App Settings
Go to http://developers.facebook.com/apps and create a new Facebook app. On the dashboard, add Facebook Login by clicking "Set Up". You can skip the quickstart guide, as the
Facebook item already handles these steps.
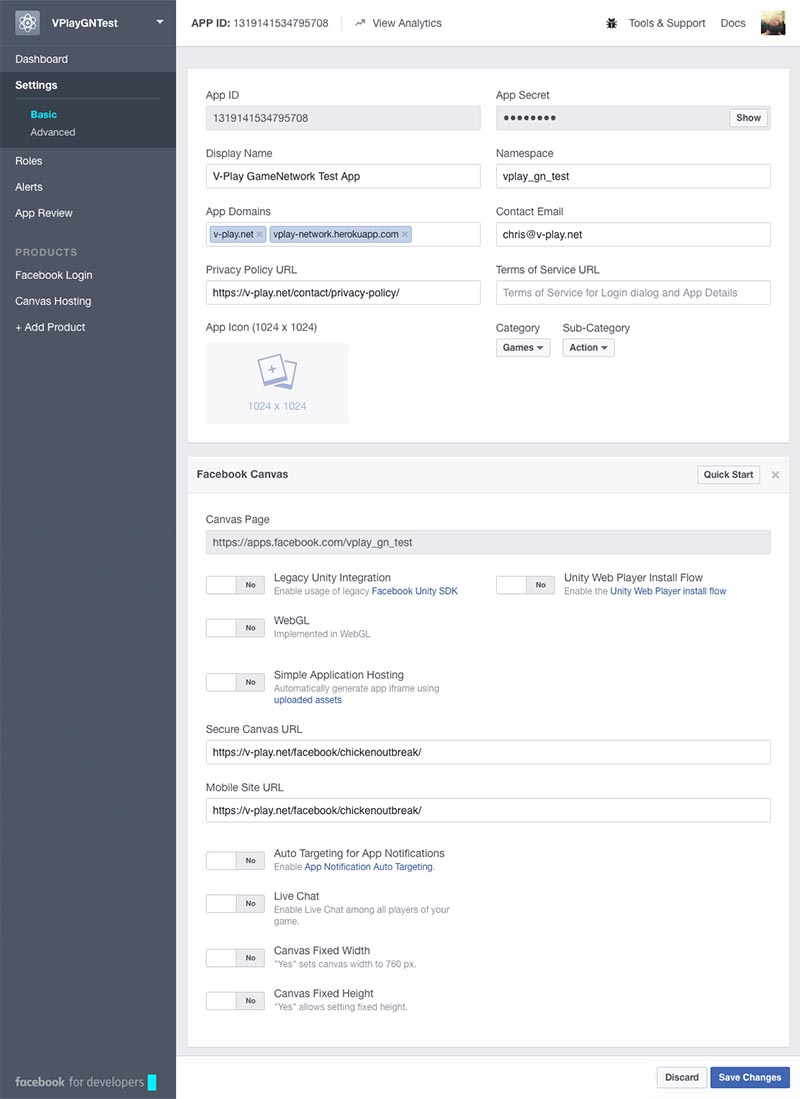
In the app settings you now see your App ID and App Secret, which you will need in the next step. You should also create a Facebook canvas page, which is shown when users click on the Facebook graph stories in their web
browser. If this html page is for example hosted on https://felgo.com/facebook/chickenoutbreak/index.html, add felgo.com to the App Domains. The
following screenshot shows the settings of a test application, where we set the canvas url to the one of ChickenOutbreak Demo.
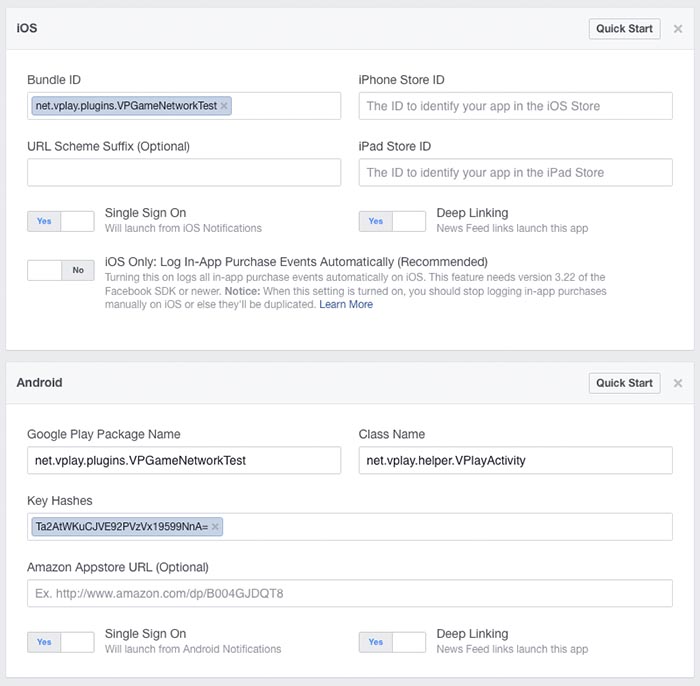
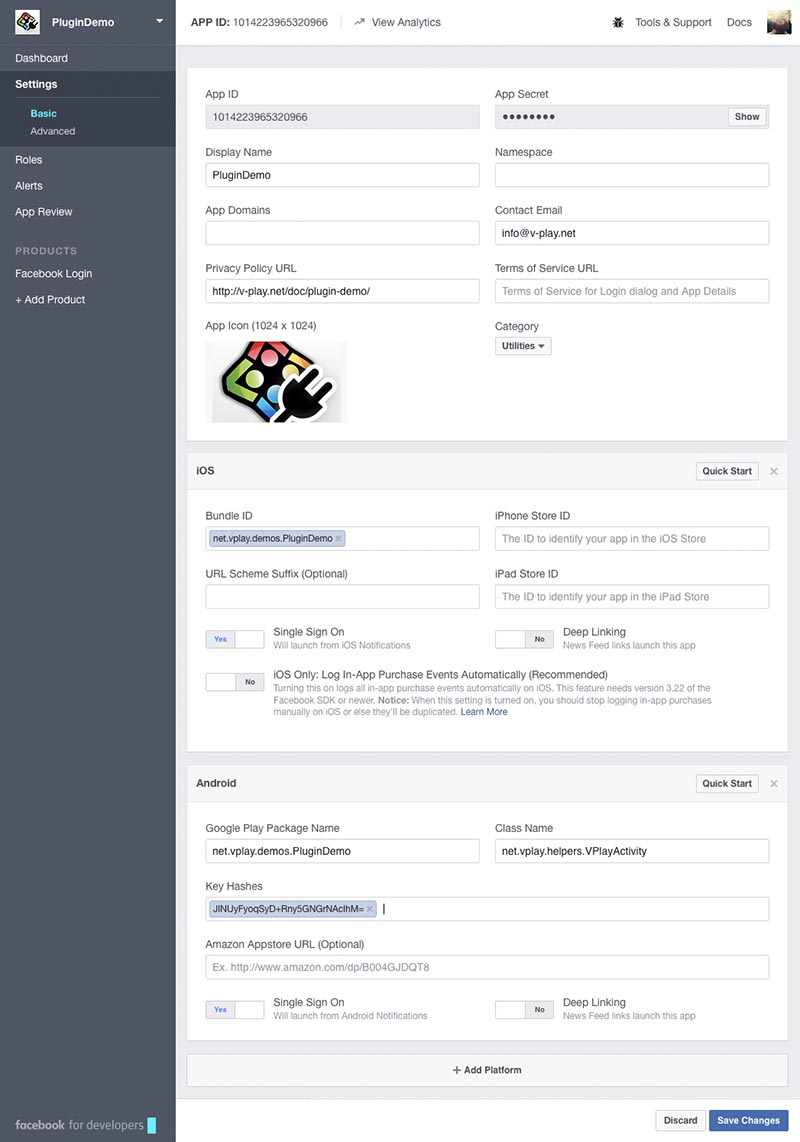
To test your app or game on iOS & Android, add these platforms in the Facebook settings. Enter your app identifier you have set in the config.json
file as the iOS Bundle ID and Android Package Name. The Class Name should be set to net.vplay.helper.VPlayActivity, which is also set in your
android/AndroidManifest.xml configuration. For Android, also add the Key Hashes for each of your used signing certificates. See Facebook::printAndroidKeyHash() on how to get your key hashes. The following screenshot shows example settings to configure your Facebook app for iOS & Android.
Note: The Deep Linking setting will launch your app or game when users click on a message in their timeline. We recommend to enable it, as it brings players back to your app or game.
Adding the Facebook Component to Your Game
After creating the Facebook app, add the Facebook component to your main qml file. The following example shows the Facebook additions: add the import Felgo statement, the
Facebook component with your Facebook::appId and set the facebookItem property to the id of your Facebook item.
import Felgo
import QtQuick
GameWindow {
Facebook {
id: facebook
appId: "569422866476284"
readPermissions: [ "public_profile", "email", "user_friends" ]
}
}
Submitting your Facebook App for Review
Facebook requires you to submit your app for review. They need to approve each type of user data item your app wants to access. These items are, for example, the user's friends, posts, or liked pages. In the developer
dashboard, click "App Review".

Then click "Start a Submission". Here you can add the privacy concerning permissions your app or game uses.
For example, to allow interacting with the user's friends, you need the friends list permission. For this, check the user_friends item from the list.
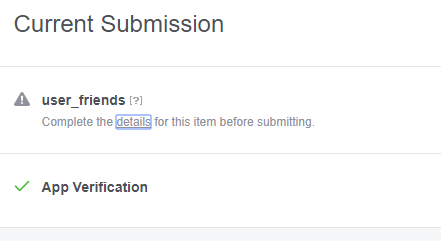
Facebook requires a description of how your app or game uses the permissions. Click "details" and describe how to use Facebook login and the permission step by step.
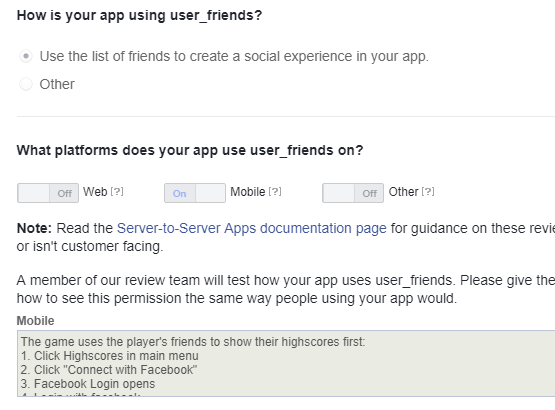
You will also need to upload a video how the Facebook login works in your app or game. You can use a screen recording tool to create a video similar to this:
Then you can submit your app for review. It usually takes between 24 hours to 14 days until your app gets approved. Once the app was approved, you can use the Facebook item, for example
using Facebook::openSession().
Facebook Examples
Plugin Demo App
To try the plugin or see an integration example have a look at the Felgo Plugin Demo app.
Please also have a look at our plugin example project on GitHub: https://github.com/FelgoSDK/PluginDemo.

Example Usage
Simple Example
The Facebook item can be used like any other QML item. Here is a simple example of how to add a simple Facebook integration to your project:
 import Felgo

 Facebook {
   appId: "xxxxxxxxxxxxxxxx"
   readPermissions: [ "public_profile", "email", "user_friends" ]

   Component.onCompleted: {
     openSession()
   }
 }
Note: The user_friends permission only allows to get a list of friends that also use your app and are connected to Facebook.
Session Handling Example
Before any Facebook interaction you have to open a valid session first. The following example opens a session at app startup and prints information about session state changes to the console:
Facebook {
id: facebook
appId: "YOUR_APP_ID"
onSessionStateChanged: {
if (sessionState === Facebook.SessionOpened) {
console.debug("Session opened.");
}
else if (sessionState === Facebook.SessionOpening) {
console.debug("Session opening...");
}
else if (sessionState === Facebook.SessionClosed) {
console.debug("Session closed.");
}
else if (sessionState === Facebook.SessionFailed) {
console.debug("Session failed.");
}
else if (sessionState === Facebook.SessionPermissionDenied) {
console.debug("User denied requested permissions.");
}
}
Component.onCompleted: {
facebook.openSession();
}
}
Available QML Items
|
Facebook
|
Item provides access to the native Facebook SDK on iOS and Android
|
|
FacebookProfile
|
Item encapsulates information about a specific Facebook profile
|
Adding and Activating Plugins
How to Add a Felgo Plugin to your App or Game
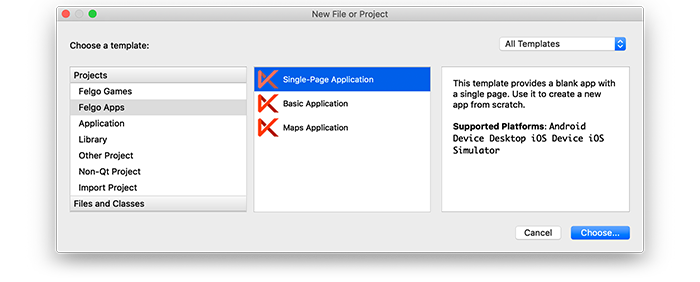
When you create a new project, you can choose to add example plugin integrations as well. Open Qt Creator and choose “File / New File or Project”, then choose Single-Page Application in the Felgo Apps section or any
other wizard. For Felgo Games, you can also find an own Game with Plugins project template as an own wizard.
Then select the platforms you want to run your application on. The plugins are available for both iOS & Android. There is a fallback functionality in place on Desktop platforms so your project still works when you call
methods of the plugins. This allows you to do the main development on your PC, and for testing the plugin functionality you can run the project on iOS and Android.
After the Kit Selection, you can choose which of the plugins you’d like to add to your project:
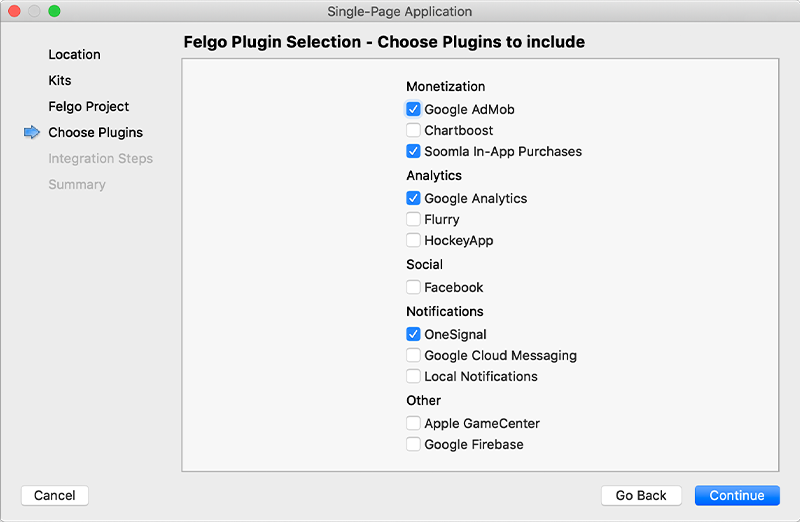
Then complete the wizard, your project is now set up with all the correct plugin dependencies for Android & iOS automatically. This includes:
- Setting up the
.gradle file for Android.
- Setting up the
.plist file for iOS.
- Setting up the
CMakeLists.txt file to include the plugin libraries for iOS.
Note: Additional integration steps are still required for most plugins, for example to add the actual plugin libraries for iOS to your project. Please have a look at the integration steps described in the
documentation for each of the used plugins.
If you have an existing Felgo application, follow these steps to include a plugin to your app or game:
In Qt Creator, select “File / New File or Project” and choose either Felgo Games or Felgo Apps from Files and Classes. Then select Felgo Plugin and press Choose.
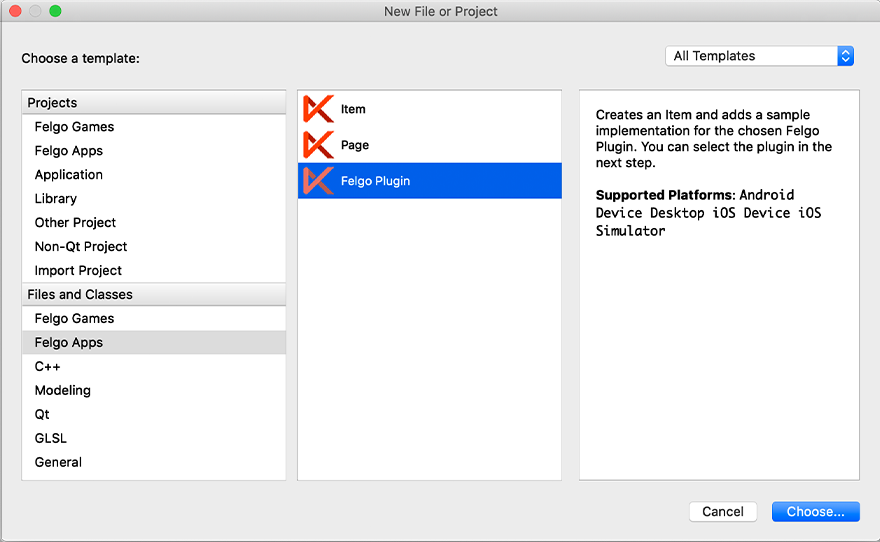
You can now select the plugin you want to add:

The plugin item, which contains the chosen plugin and a short usage example, is now added to your project. To use the item in your project, simply perform these steps:
- Include the created item (use the name you entered in the template before) in your
main.qml file.
- Modify the
CMakeLists.txt file & .plist file for iOS usage. See the iOS integration guide of the chosen plugin for more information.
- Modify the the
.gradle file for Android usage. See the Android integration guide of the chosen plugin for more information.
Note: If you have an existing Qt application, you can also add Felgo Plugins to your app! See here
how to do this.
Activating Plugins with a License Key
You can test all plugins as soon as the required integration steps and plugin configuration are completed.
However, the plugins are only available as Trial Versions if they are not activated with a valid license. When you are using unlicensed plugins, a dialog is shown and a watermark overlays your application to notify you about
the testing state of the plugin.
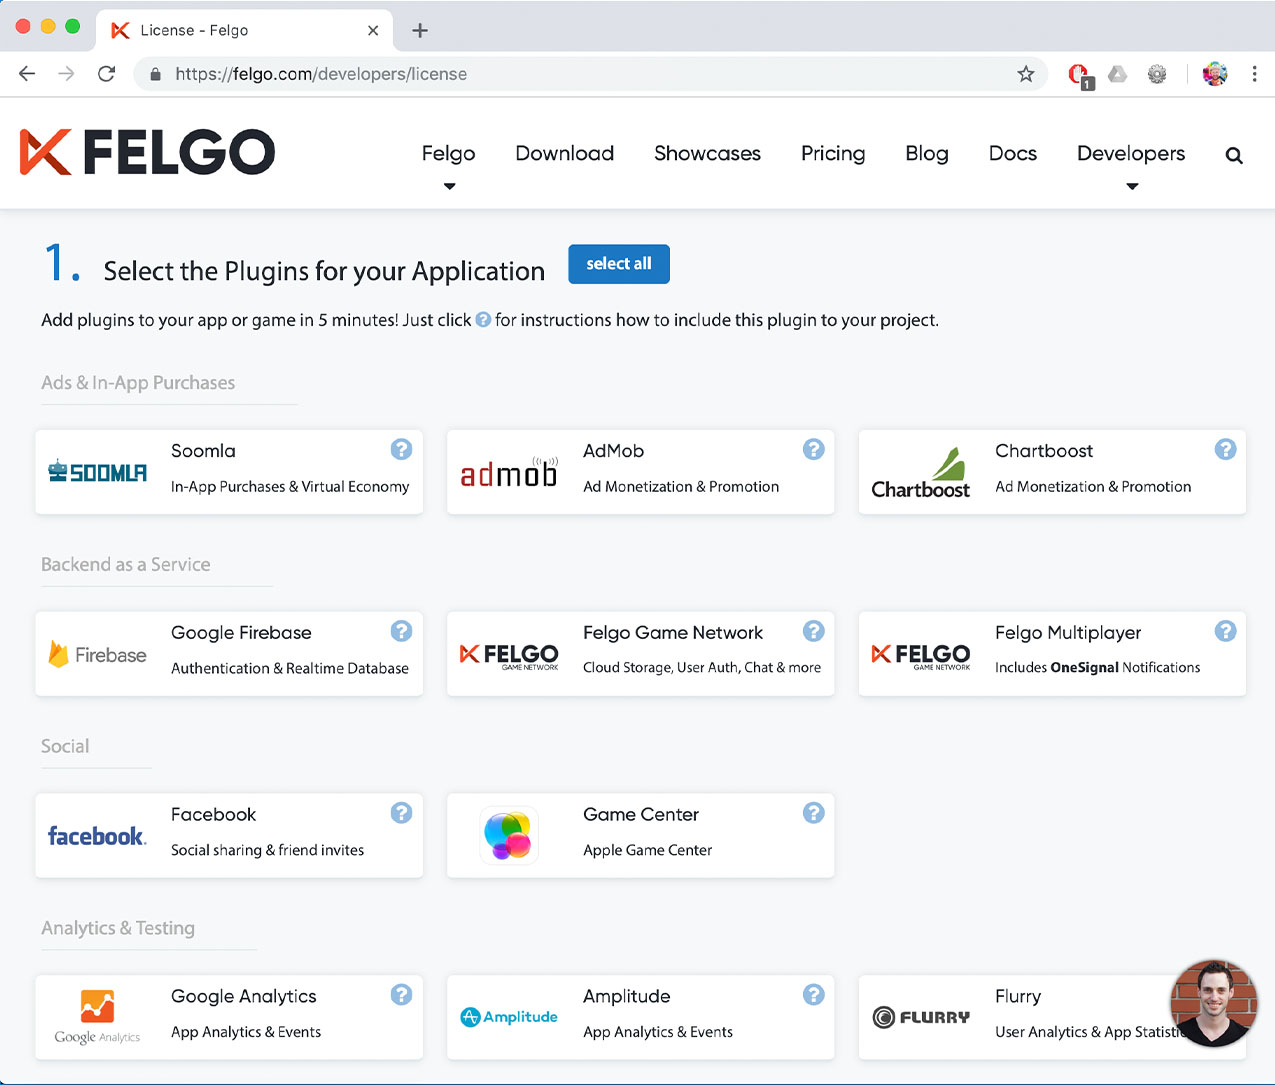
All monetization plugins are free to use in all licenses, other plugins are only fully usable if you have purchased the Startup or Business license. To activate plugins and enable
their full functionality it is required to create a license key. You can create such a key for your application using the license creation page.
This is how it works:
- Choose the plugins you want to include in your license key:
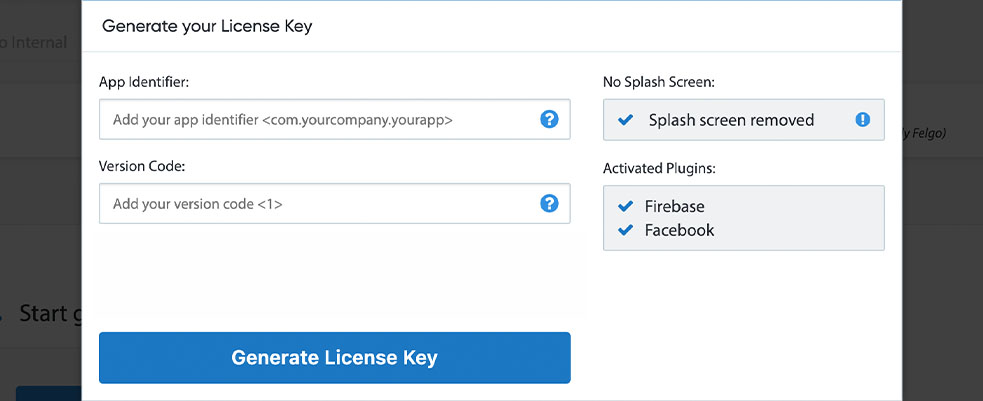
- Click on “Generate License Key” and set the app identifier & version code of your application. You can see that the AdMob plugin was enabled in this license key:
- Copy the generated licenseKey to your GameWindow or App component.
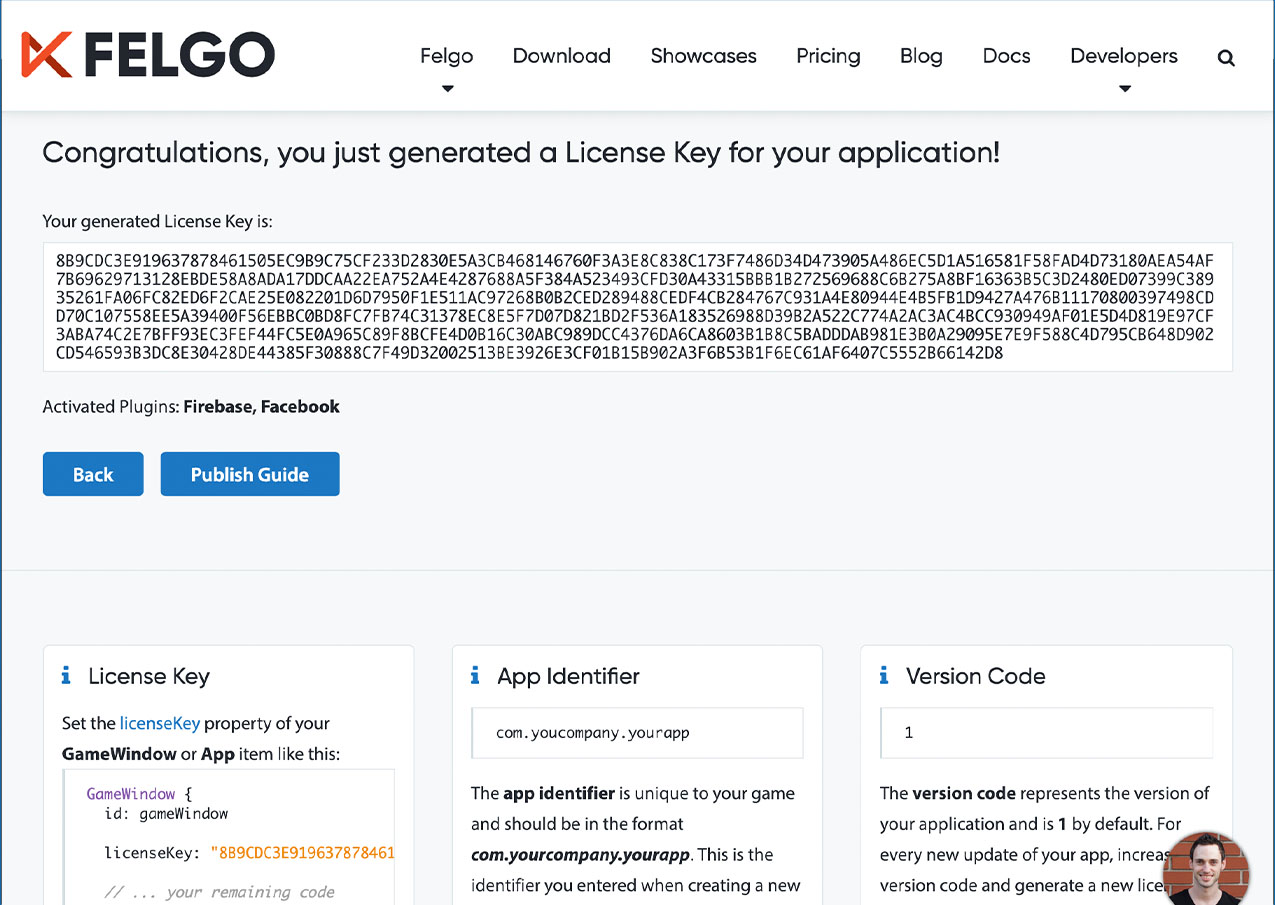
- You can now fully use the selected plugins!
Integration
To use the Facebook plugin you need to add the platform-specific native libraries to your project, described here:
Project Configuration
Add the following lines of code to your CMakeLists.txt file:
 set(FELGO_PLUGINS
    facebook
 )
Note: Make sure to declare the FELGO_PLUGINS before calling felgo_configure_executable, which links the required Frameworks based on your settings.
iOS Integration Steps
- Download our PluginDemo from https://github.com/FelgoSDK/PluginDemo/archive/master.zip and unzip it.
- Copy
FBSDKCoreKit.framework and FBSDKLoginKit.framework from the ios subfolder to a sub-folder called ios within your project directory.
- Open the
Project-Info.plist file within the ios subfolder of your project and add the following lines of code:
 <key>CFBundleURLTypes</key>
 <array>
   <dict>
     <key>CFBundleURLSchemes</key>
     <array>
       <string>fb{your-app-id}</string>
     </array>
   </dict>
 </array>
 <key>LSApplicationQueriesSchemes</key>
 <array>
   <string>fbapi</string>
   <string>fb-messenger-api</string>
   <string>fbauth2</string>
   <string>fbshareextension</string>
 </array>
right before the closing tags:
 </dict>
 </plist>
Make sure to replace {your-app-id}with your Facebook app's app ID.
Android Integration Steps
- Open your
build.gradle file and add the following lines to the dependencies block:
 dependencies {
   implementation 'com.felgo.plugins:plugin-facebook:4.+'
 }
Note: If you did not create your project from any of our latest wizards, make sure that your project uses the Gradle Build System like described here.
Adding a Facebook Application
In order to use the Facebook plugin within your app you need to create a Facebook app at https://developers.facebook.com first.
- Create a new application and go to the Settings page.
- Click the Add Platform button and add two new platforms, iOS and Android.
- For iOS add the bundle ID of your app, found in the Project-Info.plist file.
- For Android add the following information:
The Google Play Package Name of your app, found in the AndroidManifest.xml file.
The Class Name as net.vplay.helper.VPlayActivity (also set in your project's AndroidManifest.xml file).
The Key Hashes for each of your used signing certificates. See Facebook::printAndroidKeyHash() on how to get you key hashes (the hash in the screenshot
above is only a sample value!).
Used Facebook SDK Versions
| iOS |
5.13.0 |
| Android |
12.2.0 |
Note: Other SDK versions higher than the stated ones might also be working but are not actively tested as of now.


